Sides

Cheesy Spicy Hash Brown Casserole

cheesy_spicy_hashbrown_casserole_IMG_1646_690px

We love hash browns for breakfast either in a main dish like a big breakfast skillet or as a side dish. This hash brown casserole makes a great side dish and brings great flavor and a little heat. When I made this last weekend for the first time for a mixed group of scoutmasters and scouts, I seeded my chiles because I was concerned that I might overwhelm some of the younger taste buds. The heat was very mild. If you really want to bring the heat, then leave the seeds in. You could also swap out some of the chilies for hotter varieties. My son tried to talk me into using a ghost pepper. I said no. I opted for Monterey Jack cheese but, again, if you want to bring the heat, you could step it up to Pepper Jack cheese. I used frozen southern style hash browns, but you could just as easily peel and dice fresh potatoes.

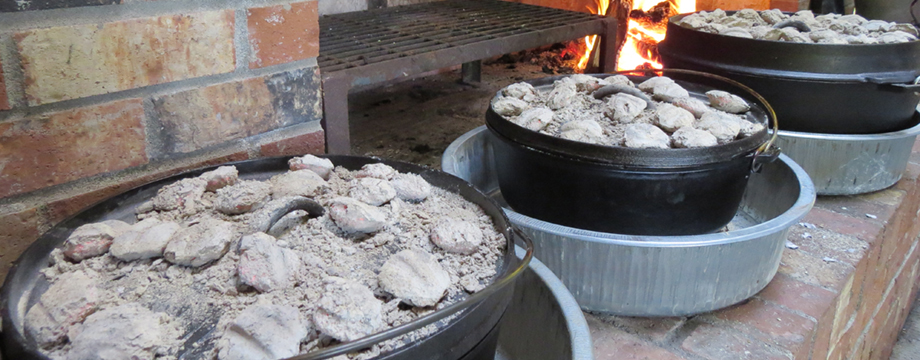
First thing in the morning, after I get my coffee, I’d start this one. It has about 30 minutes of prep (less if you chop your veggies and grate your cheese at home before you go) and then about 30 minutes of baking time. After 30 minutes, the potatoes were cooked through but you’ll notice in the picture below that they look a little pale. Next time I might let them brown a little in the Dutch oven before I put the lid on and add coals. After I put the lid on and add coals, I also might let them go longer than 30 minutes just to see if I can get a little more color on the potatoes.

I’d recommend a 12-inch or larger Dutch oven or 9×13 deep baking dish for a full batch. If you want to do a half batch, I’d step down to a 10-inch or 12-inch Dutch oven or an 8×8 baking dish. Remember to adjust your coals for the size of your Dutch oven. Here’s a link to my Dutch Oven Size Chart and Temperature Guide.

cheesy_spicy_hashbrown_casserole_IMG_1649_690px

Equipment
12-inch Dutch oven, cutting board, chef knife, cheese grater, stirring/serving spoon.

Ingredients
8 slices bacon, fried and chopped
2 tablespoons butter
2 large green chiles, diced
2 jalapenos, finely diced
1 poblano chile, diced
1 yellow onion, diced
4 pounds (2 bags) frozen southern style hash browns (diced potatoes)
Salt and ground pepper
2 cups grated sharp Cheddar
2 cups grated Monterey Jack or Pepper Jack

Prep
Dice the vegetables and grate the cheese. On a campfire, a bed of coals, or on a propane stove, fry the bacon in the Dutch oven until its nice and crispy. While the bacon is frying, load 27 coals into a chimney with 1-2 fire starters and, when the bacon is done, light your coals. Remove the bacon from the Dutch oven and set aside on a paper towel. You may want to critter and camper proof it or it just might disappear! I’ve had a number of scouts learn that lesson the hard way!

To the Dutch oven, add the butter and then add the chiles and onion, and sauté until well browned. Pour in the frozen hash browns and add some salt and pepper. Be generous with the salt; that’s a lot of potatoes. Toss everything together. Let it heat up for just a few minutes to steam off any excess liquid from the hash browns; you can crumble or chop the bacon while you wait.

Sprinkle on the cheese and top with crumbled bacon. Put the lid on and move it to coals.

Bake at 375°F, using 18 coals on the lid and 9 underneath, for about 30 minutes until hot and bubbly or until the potatoes are done to your liking.

Makes about 20 4-ounce (½-cup) servings or 10 8-ounce (1 cup) servings. And, c’mon, let’s be real. We’re all going to take a 1 cup serving and go back for seconds…. Just sayin’….

cheesy_spicy_hashbrown_casserole_IMG_1642_690px

This post has been shared at Homestead Bloggers Network. If you like this blog and don’t want to miss a single post, subscribe to Chuck Wagoneer by clicking on the Follow Us button in the upper right corner and follow us on Facebook and Pinterest for the latest updates and more stuff!

Categories: Breakfasts, Dutch Oven, Recipes, Sides | Tags: , , , , , , , , , , , , , , , , , | 1 Comment

Best Buttermilk Biscuits

Buttermilk_Biscuit_IMG_1493_690px

One of my culinary goals for 2016 is to up my biscuit/scone making game. Well, I have another winner to share with you. This is the best buttermilk biscuit I’ve ever tasted. It’s light and fluffy and buttery. It tastes great with gravy on it or honey or jam or just plain butter or nothing at all. Making these biscuits have become a weekend tradition. My family has declared them to be better than the ones made by the Golden Arches or the Colonel.

Yes, these biscuits are that good. Here are a few tricks that make them so good.

For light and fluffy biscuits, the butter needs to be really cold; so, I froze the butter and, using my cheese grater, I grated the butter. I placed the butter shavings in a container and put them back in the freezer. You could do this in camp with an ice-heavy cooler, or you could grate the butter ahead at home and then keep it in a really cold cooler or buried deep in the ice. By prepping my butter this way, when I add my butter to my dry ingredients, all it needs is a few turns of the pastry cutter and it’s mixed in. So it takes less muscle and time, and my butter stays colder.

The same goes for the buttermilk. It needs to be cold when you add it. Leave it in your cooler until you need it.

You could also premix your dry ingredients at home for easy prep in camp. I would recommend starting your coals and then, working very quickly, make your biscuits. By the time the biscuits are all cut and placed into the Dutch oven, your coals should be ready to go. If you prep your dry ingredients at home, remember to pack extra flour for flouring your board and working with the dough. A couple of cups ought to do.

Finally, when cutting your biscuits, use a straight down, straight up cutting motion. Do not twist because it seals the sides of the biscuits, which can prevent them from rising.

To cut out my biscuits, I used a 2½” cutter and I was able to make 9 biscuits, which works perfectly in my 12-inch Dutch oven. I placed 8 biscuits around the outside edge, one on each compass point, and 1 biscuit in the center.

Equipment
12-inch Dutch oven or baking sheet, medium-sized bowl, grater, pastry cutter, spatula, biscuit cutter, measuring cups and spoons.

Ingredients
6 tablespoons butter, grated and frozen
2 cups flour, plus extra for flouring your board and working with the dough
1 tablespoon sugar
¼ teaspoon baking soda
1 tablespoon baking powder
1 teaspoon salt
1 cup buttermilk, chilled
2-3 tablespoons butter, melted, for greasing the inside of the Dutch oven and for brushing onto the biscuits when they are done

Prep
In a chimney, start 33 coals or, at home, preheat your oven. Grease the inside of the Dutch oven.

In a medium-sized bowl, sift together your dry ingredients. Add the butter to the dry ingredients and cut in using a pastry cutter or a fork until it resembles course crumbs. Add the cold buttermilk and stir until dough is mixed and combined. I prefer to use a rubber spatula, but you could also use a fork or your hands. The dough will be slightly sticky.

Turn the dough onto a floured surface and pat into a rectangle, sprinkling with flour as needed to prevent it from sticking to your hands or the board. Fold the dough over and onto itself six times, so you end up with a tall square, then pat down to about 1 inch thick. I used a 2½” cutter to cut my biscuits. It is important that you push down to cut the dough and pull straight up (do not twist). Leftover dough can be combined and cut again, but no more than 1 or 2 times.

Place the biscuits in the Dutch oven or on a baking sheet, almost touching each other.

Bake in a 450°F oven, using 22 coals on the lid and 11 underneath, for 12-15 until browned. After the biscuits are baked, brush tops with melted butter.

Makes 9 biscuits

This post has been shared at Homestead Bloggers Network. If you like this blog and don’t want to miss a single post, subscribe to Chuck Wagoneer by clicking on the Follow Us button in the upper right corner and follow us on Facebook and Pinterest for the latest updates and more stuff!

Categories: Dutch Oven, Recipes, Sides | Tags: , , , , , , , , , , , | 4 Comments

Best Banana Bread

blues_banana_bread_IMG_1450_690pxIn honor of National Banana Bread Day, here’s a simple banana bread recipe. You could make this in camp and bake it in a Dutch oven or in a box oven or you could make it at home and bring it to camp for a healthy snack. It works well as either muffins or a loaf. If you make a loaf, you could also slice it up and use it to make French toast for breakfast!

This is an easy recipe with just a few ingredients. We’ve been making this banana bread for many years, I hope you enjoy it as much as we do.

Ingredients
2 cups flour
1 teaspoon baking soda
1/4 teaspoon salt
1/2 cup butter
1 cup sugar
2 eggs
1 teaspoon vanilla
3 ripe bananas, mashed

Prep
Sift and measure flour. Resift with soda and salt. Cream butter and sugar. Add beaten eggs and vanilla to creamed mixture. Add flour mixture and beat thoroughly. Mix in Bananas. Pour into well-greased pan and bake at 350°F for 1 hour. For muffins, bake for 18 minutes.

This post has been shared at Homestead Bloggers Network. If you like this blog and don’t want to miss a single post, subscribe to Chuck Wagoneer by clicking on the Follow Us button in the upper right corner and follow us on Facebook and Pinterest for the latest updates and more stuff!

Categories: Make & Take, Recipes, Sides, Snacks | Tags: , , , , , , , , | Leave a comment

Scalloped Potatoes are the Mother of All Comfort Foods


meatloaf_scalloped_potatoes_IMG_1221_690pxScalloped potatoes are one of my family’s favorite winter comfort foods. They pair very nicely with my meatloaf. They both cook at the same temperature. The potatoes go into the oven first because they cook 90 minutes and then I assemble the meatloaf and it goes into the oven for an hour. I time it so they are done at the same time. I serve them together with either a green vegetable or a salad. It’s heaven on a plate!

For the meatloaf recipe, please see my blog post: “Best Ever Meatloaf.”

I can’t even begin to tell you how old this scalloped potatoes recipe is. I know it dates back to at least my grandmother and hasn’t really changed at all over the years. I use black pepper in the béchamel (white sauce) and, technically, you should use white pepper, but this is the way my mother and grandmother made it and that’s how I make it. Feel free to try it both ways and use whichever you like best.

I think scalloped potatoes are the comfort food of all comfort foods. It’s a savory dish with just a little sweetness from the creamy white sauce. The top gets brown and just a little crusty. It’s smooth and creamy. I could probably go on for days!

For last fall’s pioneering weekend, I really wanted some comfort foods because the weather was going to be cold and rainy. I was also curious about how the scalloped potatoes would perform in a Dutch oven and they did not disappoint.

I made them a little differently in camp. At home, I make the béchamel on the stove top. In a 2-quart casserole dish, I build 2-3 layers of potatoes, sauce, parsley, and bits of butter. In camp, I wanted to make this as a one-pot dish so I actually made the béchamel in the Dutch oven and then dumped in the potatoes and pushed them down into the sauce. It worked!

Below is the camp version, but you could easily adapt it back into your home kitchen if you wanted to.

Equipment
12-inch Dutch oven, cutting board, knife, measuring spoons and cups.

Ingredients
6 tablespoons butter
6 tablespoons flour
1 teaspoon salt
½ teaspoon black pepper
3 cups whole milk or heavy cream
4 cups of potatoes, peeled and sliced (about 1/8-inch ish thick)
¼ cup parsley, dried or fresh, chopped (this measurement is just a guess on my part because I just eyeball it)
1-3 tablespoons extra butter, cubed, for dotting onto the top

Prep
Peal and slice the potatoes. I slice mine pretty thin (about 1/8-inch ish thick). You could do this at home and load them into a resealable bag. Start 21 coals. In the Dutch oven, using coals or a camp stove, melt the butter over low heat. Blend in the flour, salt, and pepper. Cook over low heat, stirring until mixture is smooth and bubbly. Remove from heat. Stir in milk or cream. Return to heat and bring to a boil, stirring constantly. Boil gently until sauce becomes smooth and creamy. Stir in a generous amount of chopped or dried parsley. Drop in the sliced potatoes and push down into the sauce until they are all covered. Dot the top with the extra butter. Bake at 350°F, using 14 coals on the lid and 7 underneath, for 90 minutes. Refresh coals as needed.

Makes 6-8 servings.

This post has been shared at Homestead Bloggers Network. If you like this blog and don’t want to miss a single post, subscribe to Chuck Wagoneer by clicking on the Follow Us button in the upper right corner and follow us on Facebook and Pinterest for the latest updates and more stuff!

Categories: Dutch Oven, Recipes, Sides | Tags: , , , , , , , , , , , , | 1 Comment

Baking in the New Year

cheese_scone_IMG_1302_690pxWhat are your plans for upping your cooking game in 2016? Is there a specific dish you’d like to perfect? A technique you’d like to master? A culinary style you’d like to try?

This year, my cooking resolution is to master the art of scones or biscuits. For me, the terms are interchangeable. Because of our genealogy, our family is heavily influenced by England, Scotland, and Ireland. For my husband, that’s nearly all of his genetic makeup. For me, that’s nearly half with my other half being Scandinavian. So, we tend to call them scones.

There are two possible pronunciations of the word scone: the first rhymes with gone and the second rhymes with tone. In US English, the pronunciation rhyming with tone is more common. In British English, the two pronunciations traditionally have different regional and class associations, with the first pronunciation associated with the north of England and the northern working class, while the second is associated with the south and the middle class.

However you pronounce it, I feel a strong genetic tug to make scones, which I have ignored for far too long.

You have to admit that there’s just nothing like a fresh baked biscuit with breakfast or dinner, and what would biscuits and gravy be without biscuits? So, in the coming months, you can expect some scone recipes to appear in the blog. I hope that excites you as much as it excites me.

Scones or biscuits are a great way to get fresh bread into your camp menu. They are relatively easy to make without all the fuss of yeast bread. They can easily be made by hand, requiring no fancy equipment.

And, everyone loves a good biscuit. While a plain biscuit is hugely popular, you can also pack them with all kinds of goodies from cheeses to meats to fruits. Depending on what else you are serving, your scone can be savory or sweet.

I decided to start with a savory, cheese scone. This is a great recipe and you can subtly alter the flavor of the scone by the type of cheese you choose to use. From sharp Cheddar to Parmesan to Swiss to Gorgonzola, choose your favorite cheese and try making a scone with it. This would be a great scone to serve with breakfast or dinner. Can you imagine serving a hot and hearty stew with a warm, cheesy scone? Yum!

Equipment
Mixing bowl, clean work surface (cutting board, tabletop), pastry cutter, a fork for mixing, measuring cups and spoons, a Dutch oven or a box oven.

Ingredients
2 cups all-purpose flour
2 teaspoons baking powder
¼ teaspoon salt
1½ cups shredded Cheddar cheese (or cheese of your choice)
⅓ cup unsalted butter, chilled
⅓ cup milk
2 large eggs
1 egg yolk mixed with 1 teaspoon water for glaze (optional)

Prep
Preheat your oven or start your coals. Lightly butter the center of a baking sheet or the Dutch oven.

In a large bowl, sift together the flour, baking powder, and salt. Stir in the cheese. Cut the butter into little cubes and distribute them over the flour mixture. With a pastry blender, cut in the butter until the mixture resembles coarse crumbs.

cheese_scone_IMG_1300_690px

In a small bowl, stir together the milk and 2 eggs. Add the milk mixture to the flour mixture and stir until combined (a fork works well for this). At some point, the fork will become useless, so you might as well just pick it up with your hands and mush it together into a ball, sponging up all the little dry bits with the dough ball.

Shape into a disc with your hands, then spread the dough into an 8-inch diameter circle in the center of the prepared baking sheet or Dutch oven. (The first time I made them, I actually got a ruler and measured; now I just eyeball it using my hand.) If desired, brush the egg mixture over the top of the dough. Cut into 8 wedges.

Using a home oven, Dutch oven, or box oven, bake at 400°F for 15-17 minutes or until the top is lightly brown (emphasis on lightly), and a toothpick inserted into the center comes out clean. Try not to overcook it. If you overcook a scone, it dries out and starts to become a brick.

This post has been shared at Homestead Bloggers Network. If you like this blog and don’t want to miss a single post, subscribe to Chuck Wagoneer by clicking on the Follow Us button in the upper right corner and follow us on Facebook and Pinterest for the latest updates and more stuff!

Categories: Dutch Oven, Recipes, Sides | Tags: , , , , , , , , , , , , , | Leave a comment

Raspberry Vinaigrette is Sweet and Tangy

raspberry_viniagrette_600w_IMG_0766

I admit, store-bought dressings are a convenience but have you ever stopped and read the labels? They are loaded with all kinds of unnecessary ingredients and some of them are allergens. Cooking for others can sometimes mean cooking for allergies so I’m always on the lookout for ways I can cook from scratch so I can control what all the ingredients are. This recipe only has 3 ingredients and you could choose to make it with fresh or frozen raspberries or you could use raspberry jam and, if it’s homemade raspberry jam, all the better.

I love this raspberry vinaigrette because it has great flavor and is so simple to make. It’s sweet and tangy and tends to be well received by kids who tend not to be big salad eaters.

Equipment
Blender or mixing bowl and whisk, measuring cups

Ingredients
¼ cup olive oil
1 cup seasoned rice vinegar
10 ounces of seedless raspberry jam or fresh or frozen raspberries, mashed

Prep
Dump everything into the blender or bowl and blend or whisk until smooth and store in the refrigerator. Serve over greens. I like to add chopped nuts and a little feta cheese to contrast with the sweet and tangy dressing.

This post has been shared at Homestead Bloggers Network and Homestead Blog Hop. If you like this blog and don’t want to miss a single post, subscribe to Chuck Wagoneer by clicking on the Follow Us button in the upper right corner and follow us on Facebook and Pinterest for the latest updates and more stuff!

Categories: Make & Take, Recipes, Sides | Tags: , , , , , , , , , , | 2 Comments

Three-Apple Salad is Sweet and Savory

3_Apple_Salad_IMG_0865_600pxI absolutely love this salad and I’m not a big salad fan so that’s saying a lot. We made it just a couple weeks ago while teaching outdoor cooking to a group of Girl Scout adult volunteers. We served it with a hearty, spicy potato chowder and it was the perfect side dish. The salad was light, tart, sweet and savory. It was like a little party in your mouth.

I love the different colors and flavors of the apples. We used a sweet red Gala, a yellow Golden Delicious, and a tart green Granny Smith. Instead of the Gala, you could use a Fuji. Of the variations below, we used cheddar cheese (I chose sharp for its bold flavor), dried cherries, and crunchy walnuts. Instead of the frozen apple juice concentrate, we used regular apple juice. The dressing is creamy and tangy and doesn’t overpower the other ingredients. The green onion adds just a little bite.

This recipe has great flavors and is very kid friendly. It’s just yummy!

To prep at home, you could mix the dressing, toast the nuts (which I forgot to do) and even dice the cheese and celery and slice the green onions. I would dice the apples in camp right before assembly. Because we were teaching, we had our “students” prep everything in camp and it didn’t take long at all. Below is a picture of everything in the bowl before we added the dressing. This is a double batch. Isn’t it pretty?!

3_apple_salad_IMG_0856

Because of its light and fresh flavors and the cooling properties of the dressing, this salad would pair perfectly with anything that is heavy and/or spicy.


Equipment

Medium-size mixing bowl, small-size mixing bowl, knife, cutting board, measuring cups and spoons, rubber spatula.


Ingredients

3 apples (1 red, 1 yellow, 1 green) diced (½-inch) to measure 2 cups

3 ounces Swiss, Cheddar or Gouda cheese, diced ½-inch to measure ¾ cup

½ cup celery, diced (½-inch)

½ cup dried cherries or cranberries

1 tablespoon green onion, thinly sliced

¼ cup walnuts or pecans, toasted and chopped (optional)

½ cup plain fat-free yogurt

¼ cup mayonnaise

1 teaspoon frozen apple juice concentrate or straight apple juice

1 teaspoon lemon juice


Prep

In medium bowl, combine apples, cheese, celery, cherries, green onion and nuts.

For dressing, in small bowl stir together yogurt, mayonnaise, apple juice concentrate and the lemon juice. Toss gently with salad. Serve on lettuce leaves if desired.

Serves 8 as a side dish.

To toast nuts, spread nuts on baking sheet and bake in a 325°F oven for 5 to 10 minutes, stirring twice, until nuts are fragrant and lightly browned. If you want to toast these in camp, you could use a box oven with 13 briquettes or a Dutch oven. To determine the number of coals needed for the size of your Dutch oven, reference the Dutch Oven Temperature Chart on the Soup to Nuts page.


This post has been shared at Homestead Bloggers Network and Homestead Blog Hop. If you like this blog and don’t want to miss a single post, subscribe to Chuck Wagoneer by clicking on the Follow Us button in the upper right corner and follow us on Facebook and Pinterest for the latest updates and more stuff!


Categories: Recipes, Sides | Tags: , , , , , , , , , , , , , , , | 1 Comment

Zesty Peppery Parmesan Aioli

Pepper_Aioli_600w_IMG_0754Aioli is a Mediterranean mayonnaise that usually includes olive oil, garlic and lemon juice. This one also has black pepper and Parmesan and goes wonderfully with the Peppercorn Crusted Pork Loin Roast. If you’re slicing the roast and serving it hot, you could use the aioli like a sauce for the pork. If you’re slicing the roast for making sandwiches, you could use the aioli in place of plain mayonnaise. Either way, it adds a whole new level of yumminess to the roast.

Equipment
Medium mixing bowl

Ingredients
1 cup mayonnaise
6 tablespoons extra-virgin olive oil
¼ teaspoon salt
½ teaspoon black pepper
1 clove garlic, minced or powdered
2 tablespoons lemon juice
¼ cup Parmesan, finely grated

Prep
In a medium bowl, stir together all the ingredients until smooth and creamy. Pour into a container and refrigerate.

Pepper_Aioli_600w_IMG_0761

This post has been shared at Homestead Bloggers Network. If you like this post, don’t forget to subscribe to Chuck Wagoneer and follow us on Facebook and Pinterest for the latest updates.

Categories: Make & Take, Recipes, Sides | Tags: , , , , , , , , , , , | Leave a comment

Caesar Salad Dressing

caesar_saladJuly 4th is National Barbecue Day, National Spareribs Day, and National Caesar Salad Day. There may be others but those are the only ones I could find. To celebrate, I thought I’d post my homemade Caesar salad dressing recipe. Just so you know, up front, there are no anchovies in this recipe. I’m not an anchovy fan, which was one of my motivations for making my own dressing. Anything I found in the store either had anchovies in it or didn’t have anchovies but didn’t taste quite right. So, I did a little research and a little experimenting and I’m really happy with this recipe.

I take a chicken Caesar salad almost every day to work for lunch. My love affair with Caesar salads began when I was pregnant with my first child. I craved and ate Caesar salads and orange juice nearly every day for 9 months and you would think that would have wrecked both for me but I still love both of those to this day. So, here’s my own concoction. Feel free to tweak it to your liking and, if you add anchovies, I won’t hold it against you. If you do want to add anchovies, I’d recommend starting with 2 anchovy fillets.


Equipment

Blender or food processor

Measuring cups and spoons

Rubber spatula

Large mason jar or plastic container equivalent


Ingredients

1 ½ cups (real) mayonnaise

½ cup buttermilk

½ cup sour cream

¾ cup grated Parmesan

2 tablespoons balsamic vinegar

2 teaspoons Worcestershire sauce

1 clove garlic, smashed

½ teaspoon salt

1 teaspoon black pepper


Prep

caesar_in_jar-with_lidPut the mayonnaise, buttermilk, sour cream, Parmesan, balsamic vinegar, Worcestershire, garlic, salt and pepper into a blender or food processor and pulse the processor or blender on low speed for several seconds. Adjust the consistency if needed with a little extra buttermilk, but not too much. The dressing will thicken when you refrigerate it. Refrigerate the dressing for a few hours before using it on a salad. This will thicken it and marry all the flavors.

I use a large mason jar and I made a little label for the top so everyone knows what it is. For camping, I pour some into a plastic bottle, which goes into my cooler.

Categories: Make & Take, Recipes, Sides | Tags: , , , , , , , , , , , | 4 Comments

Cookie’s Cornbread

corn_bread_with_chiliWe simply love this cornbread recipe. It is so yummy. It has a rich and buttery flavor, and the bits of corn provide a little texture. You can smother pieces of it in butter and honey but you don’t have to. You can eat it straight out of the pan and we have done that many times. It pairs perfectly with chili and stew, and compliments any meal with a Southern, Southwest or Tex-Mex style. In the picture above, it was paired with an amazing turkey chili, which was made by my new friend Jackie, another great camp chef! Maybe Jackie will share her chili recipe for a future blog post.

I like to serve this with my 4 Bean Chili Con Carne. For the recipe, see my blog post “Cookie’s 4 Bean Chili Con Carne.”

I have made this cornbread for family, friends, scouts (boys and girls) and adult scouters many times and it has always been devoured.

When I’m camping, I double this recipe and bake it in my 16-inch Dutch oven. It’s easy to make. I pre-mix all my dry ingredients at home so all I’m taking to camp is a bag of pre-measured sugar, a bag of pre-measured, mixed dry ingredients, butter, eggs or egg beaters, and canned creamed corn. If you foil line your Dutch oven, when the cornbread is done baking, you can grab the edges of the foil and lift the cornbread out of the oven for easier serving. Or you can just eat it out of the oven, like we do!

Equipment

10-inch Dutch oven or 8×12 pan (for a double batch, use a 16-inch Dutch oven). You’ll also need a mixing bowl, pastry cutter or mixing spoon, a rubber spatula and measuring cups and spoons.


corn_bread_in_ovenIngredients

1 cup butter, softened

1 cup sugar

4 eggs

1 pound can creamed corn

1 cup flour

1 cup yellow cornmeal

4 teaspoon baking powder

1/4 teaspoon salt


Prep

Cream butter and sugar. Add eggs and creamed corn. Add dry ingredients. Pour into a foil lined, lightly greased, 10-inch Dutch oven or a lightly greased 8×12 baking dish. Bake in a 350°F oven, using 14 coals on the top and 7 coals underneath, for 1 hour or until the top is dry and golden brown. Serves 4-6.

For a double batch in a 16-inch Dutch oven, use 24 coals on the lid and 12 underneath.

Every 15 minutes, remember to give the oven a quarter turn in one direction and the lid a quarter turn in the opposite direction to help prevent hot spots.

Serve with butter, honey, and/or jam.

corn_bread_on_plate

Categories: Dutch Oven, Recipes, Sides | Tags: , , , , , , , , , , , , | 1 Comment

Create a free website or blog at WordPress.com.