Posts Tagged With: Camp Chef

Product Review: Italia Artisan Pizza Oven

Earlier this month, our Boy Scout Troop camped on Whidbey Island at Fort Ebey State Park. We were in a group site located on a bluff with amazing views of Port Townsend, Fort Worden, Fort Flagler, the Puget Sound, the Strait of Juan de Fuca, and Canada. Friday night, we had gale force wind gusts, which made it a bit challenging to get all the tents up, but we managed.

Saturday dawned bright and clear with only an occasional shower. It was a great weekend and I was cooking for the Scoutmasters, which is always fun. The menu included a few favorites like biscuits and gravy, and cornbread, but I also field-tested a couple of new recipes, so in the coming weeks I’ll have some winners to share. The menu also included personal pizzas for lunch on Saturday, thanks to one of our scoutmasters.

Recently, Mr. Weddle purchased an Italia Artisan Pizza Oven from Camp Chef. It’s a self contained unit that hooks up to a propane tank. It can run on a 1lb disposable propane bottle or a standard bulk propane tank. It puts out 17,000 BTUs and oven temperatures can reach upwards of 700°F. And, it only weighs 47 pounds so it was easy to move.

It was designed to replicate the performance of a wood-fired brick oven from its double walled construction and specially designed burners to its ventilation and cordierite ceramic pizza stone. I’d say Camp Chef nailed it. The pizzas came out great! We were all very impressed.

I have to preface this by saying, in the five years I have known him, Mr. Weddle has never cooked on a campout. So, it was so much fun to see him get all excited to use this pizza oven and he, literally, took over my camp kitchen and personally made pizzas for all 10 of us scoutmasters, including himself. And, yes, that is a little pink rolling pin in his hand in the picture below. It was a gift from his beautiful wife so he could roll out his mini pizzas.

He brought store-bought pizza dough and a couple different jars of pizza sauce. He brought a variety of meats and some shredded cheese. I provided more cheese and some vegetables because he doesn’t “do” vegetables. I’ve mentioned several times in previous blogs how I have to sneak them into whatever I am making. So, between the two of us and a couple of other scoutmasters, we had quite the variety of pizza toppings.

Mr. Weddle divided his dough and made personal-sized pizzas for each of us. He was able to bake two pizzas at a time, and they cooked pretty fast so it didn’t take long at all to make 10 pizzas. The dough was cooked, the toppings were hot, and the cheese was melted and gooey, just as it should be.

Because it was cold and windy, he did struggle a little with maintaining the air temperature inside the oven. As a result, the stone was a little hotter than it probably should have been. Some of the pizzas did get a wee bit black on the underside, but it didn’t affect the flavor too much.

Overall, I’d rule it a success and told Mr. Weddle his pizza oven was welcome in my camp kitchen any time!

If you like this blog and don’t want to miss a single post, subscribe to Chuck Wagoneer by clicking on the Follow Us button in the upper right corner and follow us on Facebook and Pinterest for the latest updates and more stuff!

Categories: Product Reviews | Tags: , , , , , , , , , | 3 Comments

What’s on Your List?!

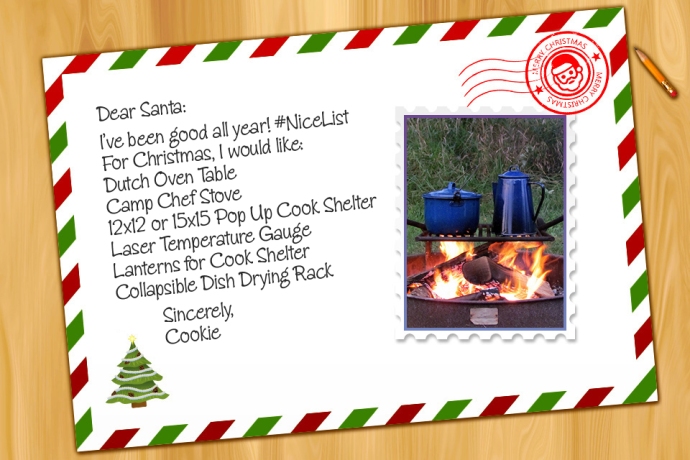
santa_list_2016

Halloween is over. Thanksgiving is only a week away and, before we know it, it will be Christmas. What’s on your Santa List and have you been naughty or nice this year?!

When crafting my annual letter to Santa, I always try to include something that will improve my camping and/or outdoor cooking experience. Because I camp nearly every other weekend three seasons a year, I want to be as comfortable as possible. I also spend a lot of time in my camp kitchen and I want to make sure it’s in the best shape possible for my budget.

Now is a great time to assess your camping and camp cooking supplies and needs. Do you have tents, cots, or sleeping bags that are getting old and need to be replaced? Would you like to add a new Dutch oven to the mix? How’s your camp stove? Does it need to be replaced or upgraded? Do you need any new toys? Take stock of what you got and what you need. The holidays are when we tend to give ourselves permission to make those larger purchases. Now is a great time to up your camping and outdoor cooking game.

Recently, I’ve noticed that my back has begun to complain while bending and tending to my Dutch ovens that are usually sitting on the ground so I’m thinking of adding a Dutch oven table to my list this year.

Dutch oven tables are made of sturdy, durable steel and will support the weight of 2-4 Dutch ovens, depending on the size of your ovens. You place your coals directly on the table and then set your ovens on top of the coals. This raises your ovens to a comfortable height. I looked at Lodge, Cabela’s, and Camp Chef. They all offer a three-sided windbreak although height of the windbreak varies. They also feature adjustable legs for level cooking, and they collapse down for easy transport. There are subtle differences in overall dimensions, weight, and price.

I would love to upgrade my little propane camp stove to a large Camp Chef 2 or 3 burner stove. These durable, versatile stoves pack enough power in their 30,000 BTU burners to boil water and cook food lickety split! And, because they belong to Camp Chef’s 14” cooking system, you can get all kinds of accessories to go with them like flat-top griddles, BBQ grill boxes, and even pizza ovens.

It would also be nice to have a larger pop up canopy. When it rains, and it frequently does here in the Northwest, it’s very difficult to get my entire kitchen under the canopy and still have room to maneuver. It would be nice to have a 12×12 or a 15×15.

On the smaller scale, I’d like to have a collapsible dish drying rack to make clean up easier.

I need a new lantern or two for my cook shelter. I love the convenience and safety of a battery-powered lantern, but they just don’t put out the light like a propane-powered lantern, which is a little more delicate and higher maintenance.

I also think it would be fun to have a laser temperature gauge. When I’m teaching youth and talking about managing their heat, it would be nice to be able to actually show them just how hot their griddle or pan is compared to what it should be.

So what about you? Is any of your equipment old, worn out or broken, and need replacing? Are there any upgrades or improvements you can make? Now’s the time to get it on “The List.”

So, assess your camp kitchen and determine what you need to get cooking better or cooking more in the outdoors? And, if you come across anything good, let me know so I can get it added to my list!

If you like this blog and don’t want to miss a single post, subscribe to Chuck Wagoneer by clicking on the Follow Us button in the upper right corner and follow us on Facebook and Pinterest for the latest updates and more stuff!

Categories: Cooking Outdoors | Tags: , , , , , , , , , | 1 Comment

Product Review: Dutch Oven Dome

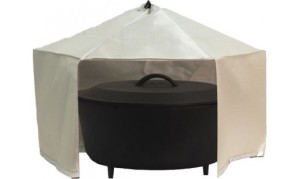
dutch_oven_domeJust in time for last Christmas, Camp Chef came out with a Dutch Oven Dome. I went and took a look at it and immediately added it to my list for Santa. Christmas morning, Santa delivered!

I’ve been using the dome for nearly a year now and if your weather conditions are cold and/or windy, the dome is a definite game changer.

There are two ways to use it.

On a Camp Stove

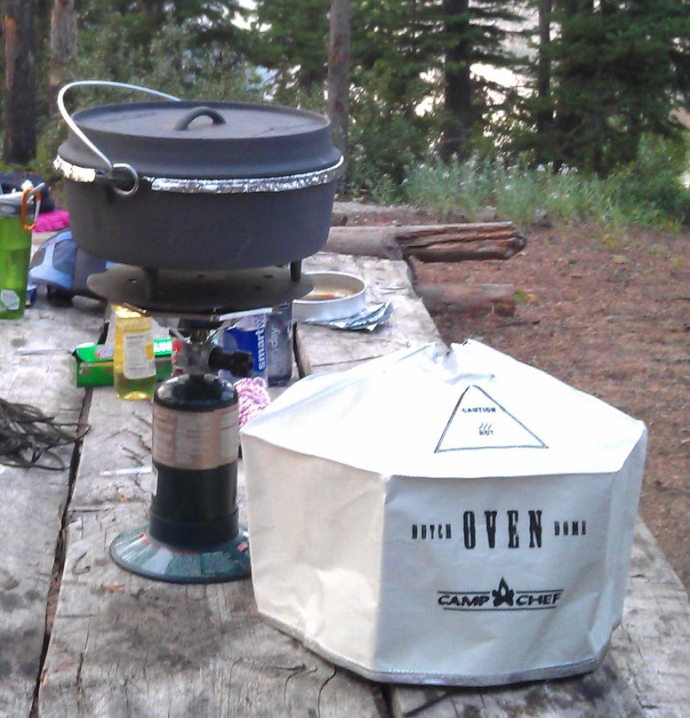
If you don’t want to pack coals, don’t want the hassle of coals or can’t use coals because of a fire restriction, but still want to use your Dutch oven, you can still use it on a camp or backpacking stove with a Dutch Oven Dome and Heat Diffuser Plate. The plate sits on the stove burner. Your Dutch oven sits on the plate. The plate efficiently uses the heat from your stove and distributes it to your Dutch oven. The dome goes over your oven and traps, diverts, and circulates the heat creating a convection oven. (Please see photograph below.)

dome_in_action_cropped

With Coals

Place your coals on top and bottom of your oven just like you normally would. Place the dome over the oven and not only does it circulate the heat but it also insulates the oven from inclement weather.

Field Test

Last March I was a facilitator for an outdoor training for Girl Scout leaders. We were feeding about 30+ women so I brought my 2 12-inch deep Dutch ovens. It was very cold and rainy with overnight temperatures below the freezing point and we were getting a cold breeze off the water the whole weekend. Saturday night for dinner and Sunday morning for breakfast, we loaded the two identical Dutch ovens with identical recipes and used the same amount of coals on each.

I only had the one dome (should have asked Santa for two) so I thought this would be a great opportunity to do a side-by-side comparison and I domed one oven each time. We pulled them at the same time and checked them. For both meals, the un-domed oven was slightly undercooked and actually had to bake a little longer. The domed oven was perfectly done both times.

How Cold is Too Cold?

Below what temperature do I need to use the dome to level the playing field? I’m still trying to figure that out. If it’s not cold enough and I dome my Dutch oven, then I can end up with a hotter oven and risk burning my food. However, here in the Northwest, we have a lot of cold, rainy, windy weather and I like my dome so much it only stays in the equipment box in summer.

The Dutch Oven Dome with Heat Diffuser Plate included retails on the Camp Chef website for $37.50. If you want just the Dutch Oven Dome without the Heat Diffuser Plate, that retails for $29.16.

This Christmas, I definitely need to ask Santa for a second dome!

Categories: Cooking Outdoors, Dutch Oven, Product Reviews | Tags: , , , , , , , , , | 1 Comment

What Kind of Dutch Oven Should I Buy?

Recently, a friend said her husband returned from a camping trip where he witnessed a couple of Dutch ovens in action and he wanted to get one. She wanted to know what I would recommend. Of course, my answer was, “Well, it depends.”

Before you buy, you need to figure out how much you want to spend, how you’re going to use it, how many you need to feed, and what you want to make? Let’s explore these in more detail.

How Much Do You Want to Spend?

If you have the money, Lodge is probably the best brand on the market. They’ve been making quality cast iron cookware since 1896. Lodge is an American company and still family-owned and operated. For many, Lodge is considered the Cadillac of cast iron.

While much, much younger, Camp Chef is another solid American brand with a vast selection of products, including some great Dutch ovens and skillets. Since 1990, Camp Chef has been designing their products to be rugged and reliable.

There are also a number of other well-made, quality brands out there such as Texsport, Stansport, Bayou, Cajun, Le Creuset, just to name a few. I have 2 Texsport 12-inch deep Dutch ovens that are at least 15 years old and they have served me very well over the years. I have absolutely no complaints.

No matter which brand you go with, Dutch ovens can be expensive, but they are also an investment. If well cared for, your Dutch oven can be handed down to future generations. Imagine someday your grandchildren begging you to teach them how to cook in the Dutch oven.

How Are You Going to Use it?

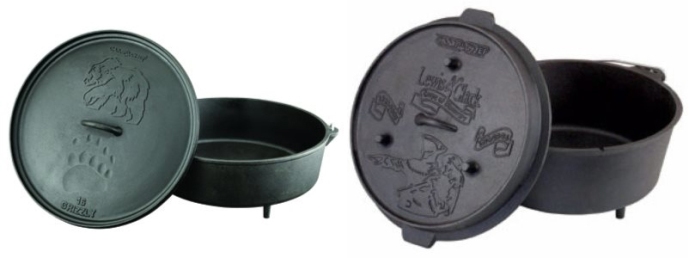
Style is an important consideration. If you’re going to suspend it over a fire or use it on a conventional stove then your Dutch oven doesn’t need to have feet and will have a flat bottom and a domed lid. These are also known as bean pots. If your plan is to use it as a camp oven with coals on top and bottom, then you should get one with short legs. These have lids that are flatter and flanged (a lip around the rim) so the coals won’t roll off. Some lids also have their own short legs and can double as a griddle, essentially giving you two for the price of one.

dutch_ovens

How Many Do You Need to Feed?

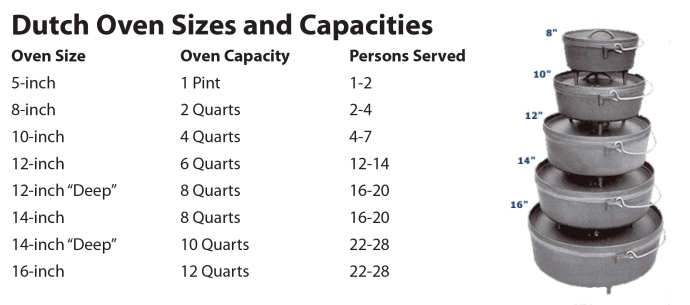
To feed a family of 4, my 10-inch Dutch oven is great. It has a 4-quart capacity and will feed from 4-7 people so that gives us plenty of extra for seconds and/or leftovers. When I started cooking for my daughter’s Girl Scout troop, I picked up the 2 12-inch deep Dutch ovens because we needed to feed 24 girls and 3+ adults. Each Dutch oven has an 8-quart capacity and will feed 16-20 people.

Here is a chart that shows sizes, capacities and servings of Dutch ovens.

DO Charts.indd

What Do You Want to Make?

Cast iron’s ability to withstand and maintain very high cooking temperatures make it a common choice for searing or frying, and its excellent heat retention make it a good option for long-cooking stews or braised dishes. Other uses include baking such as cornbread, cobblers and cakes.

Ovens with shallow sides of about 4” are called “bread” ovens and the deeper sided ones are known as “stew” or “meat” ovens. The 12” to 16” regular ovens are excellent for baking pies, cakes, breads, and biscuits or rolls. You can even bake a pizza!

The “deep” ovens can more easily handle turkeys, hens, hams, and even standing rib roasts! They can also handle large batches of soups and stews.

It’s Time to Go Shopping!

Now that you have a good idea of how you want to use your Dutch oven, you can find the one that will work best for you—one that you will be able to legacy to your children. And if you have more than one child then you will need to get more than one Dutch oven; otherwise, they’ll fight over it!

Categories: Dutch Oven, Fan Favorites | Tags: , , , , , , , , , , , | Leave a comment

Spicy Taco Cobbler

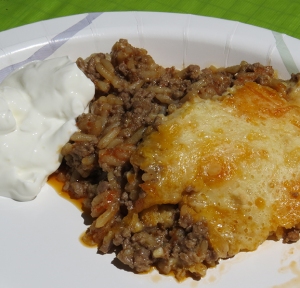
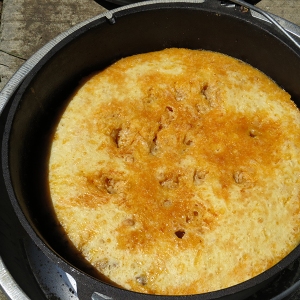
taco_cobblerLast night, we made a taco cobbler in the Dutch oven. The preparation was simple: Heat the Dutch oven, brown the burger, add the enchilada sauce and rice, lay down a layer of cheese, lay down a layer of Bisquick cheese topping and bake for 30 minutes. Bazinga!

The topping turned a beautiful golden brown and was just thick enough. It was cooked all the way through and not gooey at all.

If you’re going to pre-cook your burger at home and then foil line your Dutch oven, I recommend spraying the foil with some cooking spray as the burger rice mixture might stick.

The flavors were great; not too spicy. The Spanish rice and enchilada sauce brought just a little heat. I think kids would like it; mine did. It was hot and hearty. The Bisquick cheese topping provided just a little crunch.

Depending on your taste buds, it would be very easy to add more heat to this recipe with some diced peppers and/or diced green chilies. A little fresh chopped onion might also be nice. You could also bulk up this dish by adding some pinto or kidney beans. A can of corn would also be a nice addition.

We loved the simple prep (dinner was on the table in just under an hour), great flavors, and heartiness of the dish. Our tummies stayed warm long after the meal was over. We also loved all the different ways we could dress up this dish and how we could make it a little different each time.


Equipment

12-inch Dutch oven, medium-size mixing bowl, measuring cups, rubber spatula.

taco_cobbler_in_oven

Ingredients

2 (8.8 oz.) packages Uncle Ben’s Spanish Style Ready Rice

2 pounds ground beef

2 (10 oz.) cans green enchilada sauce

1 cup milk

2 eggs

1 cup Bisquick baking mix

8 ounces (2 cups) cheese, shredded


Prep

Brown the ground beef in the Dutch oven on a propane stove or on a bed of hot coals. Add rice and enchilada sauce. In a medium-size bowl, mix milk, eggs, Bisquick, and ½ cup cheese. Sprinkle remaining cheese over meat and rice mixture. Slowly pour or spoon out the Bisquick mixture evenly on top of the cheese. Do not pour too fast and do not mix the ingredients once they are in the oven. Bake in 400°F oven, using 19 coals on the lid and 10 coals under the oven, for 30 minutes or until top is golden. Serve with salsa and sour cream. Serves 10-12.

Categories: Dutch Oven, Main Dishes, Recipes | Tags: , , , , , , , , , , , , , | 3 Comments

Create a free website or blog at WordPress.com.