Posts Tagged With: outdoor skills

Green Bean, Bacon, Mushroom Skillet

Green beans are good and so are mushrooms. Onions and bacon makes them even better. I mean, bacon makes everything better, right?! This green bean skillet is so good, it disappears very quickly. Try to load each fork bite with a little of everything. The combination of flavors is simply delightful.

This is a quick and easy side dish that compliments just about anything. Serve it alongside any protein you’ve grilled or baked in camp. It also goes well with other side dishes. Serve it alongside a casserole you baked in a Dutch oven. It’s fresh and tasty and the recipe can be sized up to feed a crowd. If you don’t have a cast iron skillet that is big enough, you can use a Dutch oven on a camp stove or over coals.

Feel free to adjust the size of your cuts depending on how chunky you want your bacon, onion, and mushrooms and, of course, salt and pepper to your liking. If you wanted to add a little heat to this, try adding some red pepper flakes or a dash of your favorite hot sauce.

The first time we made this, everyone grabbed a fork to taste it and before we knew it, the skillet was empty. Once we started, no one could stop.

Equipment
Cast-iron skillet or a Dutch oven.

Ingredients
4 slices bacon, cut into strips
1/2 medium white onion, diced or half moon slices
12 ounces green beans, cut into 1-inch pieces
4 mushrooms, sliced
1 tablespoon butter
1/2 teaspoon salt
1/4 teaspoon black pepper

Prep
In a cast-iron skillet, on medium heat, fry bacon until just starting to brown. Add onions and cook until translucent. Add green beans on top of the onions and bacon; do not stir. Let them cook about 2 minutes, then stir. Add the mushrooms. Cook, stirring frequently until the green beans are just starting to blister and mushrooms are cooked through, but still fairly firm. Add 1 tablespoon butter and stir in until melted. Add salt and pepper to taste.

Serves about 4

If you like this blog and don’t want to miss a single post, subscribe to Chuck Wagoneer by clicking on the Follow Us button in the upper right corner and follow us on Facebook and Pinterest for the latest updates and more stuff!

Categories: Recipes, Sides | Tags: , , , , , , , | 1 Comment

New Year’s Resolutions

2021 has finally arrived but, at the moment, it doesn’t feel a whole lot better than 2020. Nevertheless, there are things we all can do to try and make 2021 a better year and it all starts with our new year resolutions.

One resolution we all should make is to get outside more often and by that I mean every day. No matter what the weather is like, get outside, take a short or a long walk, breathe in fresh air, soak up some sun (and vitamin D), listen to the birds, stop and smell a flower, wave to your neighbor. The important thing is to spend time outside in some kind of activity be it walking, running, gardening, etc. It doesn’t matter what you do, just do it, outside.

Speaking of activity, increase yours. Find ways to be more active. If you don’t workout, start. If you do workout, up your game. If you have health issues, talk to your doctor about what you could do. Make a commitment to work toward being your best. We all love to camp and cook, but it can be physically demanding so we need to make sure we stay physically fit so we can continue to do what we love to do.

Up your outdoor cooking game. Have you ever made biscuits from scratch? If not, you should, they are amazing and they are not as hard as you think they are. For a good biscuit recipe, please read my blog post: “Best Buttermilk Biscuits.” Have you have ever made bread in a Dutch oven? Have you ever made your own meatballs? Have you ever made an Asian stir fry? I have a few that we love to make: Beef and Broccoli and Kung Pao Chicken. Check ‘em out.

Have you ever baked something in a box oven? Do you have a Dutch oven that you’ve never really used? Make a resolution to master it or some other culinary technique.

Is there some outdoor camping skill you could improve upon? Do you suck at fire building? Can you tie a taut-line hitch? A clove hitch? Maybe it’s time you learned.

 So, sit down for a moment or go for a walk and figure out what kinds of resolutions (goals) you can set for 2021, and make sure they include the outdoors and upping your outdoor cooking skills. Before you know it, camping season will be here. Will you be ready?

If you like this blog and don’t want to miss a single post, subscribe to Chuck Wagoneer by clicking on the Follow Us button in the upper right corner and follow us on Facebook and Pinterest for the latest updates and more stuff!

Categories: Cooking Outdoors, Health & Safety | Tags: , , , , , , | 2 Comments

Who Doesn’t Love Hot Cocoa?

Unless you don’t like chocolate (and who doesn’t?!), most everyone loves a hot cup of cocoa. Kids love it. Adults love it. And, you can dress it up or down, make it fancy or keep it simple.

Saturday, December 12, is National Cocoa Day and no camping trip would be complete without a good supply of hot cocoa. Hot cocoa is a must have for cold, winter weather, but it’s also great on a chilly spring morning or a crisp fall evening. It’s even a good way to start the day in the middle of July.

Hot cocoa can be made from scratch or you can grab a packet of the instant stuff and just add hot water. If you’re making cocoa from scratch, remember to add just a pinch of salt to enhance the flavor.

So, how do you spice up or, for the adults, spike your hot cocoa?

Marshmallows and Whipped Cream have to top the list. They are the classic toppings. If you are a marshmallow fan, they come in flavors and multiple sizes for more options.

Make a s’mores cocoa with Marshmallows and crushed Graham Crackers (pictured).

Melt a crushed up Candy Cane or an Andes Mint in your hot cocoa for a minty twist. My daughter has recently started doing this and loves it.

Stir in some Caramel sauce.

Add a dash of Cinnamon for a Latin twist.

Add some Almond Extract or Vanilla Extract.

Mash up a bit of Banana. It might make for some chunks and floaties but you can spoon those out and eat them!

How about using Coconut Milk in place of regular milk?

Melt some Peanut Butter in your hot cocoa or stir in some PB2 powdered peanut butter.

Add a flavored creamer, like Hazelnut or melt some Nutella in your hot cocoa.

Melt in some White Chocolate or, if you make your hot cocoa from scratch, use White Chocolate or Dark Chocolate instead of regular chocolate.

For the adults in the crowd, try adding a shot of Amaretto or Bailey’s Irish Cream or Kahlua or Crème de Cacao to your hot cocoa. Makes a perfect nite cap at the evening campfire.

In addition to the Crème de Cacao, add some Peppermint Schnapps and Crème de Menthe for a peppermint patty style cocoa.

For an almond joy, use Coconut Milk and add Crème de Cacao and Amaretto.

Grand Marnier makes for super-sophisticated, orange and chocolate cocoa.

We hope you’ll give some of these a try and have some fun experimenting. And, feel free to mix and match. We can’t wait to see what you come up with!

If you like this blog and don’t want to miss a single post, subscribe to Chuck Wagoneer by clicking on the Follow Us button in the upper right corner and follow us on Facebook and Pinterest for the latest updates and more stuff!

Categories: Beverages, Cooking Outdoors | Tags: , , , , , , | 5 Comments

Blueberry Cream Cheese Pound Cake

This pound cake is easy and fast to make and is moist and sweet and delicious, and disappears as quickly as it’s made. This could be served in the evening as a light dessert as is or with maybe a little fruit and whipped cream spooned over the top. It could be added to a breakfast menu. It is simply delightful with a hot cup of coffee, tea or cocoa. It can be served as is. It is that tasty.

This pound cake is so yummy; I could start every morning with a slice of this and a hot cup of coffee.

This pound cake is simple enough to make in camp or it could be made ahead and taken to camp wrapped in plastic wrap or stored in an airtight container. It tastes just as good fresh as it does the next day. Loaves can also be frozen for enjoying much later.

If you’re making this in camp, you’ll want to bake it in a box oven or you could bake it in a Dutch oven with the loaf pans sitting on a trivet. Or you could pour it directly into a small Dutch oven and not use loaf pans at all. How you decide to bake it will determine how many coals you need.

For more quick bread ideas, check out my “Best Banana Bread” recipe and “Cookie’s Cornbread” recipe.

Equipment
2 9×5 loaf pans, 2 medium mixing bowls, sturdy mixing spoon, and measuring cups and spoons.

Ingredients
1 cup unsalted butter, softened
8 ounces cream cheese, softened
1 1/2 cups granulated sugar
1 teaspoon vanilla extract
4 eggs
2 cups plus 2 tablespoons all-purpose flour
1 1/2 teaspoons baking powder
1/2 teaspoon salt
2 cups fresh or frozen blueberries

Prep
Preheat your oven or prep your coals. Toss your blueberries in a little flour. This will help them integrate better into the batter and not sink to the bottom.

In a medium mixing bowl, cream butter, cream cheese, sugar, and vanilla until smooth. Mix in the eggs one at a time. In a second medium mixing bowl, combine dry ingredients. Slowly mix dry ingredients into wet ingredients. By hand, gently fold in blueberries.

Divide the batter evenly between two greased 9×5 loaf pans. Bake in a 350°F oven for 45-55 minutes. Refresh coals as needed. Remove from oven and let rest for 10 minutes before running a knife around the outside the pans and turning out the loaves onto a cooling rack.

Makes 2 loaves. Servings will vary depending on how thick you slice the loaf.

If you like this blog and don’t want to miss a single post, subscribe to Chuck Wagoneer by clicking on the Follow Us button in the upper right corner and follow us on Facebook and Pinterest for the latest updates and more stuff!

Categories: Breakfasts, Desserts, Make & Take, Recipes | Tags: , , , , , , , , | Leave a comment

Setting the Perfect Picnic Table

If you camp as much as I do, paper plates and plastic silverware can get really expensive, and they also create a lot of trash. While paper plates could be burned in the fire pit, the rest is just filling up the garbage bag, and there are a few camping spots where we need to pack out our trash.

All that paper and plastic is just not good for the environment and that’s something we care about and want to protect so future generations can camp and enjoy the outdoors. It’s also a good example to set for kids and show them that the world is not disposable.

For eating and drinking, we use enamelware and metal silverware. Ceramic and glass, of course, are too fragile and won’t stand up to the rugged camp environment. Plastic is lightweight, but you need to be careful with it around fire and hot coals. I have seen many a plate melted because it was set too close to the fire. For that very reason, I prefer the enamelware. It’s super durable, easy to clean, and the speckled finish captures that classic camping look that I grew up with.

For hot or cold beverages, everyone has an insulated mug or they use one of the enamelware cups. We wash dishes after every meal and hang everything in mesh laundry bags to air dry. If you don’t let dishes sit and you clean up right away using soap and hot water, it’s really not that hard, and if everyone pitches in, it goes really fast. For more information on washing dishes in camp, read my blog post: “Good Dish Washing in Camp.”

When I’m cooking, if I need a little butter melted, I’ll grab a cup and set it near the fire or on the stove near the burner to melt the butter. If my coffee gets cold, I’ll do the same thing and it warms in no time. If it’s cold outside, I can load plates into a Dutch oven and add just a few coals to the top and bottom of the oven and warm them before serving.

Enamelware comes in many colors so you have choices if you want to coordinate with an RV décor, other serving items, or if you just want to set that Sunset Magazine table.

Currently, I have a red set, a blue set, and a green set. A friend suggested I get a white set for photographing my food, so I’m on the hunt for a nice white, speckled set to add to my collection.

However you set your picnic table, be sure you’re doing it in a way that is easy on the environment. It might mean a little more work when cleaning up, but it’s worth it if it saves the outdoors for future generations. And, for that future generation, it’s a teachable moment about pitching in, helping out, and working together to get a job done quickly and easily. And the faster we get cleaned up, the faster we can move on to a campfire and s’mores!

If you like this blog and don’t want to miss a single post, subscribe to Chuck Wagoneer by clicking on the Follow Us button in the upper right corner and follow us on Facebook and Pinterest for the latest updates and more stuff!

Categories: Cooking Outdoors | Tags: , , , , , , , , , | Leave a comment

Chicken Cordon Bleu Casserole

Imagine the looks on your campers’ faces if you told them you were making chicken cordon bleu for dinner. This is a fancy classic French dish made of chicken breasts (pounded flat) stuffed with ham and Swiss cheese. Each stuffed chicken breast is then rolled in bread crumbs and baked. Now, while you could make it this way in camp and bake them in a Dutch or box oven, we found an easy way to make it casserole style, which is great if you’re feeding a crowd.

This casserole has all the flavors of chicken cordon bleu, including the crunchy breadcrumb topping, without the labor, and, if you are feeding a crowd, a casserole is always a good way to go. Much of the prep work could be done at home before you go so that when you get to camp it’s just “some assembly required.”

The chicken can be cooked at home and cubed along with the ham, and the cheeses could be grated at home. Everything can be loaded into containers for the ride to camp in your cooler.

You could also modify this by adding some broccoli to it. You could also kick it up a notch and add some bacon bits giving it more of a club sandwich flavor.

Equipment
12-inch Dutch oven or 9×13 baking dish, and a skillet

Ingredients
6 tablespoons unsalted butter
2 cups small-cubed ham
1 1/4 cups grated Swiss cheese
1 1/4 cups grated Monterey Jack cheese
4 cooked boneless, skinless chicken breasts, cut into cubes
1/2 cup panko breadcrumbs
1/4 cup all-purpose flour
2 cups milk
1 cup chicken broth
2 tablespoons Dijon mustard
1/2 teaspoon cayenne
salt and black pepper

Prep
At home before you go, cook the chicken breasts by either grilling, frying, baking or poaching, and cube them. Cube the ham and grate the cheeses. Load everything into containers or resealable bags for the ride to camp in your cooler. The cheeses could be combined in one container.

In camp, foil line (if you’re going to) and/or grease your Dutch oven. Put about a third of chicken in a layer in the bottom. Top with half the ham. Sprinkle over 1/4 cup of the mixed cheese. Repeat 1 more time, then finish with a layer of chicken.

You’ll probably want to start your coals about now.

In a skillet over medium heat, melt the butter. Put the panko in a bowl, pour in half of the melted butter, mix well and set aside. Add the flour to the remaining butter in the skillet and cook for 2 to 3 minutes, whisking out any lumps. Whisk in the milk, broth, Dijon and cayenne and let it cook until it begins to thicken. Remove from the heat and stir in 1 cup of the cheese until melted. Season with salt and pepper. Go easy on the salt because the ham will bring some saltiness. You can always add more salt at the table.

Pour the sauce over the casserole. Sprinkle over the remaining 1 cup cheese, then the panko mix. Bake in a 350°F oven, using 17 coals on the lid and 8 underneath, for 25-30 minutes until the top is browned and the casserole is bubbling.

Makes about 6 servings. Serve with buttered noodles or a rice pilaf, and some green vegetables or a salad.

If you like this blog and don’t want to miss a single post, subscribe to Chuck Wagoneer by clicking on the Follow Us button in the upper right corner and follow us on Facebook and Pinterest for the latest updates and more stuff!

Categories: Dutch Oven, Main Dishes, Recipes | Tags: , , , , , , , , , , , , , | Leave a comment

Cooking with Propane

When I’m teaching outdoor cooking skills, I’m often asked what are the essential items to get started? Whether you are backpacking or car camping, one must-have is a stove.

Backpacking Stoves

A backpacker’s stove of choice will be a one-burner lightweight, compact stove that will predominantly be used for boiling water that will then be used to rehydrate ingredients to make a beverage or a meal.

Canister stoves are the most common and convenient type of stove, and they’re the easiest to use. Liquid fuel stoves are the most efficient for high altitude or below freezing temperatures. Wood stoves are nice because you don’t have to carry fuel, but they don’t work for trips above the tree line or in most desert environments. Solid fuel stoves and alcohol stoves are generally pretty budget-friendly and they’re ultra light, but you can’t control the flame, they yield slow boil times, and they’re not great in wind. Do your research and factor in where you like to backpack and choose according to your budget and need.

If you’re looking for an all around 3-season option, canister stoves are light, compact, easy to use, and fast. With canister stoves there’s no priming, pumping, or maintenance of any kind. Simply screw the canister into your stove and light the burner for a quick meal. In addition, isobutane canisters are more efficient than esbit and alcohol, and they’re very easy to find in outdoor stores and online.

Car Camping Stoves

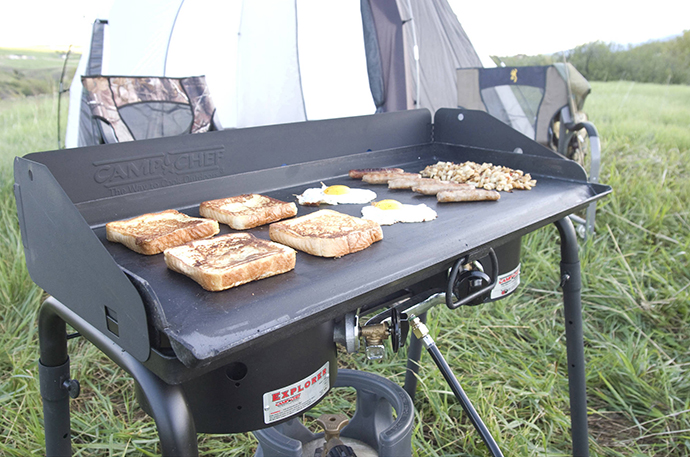
For car campers, the classic compact two-burner stove will get you started. It will heat water and make a pot of coffee. You can cook a pot of pasta or rice. You can make a pot of soup, stew, or chili. You can make breakfast or dinner in a skillet or on a griddle. If you have a gas stove at home, your camp stove will be very familiar to you. Camp stoves are usually allowed everywhere, even during a fire ban (check the regulations for where you will be camping before you go, just to be sure).

For fuel, you can use the 1-pound disposable propane fuel cylinder or you can hook up a larger propane tank. I don’t recommend stoves with a push-button igniter. Too often, I’ve seen them wear out and start failing. I just carry a long-nosed lighter and waterproof matches, and light my burner the old fashioned way.

Your average compact 2 burner stove is going to have about 10,000 BTUs per burner, which is great; however, if you want more BTUs for your buck and want something more heavy duty, you could consider a large burner option. These are a little more spendy, but you get more power (30,000+ BTUs per burner), and because the burners are larger, you can use larger pots and griddles, which comes in handy for group camping. These are typically free-standing but still highly portable and you will need to connect them to a larger propane tank. Depending on your budget and needs, you could opt for 1-3 burners, and they also have all kinds of accessories, including griddles, BBQ boxes, and ovens. Please read my blog post: “Product Review: Italia Artisan Pizza Oven.”

If you’re cooking for a crowd or just wanting more BTUs for hotter, faster cooking, a large burner cooking system is the way to go, and the available accessories give you lots of cooking options. However, if you’re just starting out and/or wanting something smaller and more compact, there are lots of good options out there.

If you like this blog and don’t want to miss a single post, subscribe to Chuck Wagoneer by clicking on the Follow Us button in the upper right corner and follow us on Facebook and Pinterest for the latest updates and more stuff!

Categories: Cooking Outdoors | Tags: , , , , , , , , | Leave a comment

Kiss My Grits!

That cheeky catchphrase was a favorite of a sassy waitress named Flo on the 1970s sitcom Alice. The actress who played Flo was a native of Alabama and no stranger to grits. Made using ground corn kernels, grits are a southern specialty and the official state food of South Carolina, but you don’t have to be southern to enjoy them.

Growing up, one of my best friends was a southern girl and whenever I ate at her house, grits were almost always on the menu. Grits can be served for breakfast much like oatmeal or cream of wheat and they can be served with dinner much like mashed potatoes, rice, polenta, and pasta.

And for those of you who are wondering, both grits and polenta are made from ground corn, but the main difference is what type of corn. Polenta, as you can probably guess from the color, is made from yellow corn, while grits are normally made from white corn (or hominy). Polenta originated from northern and central Italy. Grits came from the Native America Muskogee tribe. Grits will usually end up being finer and smoother. Polenta has a coarse texture and takes a little longer to make.

And, just like potatoes, polenta, rice, and pasta, grits will go with just about anything, but perhaps the most famous pairing is shrimp and grits. Think of them as mashed potatoes but with a different flavor and texture.

Grits can be made simply with just water, a little butter, and some salt and black pepper or they can be dressed up with milk or cream, chicken stock, cheese, green onion, garlic, almost anything. They are a blank canvas. They are also an excellent source of vitamin B and iron. For a sweet, hot breakfast, omit the black pepper and add some fruit or cinnamon and sugar. Again, treat it like oatmeal or cream of wheat. Today, September 2, happens to be National Grits for Breakfast Day.

Grits can be made on the stove top or in a slow cooker. The only trick is, much like cream of wheat, when you add the grits to the boiling liquid you have to add slowly and stir or whisk the whole time and keep stirring until everything is mixed well; otherwise, they will clump.

The recipe below is easy to make on a stove or in a slow cooker. They are smooth and creamy, and all my southern buddies have given them two thumbs up. When I make these in the scout camp dining hall, on Saturday morning, I’ll set out a large slow cooker with breakfast and they quickly disappear.

Ingredients
2 cups heavy cream
1 1/2 cups half-and-half
3 1/2 cups water
8 tablespoons (1 stick) butter
1 teaspoon salt
1/2 teaspoon black pepper
1 1/2 cups stone ground grits
1 cup sharp cheddar cheese, grated

Instructions
In a saucepan, on medium heat, combine all ingredients except grits and cheese. Bring to a simmer, stirring frequently to prevent the milk from scalding on the bottom. Gradually whisk in grits. (Add them too quickly and they will clump.)

Reduce heat to low and cook according to the directions on the container, stirring frequently. Add the cheese and stir until melted in. If grits get too thick add more water or half-and-half.

Serves 6-8

If you like this blog and don’t want to miss a single post, subscribe to Chuck Wagoneer by clicking on the Follow Us button in the upper right corner and follow us on Facebook and Pinterest for the latest updates and more stuff!
Categories: Breakfasts, Recipes, Sides | Tags: , , , , , , , , , | Leave a comment

Use More Herbs and Spices

This Saturday is More Herbs/Less Salt Day and I am reminded of my dad who had a massive heart attack when I was about 13 years old. By the grace of God, he survived it. Following his recovery, his doctor put him on a no salt diet and to make it easier on dad, mom and I went on a no salt diet with him. It was really hard at first, everything just tasted so bland, and dad was just miserable, but we learned to compensate by adding more herbs and spices when we cooked.

Because dad could no longer work, he started doing more cooking and it was fun to get into the kitchen and experiment with him. He was a marine and he embraced the Marine Corps motto of “Improvise, Adapt, and Overcome.” He was a problem solver and bland tasting food was a problem that needed to be solved.

Salt is a great flavor enhancer and aids foods in a variety of ways. Check out my blog post: “Let’s Get Salty” for all the great things that salt can do. But too much salt for some folks is a bad thing. Too much salt increases the risk of high blood pressure, heart disease, and stroke. However, just because you’re limiting your salt intake does not mean that you have to eat bland food.

In order to reduce our salt intake, we eliminated processed foods, which tended to be high in sodium, and we cooked almost entirely from scratch. This allowed us to have 100% control over all the ingredients.

We added more acid using citrus fruits and vinegars. Acids act a little like salt in that they help bring out the natural brightness of foods and work to meld flavors together.

We increased the size of our garden and used a lot more fresh vegetables and herbs. And, in some cases, we more than doubled the amount of herbs and spices any given recipe called for. We seasoned liberally and with authority. We learned to be fearless when it came to seasoning. Did we overdo it once in a while? Ya, we did, but we learned from each and every mistake how to make it better tasting despite the lack of salt.

Over time, we found that we didn’t miss salt quite so much because there were so many other flavors in our food. My grandmother who was diabetic loved coming to visit. She had to limit not only her salt intake but her sugar as well. Talk about there being no joy in Mudville. No salt and no sugar, and there just weren’t all of the sugar substitutes we have today.

But, being who he was, my dad stepped up to the challenge. When grandma came to visit, my dad would pull out every trick he knew, but he made sure she was still following her diet and eating healthy. She ate so well and the foods were so flavorful, I know her visits to our house brought so much joy to her in her final years.

That was just how I was raised. That was the life lesson my dad taught me. If you’re presented with a problem, you figure out a way to solve it. You improvise, adapt, and overcome.

So, whether it’s salt or sugar or dairy or gluten or something else, there is absolutely no reason why you can’t enjoy what you’re eating. Herbs and spices bring so much flavor that you won’t even miss what you can’t have.

If you like this blog and don’t want to miss a single post, subscribe to Chuck Wagoneer by clicking on the Follow Us button in the upper right corner and follow us on Facebook and Pinterest for the latest updates and more stuff!

Categories: Under the Lid | Tags: , , , , , , , , , , , | Leave a comment

Hot Stuff

Today is National Hot & Spicy Food Day. For those of you who like it hot, how do you roll? In my blog post “Some Like it Hot” we talk about cooking with hot peppers, but there are other ways to up the heat from a little to a LOT!

When folks think spicy food, there are a few cuisines that immediately come to mind. Thai food is known for its heat. Mexico, Latin, Central and South America are known for being spicy. Italy and India can also bring the heat.

Adding hot stuff to your cooking can help you enjoy more flavorful food, weight loss, and better health. Consuming spicy foods can do everything from reduce your risk of heart disease to help you shed that stubborn spare tire.

In our spice cupboard, we keep a bottle of crushed red pepper flakes. We also stock black pepper (of course), white pepper, cayenne pepper, paprika, chili powder, cumin, sriracha powder, and curry powder. These are just a few of the hot spices out there. These just happen to be the ones we keep in our spice cupboard.

Hot sauces are another way to go. Tabasco, Sriracha, and ghost pepper sauce are our go to hot sauces, depending on the level of heat and the flavor we want. Habanero hot sauce is another really popular and really spicy hot sauce. Cholula is a popular Mexican hot sauce that derives its great flavor from Arbol and Piquin peppers. Korea’s gochujang sauce is both hot and sweet and can be added to just about anything, not just Asian dishes. It’s a lot like Sriracha but has more flavor and depth.

Hot sauces are great because they can be mixed into a sauce for a milder heat or they can be poured on top for a more powerful punch.

I know I’ve only scratched the surface when it comes to hot stuff. Now that our daughter has upped her heat level and can tolerate spicier foods, our family has only just begun to fully explore the world of spicy foods. But I have to say that what we have explored so far has been very flavorful.

Your local large grocery store probably has whole sections devoted to hot sauces, spices, and other hot ingredients. Spicy foods are fun and bring so much flavor. If your heat tolerance is low, start small and slowly add more heat.

If you like this blog and don’t want to miss a single post, subscribe to Chuck Wagoneer by clicking on the Follow Us button in the upper right corner and follow us on Facebook and Pinterest for the latest updates and more stuff!

Categories: Under the Lid | Tags: , , , , , , , , , | Leave a comment

Blog at WordPress.com.