Posts Tagged With: propane stove

Cooking with Propane

When I’m teaching outdoor cooking skills, I’m often asked what are the essential items to get started? Whether you are backpacking or car camping, one must-have is a stove.

Backpacking Stoves

A backpacker’s stove of choice will be a one-burner lightweight, compact stove that will predominantly be used for boiling water that will then be used to rehydrate ingredients to make a beverage or a meal.

Canister stoves are the most common and convenient type of stove, and they’re the easiest to use. Liquid fuel stoves are the most efficient for high altitude or below freezing temperatures. Wood stoves are nice because you don’t have to carry fuel, but they don’t work for trips above the tree line or in most desert environments. Solid fuel stoves and alcohol stoves are generally pretty budget-friendly and they’re ultra light, but you can’t control the flame, they yield slow boil times, and they’re not great in wind. Do your research and factor in where you like to backpack and choose according to your budget and need.

If you’re looking for an all around 3-season option, canister stoves are light, compact, easy to use, and fast. With canister stoves there’s no priming, pumping, or maintenance of any kind. Simply screw the canister into your stove and light the burner for a quick meal. In addition, isobutane canisters are more efficient than esbit and alcohol, and they’re very easy to find in outdoor stores and online.

Car Camping Stoves

For car campers, the classic compact two-burner stove will get you started. It will heat water and make a pot of coffee. You can cook a pot of pasta or rice. You can make a pot of soup, stew, or chili. You can make breakfast or dinner in a skillet or on a griddle. If you have a gas stove at home, your camp stove will be very familiar to you. Camp stoves are usually allowed everywhere, even during a fire ban (check the regulations for where you will be camping before you go, just to be sure).

For fuel, you can use the 1-pound disposable propane fuel cylinder or you can hook up a larger propane tank. I don’t recommend stoves with a push-button igniter. Too often, I’ve seen them wear out and start failing. I just carry a long-nosed lighter and waterproof matches, and light my burner the old fashioned way.

Your average compact 2 burner stove is going to have about 10,000 BTUs per burner, which is great; however, if you want more BTUs for your buck and want something more heavy duty, you could consider a large burner option. These are a little more spendy, but you get more power (30,000+ BTUs per burner), and because the burners are larger, you can use larger pots and griddles, which comes in handy for group camping. These are typically free-standing but still highly portable and you will need to connect them to a larger propane tank. Depending on your budget and needs, you could opt for 1-3 burners, and they also have all kinds of accessories, including griddles, BBQ boxes, and ovens. Please read my blog post: “Product Review: Italia Artisan Pizza Oven.”

If you’re cooking for a crowd or just wanting more BTUs for hotter, faster cooking, a large burner cooking system is the way to go, and the available accessories give you lots of cooking options. However, if you’re just starting out and/or wanting something smaller and more compact, there are lots of good options out there.

If you like this blog and don’t want to miss a single post, subscribe to Chuck Wagoneer by clicking on the Follow Us button in the upper right corner and follow us on Facebook and Pinterest for the latest updates and more stuff!

Categories: Cooking Outdoors | Tags: , , , , , , , , | Leave a comment

Cooking at Higher Altitudes

Cooking at higher altitudes can be challenging. When we’re camping, often times it is up in the mountains and the elevation gain may be enough to affect our cooking. A recipe that we tested at home, at sea level, now is taking longer to cook or is not quite right at higher elevations. When we’re backpacking, elevation can change dramatically from one day to another, so what took 20 minutes to cook yesterday might take longer to cook today because we are higher up.

As elevation increases, the atmospheric pressure decreases, or becomes thinner. The atmosphere becomes drier and liquids evaporate more rapidly, resulting in the need for changes in cooking methods. High altitude is defined as an elevation of 3,000 feet or more above sea level. Even at elevations of 2,000 feet, the temperature of boiling water changes from the standard 212°F at sea level to 208°F. Boiling or simmering foods at high altitude means lower temperatures and longer cooking times.

About 6 months ago, our family moved to a more arid state and we gained about 2,000 feet in elevation. Our everyday cooking has been a little challenging but we are adapting to this new climate and elevation. Here are a few tips to help you cook your food long enough and still keep it moist and full flavored.

Up Your Liquid

The higher the elevation, the faster moisture evaporates. When cooking foods like pasta or rice, start with more liquid in the pot and have some hot water standing by in case you need to add more during the cooking process. For example, my Pizza Pasta One Pot calls for 12 ounces of water. When I made that recently at 2,500 feet, I had to nearly double the amount of water for the pasta to completely cook. And, it needed longer to cook.

Pizza Pasta One PotPizza Pasta One Pot

Up Your Cook Time by 25%

Moist heating methods for pasta, rice, meat and poultry, even eggs, such as boiling, simmering or braising, will take up to 25% more cooking time. For example, if you are simmering a roast at 325°F that would usually take two hours to cook at sea level, that same roast cooked at high altitudes at 325°F would require 2½ hours of cook time. Increasing cook time does not apply to oven-roasted meat or poultry; oven temperatures remain unaffected in high altitudes. Use sea-level cooking instructions for oven roasting.

Resist the Temptation to Raise the Heat

Hiking up the temperature while boiling foods will not cook food faster. The liquid will simply boil away more quickly and food will dry out or worse, scorch on the bottom of the pan. The temperature of a boiling liquid cannot exceed its own boiling point, but the higher you are, the lower the boiling point. So, while water does reach its boiling point faster, it’s boiling at a lower temperature, which means you are cooking at a lower temperature. What you need is more time, so patience, Grasshopper.

Keep a Lid on it

Retain moisture in meat and poultry products or any boiled food by tightly covering the pan during cooking. To continue to keep foods moist, cover dishes after cooking.

Use a Food Thermometer

To avoid undercooking or overcooking meat and poultry, especially at high altitudes, use a food thermometer to confirm internal temperature. According to the USDA Food Safety and Inspection Service’s guidelines, internal temperatures should reach the following:

  • Ground meats such as beef, pork, lamb, and veal – 160°F
  • Beef, pork, lamb, veal (roasts, steaks, chops) – 145°F (and allow to rest for at least 3 minutes)
  • Ham, fresh or cook before eating – 145°F
  • Ham, reheat fully cooked – 140°F
  • Ground chicken or turkey – 165°F
  • Whole chicken or turkey – 165°F
  • Poultry pieces – 165°F

Bring More Fuel

Because we’re having to cook everything longer this will require more fuel, so make sure you pack more propane and more charcoal to ensure you don’t run out.

Experiment & Adapt

Every recipe will be a little different and the additional liquid and time needed for cooking will vary depending on your altitude. This is particularly true if you are baking because there is way more chemistry involved and almost every ingredient in baked goods is affected by the lower air pressure at higher altitudes, especially leavenings, liquids, and sugar.  If you like to camp at higher altitudes and you like to bake while camping, it might be worth it to invest in a high altitude baking cookbook and adapt the recipes to either a box oven or a Dutch oven.

So, while cooking at higher elevations can be more challenging, it’s nothing you can’t handle. All you need is a little patience, Grasshopper.

If you like this blog and don’t want to miss a single post, subscribe to Chuck Wagoneer by clicking on the Follow Us button in the upper right corner and follow us on Facebook and Pinterest for the latest updates and more stuff!

Categories: Cooking Outdoors | Tags: , , , , , , , , , | Leave a comment

Sausage and Kale Soup

Last week, around dinner time, I received a text from the mom of one of our Boy Scouts, a scout who is close to Eagling I might add. She sent a picture of her youngest son Nathan standing at the stove, stirring a pot. She wrote, “Sausage and kale soup from scratch! The Cooking Merit Badge is the best thing that ever happened to me!” I couldn’t be more proud or thrilled.

This is one of those moments when you dust off your hands and walk away saying, “My work here is done!” Nathan has embraced what he’s learned from a merit badge and he is applying it to his everyday life. His cooking skills will continue to grow and he’ll use them his whole life. And, just at look at that smile. He’s so proud of himself and his smile could light an entire city!

So, after the rave reviews from his family, we had to make the soup ourselves (and so I could photograph it). This is an easy soup to make in camp. It has a little prep and could easily be gotten onto the picnic table in about 30 minutes, making it a great meal for a Friday night after rolling into camp and setting up.

If you are a kale fan, you should like this soup. It’s warm and filling, but not heavy. We served it with our favorite cornbread. You could also make a crusty artisan bread. Any bread would go nicely.

For the sausage, Nathan used turkey sausage. We used a hot Italian pork sausage. Choose your sausage according to your likes and go as mild or as spicy as you want. The recipe calls for wine, which you could omit and just add more chicken stock. I opted to include the wine and used a chardonnay. For the kale, strip the leaves off the stocks and discard the stocks. The leaves just need a rough chop.

Equipment
6-quart Dutch oven or stock pot, knife, cutting board.

Ingredients
20 ounces sausage, ground or links (remove casings)
1 medium onion, diced
8 cups kale, fresh, chopped
2 cloves garlic, minced
½ cup white wine
3 ¼ cups chicken stock
1 (15-ounce) can white kidney or cannellini beans, drained and rinsed
1 (15-ounce) can diced tomatoes, undrained
½ cup sun-dried tomatoes, chopped
¼ teaspoon pepper

Prep
Chop the vegetables, drain and rinse the beans, and get everything measured out and ready. Once you start cooking, this one moves pretty quickly. In your Dutch oven, over medium heat, cook the sausage and onion until the sausage is no longer pink. Remove and set aside. Add the kale to the Dutch oven and cook, stirring constantly, for 2 minutes. Add garlic and cook 1 minute. Add wine and cook 2 minutes. Stir in the sausage and onions, and the remaining ingredients. Bring to a boil. Reduce heat, cover and simmer 15-20 minutes or until kale is tender.

Serves 8

This post has been shared at Homestead Bloggers Network. If you like this blog and don’t want to miss a single post, subscribe to Chuck Wagoneer by clicking on the Follow Us button in the upper right corner and follow us on Facebook and Pinterest for the latest updates and more stuff!

Categories: Main Dishes, Meals in 30 Min., One Pot, Recipes | Tags: , , , , , , , , , , , , , | Leave a comment

Camp Kitchen Setups

When we camp, we eat well. I wouldn’t call it gourmet, but it’s healthy (most of the time), balanced, nutritious, and very satisfying. And, we’re constantly trying to change things up. We each have our go-to recipes and our specialties, but we’re always on the hunt for something different. Just like we change our camping locations between beach, mountains, lake, etc., and we change our activities between biking, fishing, canoeing, etc., so we change up our camp menus. It’s all in the spirit of keeping it interesting. None of us like to settle for the same old stuff. All it takes is a little planning, a little culinary ambition, and a good camp kitchen setup, and you, too, can cook like a chef and eat like a king or a queen.

Here’s what I recommend for a good camp kitchen setup:

Chuck Box

You need all your cooking essentials organized and stored in one place. A chuck box can be as simple and economical as a large plastic tote or as complex as a hand-crafted wooden box (DIY tutorials are widely available online). Ideally, your chuck box has compartments or smaller containers for your smaller cooking utensils. It should include all the basic things you need from pots and bowls to knives and vegetable peelers. I always pack heavy-duty aluminum foil for making foil packets. It’s fun to lay out a selection of proteins, veggies, spices, and sauces and everyone assembles their own dinner and cooks it over a fire or coals. For a complete list of what my chuck box includes, see my blog post, “Think Inside the Box Part 1-Your Camp Kitchen.”

Stove

A reliable stove system is central to every serious camp kitchen. Depending on the amount of packing space in your vehicle, you can decide to go with a compact two-burner system that runs on a one-pound propane canister or you can equip yourself with a larger and more powerful two- or three-burner system that runs on a standard 20-pound propane tank. Generally, you just want to make sure that each burner on the stove you select puts out at least 10,000 BTU/hr, which is the average output of a household stove burner. A number of the larger models that run on standard 20-pound propane tanks will crank out an impressive 30,000 BTU/hr per burner, providing you with an immense range of culinary ability. Many models can also be accessorized with grill boxes and griddles, which make serving up a stack of pancakes or juicy T-bone steaks a simple task.

Cooler

One or two quality hard-shell coolers will insulate and protect your food from being crushed in a fully packed vehicle. For safe food handling, it’s important that your iced-cooler keep your foods at or below 40°F. If you can, do your prep work before leaving home. Label your sealed bags of pre-chopped veggies and meats specific to each meal, which allows you to start cooking with minimal prep time. If you plan on packing lots of canned and bottled beverages, consider bringing a second beverage-specific cooler. Beverage coolers are opened and closed frequently, which allows chilled air to quickly escape. If your food is stored in a separate cooler that is opened less frequently, your temperature-sensitive foods will stay chilled for a longer period of time. For more cooler packing tips, see my blog posts, “Chillin’ With Your Cooler” and “Think Inside the Box Part 3-Your Camp Refrigerator.”

Food Tote

Just like a cooler, a hard-sided plastic tote will protect your food from being crushed in a fully packed vehicle. It will also protect your food from sun and rain and help keep critters out in the middle of the night. Even if you are just making hamburgers, no one wants a bun that’s been flattened like a pancake. For more Food Tote tips, see my blog post, “Think Inside the Box Part 2-Your Camp Pantry.”

Table

Even if you do the bulk of your prep work at home, you will still need a place to assemble and prepare your meals. A sturdy camp table is a must-have for your camp kitchen. Not only does it provide valuable work space, but you can also use it like a buffet table.

Shelter

We usually pack a pop up for a cook shelter. It provides shade when it’s sunny and protection from the rain when it is not, which is most of the time! I like to string a small clothesline along one side for washing cloths and drying towels. Sometimes I attach a tarp to one side and stake out the tarp to provide added shade for my coolers.

Extras

In my opinion, an outdoor kitchen wouldn’t be complete without at least one cast iron Dutch oven. From casseroles to cakes, a Dutch oven will allow you to bake just about anything you can bake in your oven at home. A Dutch oven gives you the versatility to prepare a much wider range of dishes. Its rugged durability and its ability to evenly distribute heat, allowing you to cover it with charcoal briquettes, position it in hot coals near an open fire, or place it on the stove top, make it a valuable component of your camp kitchen. For more information about what you need to support your Dutch ovens, see my blog post, “The Right Tool for the Right Job.”

So, there you have it. A good camp kitchen setup will go along way toward making every camping trip a successful one.

What’s in your Chuck box?

If you like this blog and don’t want to miss a single post, subscribe to Chuck Wagoneer by clicking on the Follow Us button in the upper right corner and follow us on Facebook and Pinterest for the latest updates and more stuff!

Categories: Cooking Outdoors | Tags: , , , , , , , , , , , , | Leave a comment

Fantastic French Dip Sandwiches

This roast was fall-apart tender and soaked with juice and spices. The French dip sandwiches we made were so flavorful. It was hard not to go back and make a second sandwich, but I knew, if I did, I’d be groaning all afternoon.

In March, we were teaching outdoor cooking to adult volunteers at our annual Girl Scouts of Western Washington Outdoor Learning Weekend at Camp Robbinswold. Right after breakfast, we heated up a 12-inch deep Dutch oven on the propane stove, added some olive oil, and seared off the beef chuck roast. Then, we added all the spices and liquids, put on the lid, and set it on the fire.

I used my 12-inch deep because I wasn’t sure how much volume I was really going to have between the roast and the liquid. Our fire was a little hot and the deep oven allowed for some bubbling up room.

We let it simmer all morning. At lunchtime, I pulled it out and sliced it, but it really wasn’t necessary. I could have just pulled it apart in the Dutch oven. I returned the meat to the Dutch oven and the juice, and it was time to assemble our sandwiches. Because the meat is so juicy, I recommend a sturdy roll. If your roll is too soft, it will soak up all the juice and turn to mush. I would also recommend toasting the rolls on a grill or griddle. We did not, and I wish we had; it would have kicked it up yet another notch.

We split our rolls, piled on the juicy beef and topped the sandwiches with 2 slices of Provolone cheese. You could also layer on some sautéed onions, bell peppers, and/or mushrooms. You can ladle juice out of the Dutch oven for dipping, too, but we found it wasn’t necessary at all.

At home, you could make this in a slow cooker. Start it in the morning and just let it go all day on low. If you need to size up this recipe, just add a half pound of beef per extra person and then size up the other ingredients accordingly. I also wouldn’t worry too much about being exact. If you end up with a little more juice, who cares?!

Equipment
12-inch deep Dutch oven or a slow cooker

Ingredients
1 3-pound beef chuck roast
1 tablespoon olive oil
2 cans (10.5 ounces each) beef consommé
1/3 cup soy sauce
1 cup Coca-Cola (or just add the whole can)
1 bay leaf
1 teaspoon garlic powder
1/2 teaspoon onion powder
1/4 cup onions, dried, minced
1/2 teaspoon oregano, dried
1/4 teaspoon thyme, dried
1 tablespoon beef bouillon, granulated
1/4 teaspoon black pepper
1/2 teaspoon salt
6 French rolls or hoagie buns
12 slices Provolone cheese

Prep
In camp, in a hot Dutch oven or, at home, in a hot cast iron skillet, add a little olive oil, and sear the beef on all sides. If you’re making this at home in a slow cooker, transfer the beef to the slow cooker. Add all the liquids and spices, put the lid on and cook low and slow. There really isn’t much more than that. Super simple to make. After hours of simmering, slice or pull apart and serve on sturdy French rolls or hoagie rolls with Provolone cheese, and/or grilled onions, peppers, and/or mushrooms. If desired, ladle au jus into bowls for dipping.

Serves 6

This post has been shared at Homestead Bloggers Network. If you like this blog and don’t want to miss a single post, subscribe to Chuck Wagoneer by clicking on the Follow Us button in the upper right corner and follow us on Facebook and Pinterest for the latest updates and more stuff!

Categories: Dutch Oven, Main Dishes, Recipes | Tags: , , , , , , , , , , , , , , , | 2 Comments

Camp Coffee Connoisseur

Coffee02_690px

September 29 is National Coffee Day!

When you’re camping, there is nothing quite like the smell of freshly brewed coffee in the morning. It’s one of the top reasons why campers crawl out of their sleeping bags in the morning. It ranks right up there with the warmth of a crackling campfire and the smell of bacon frying!

For coffee lovers, enjoying a good cup of coffee can make or break a weekend camping trip. However, between the single cup brewers for home and office, and having a Starbucks on every corner, many people don’t “make” coffee anymore. Then, when they go camping, and those luxuries are not available, they either go without (and we have to put up with their grumpiness) or they “settle” for instant coffee or a coffee tea bag.

Well, I’m here to tell you that you don’t have to settle. You can brew a great cup of java in your camp kitchen. Here’s how to do it.

For equipment, you’ll need a camp stove and a coffee percolator. For the percolator, you’ll want one with a clear-glass percolator knob so you can see the coffee as it brews. Being able to see the coffee will help you decide when it is done. Your percolator will also include a metal basket with a spreader plate that sits on a metal straw (I’m not sure if it has an official name).

The basket for the grounds is not really a filter and you may occasionally get a few grounds in your coffee, but that doesn’t bother me. But if you’re bugged about those things, you could use separate disc-style filters or strain your coffee when you pour it.

How the percolator works is by forcing water up through the straw where it spurts out over the spreader plate and seeps through the coffee grounds. (see diagram)

Coffee_Percolator_Cutaway_DiagramNow for the ingredients. You’ll want to start with good beans, medium ground. Either purchase your favorite coffee beans already ground or buy them whole and grind them yourself at home. Either way, store the ground coffee in an airtight container and bring more than you expect to consume because coffee always tastes better in the great outdoors.

Fill the coffee pot with water. It is important that the water level is below the bottom of the basket.

Before loading your coffee into the basket, wet the inside of the basket to help prevent grounds from going through the holes. Scoop the coffee into the basket (do not pack it in), set the plate on the basket, and insert the entire assembly into the coffee pot. Put the lid on the coffee pot and set it to flame.

Once it starts to boil, turn the heat down. Brewed coffee left on high heat for too long will acquire a bitter taste. Keep an eye on the coffee bubbling up into the clear-glass percolator knob. Coffee is ready when it’s a nice rich brown to your liking.

Coffee04_IMG_0999_690px

My red coffee pot (pictured below) holds 48 ounces or 6 cups of water (pot filled to the bottom of the bottom hole of the pour spout). To the basket, I add ¾ cup coffee grounds (6 scoops). This makes 8 (6 ounce) cups.

Coffee02_IMG_0997_690px

And don’t forget to pack the coffee extras like sugar and creamer for those of us who prefer our coffee on the blonder side. I love all the flavored creamers available today. My favorite is Hershey’s Chocolate Caramel by International Delight. Last summer, on our 50-mile bike trip, a friend of mine brought a chocolate chip cookie dough flavored creamer and it was yummy. If you don’t want to keep it refrigerated, there are many tasty flavored coffee creamers in powdered form.

In addition to coffee fixin’s, remember to pack a good supply of hot chocolate, apple cider, tang, and a variety of teas for the non-coffee drinkers. For a great Russian tea recipe, see my blog post “Russian Tea is a Tangy Beverage Hot or Cold.”

Now you have a reason to crawl out of that sleeping bag in the morning. And the rule in camp is: First one up starts the coffee.

If you like this blog and don’t want to miss a single post, subscribe to Chuck Wagoneer by clicking on the Follow Us button in the upper right corner and follow us on Facebook and Pinterest for the latest updates and more stuff!

Categories: Beverages, Cooking Outdoors | Tags: , , , , , , , , | Leave a comment

Creatures of Habit

coffee_cup_IMG_1825_690px

During the weekdays, I make my morning coffee in my travel mug so I can take it with me on my way to work. On the weekends, I have a favorite coffee mug that I use. You know the kind. It’s a little over-sized. The handle fits perfectly in my hand. It’s so comfortable. It has one of my favorite childhood cartoon characters on it. I always hand wash it, not because it needs to be, but so it’s ready for the next time I need it. It’s my go-to mug and everyone in the household knows that it’s Mommy’s mug.

Last Sunday, I was in the kitchen making my coffee and I went to the cupboard to get my mug and it wasn’t there, and, honest to God, the first thought that popped into my head was, “Snap! I can’t have coffee!”

Really?!

And then it occurred to me to look in the dishwasher and, sure enough, it had been accidently loaded into the dishwasher. Coffee was saved. All was right in the world.

We are Such Creatures of Habit

When we’re planning our camp menus, how many times do we rule out certain dishes because we won’t have that go-to appliance in our camp kitchen?

Oh, I can’t make that, I won’t have an oven? I can’t make that, I won’t have a microwave? I can’t make that, I won’t have a food processor? And so on until, finally, all we’re left with is the same old, same old.

Where’s the fun in that?!

Kick those habits. Get outside your comfort zone. Think outside the box.

Don’t be limited by your home cooking habits! Just about anything you can make in your home kitchen, can be made in your camp kitchen. You might have to get a little creative. You might have to use a little elbow grease instead of using that food processor. You might have to use more traditional methods. But the finished dish will taste just as good, maybe even better.

Foods can be chopped by hand. I find there is something almost zen like when I’m cutting up vegetables, fruits or meats. Have a good board, a sharp knife, maybe some music, and get into a groove.

Butter can be cubed and then cut into flour using a pastry cutter or a fork or two knives. Recently, I started freezing my butter and then grating it. Wow! Wish I had learned that trick 30 years ago!

Instead of using a microwave, vegetables can be steamed or grilled or wrapped in foil and placed on coals or near the fire. Drizzle on a little olive oil and some seasonings and cook until tender.

Anything you would bake in your oven at home, you can bake in a Dutch oven or a box oven so don’t dismiss casseroles, muffins, biscuits, etc. And nothing beats a warm, fresh from the “oven” muffin.

Take Stock of Your Resources

What do you have in your camp kitchen? You probably have a propane stove with a couple of burners. Do you have a griddle/grill? Do you have any Dutch ovens? Just adding one Dutch oven will open a world of culinary possibilities. Can’t afford a Dutch oven right now? You could build a box oven for pennies.

For instructions on how to build a box oven, please see my blog post: “DIY: How to Build a Box Oven.”

You also can make foil wraps. You probably have more options than you realize.

So, when planning your camp menu, just think about what you want to eat and then figure out how you could make it in your camp kitchen. It’s easier than you think. And it will taste that much better!

If you like this blog and don’t want to miss a single post, subscribe to Chuck Wagoneer by clicking on the Follow Us button in the upper right corner and follow us on Facebook and Pinterest for the latest updates and more stuff!

Categories: Cooking Outdoors | Tags: , , , , , , , , , , | 1 Comment

Beef Stroganoff on a Camp Stove

beef_stroganoff_IMG_0682_690px

This beef stroganoff recipe is a nod to my grandmother’s eastern European roots. This is one of my son’s favorite dishes and was the first recipe he asked me to teach him how to make. It is fast and easy, and I can usually have it on the table in less than 30 minutes. This would make a great Friday night dinner after rolling into camp because it is so quick.

It’s a 2 pot dish so you’ll need a 2 burner camp stove. Traditionally, the pasta for this would be egg noodles, but I like to use rotini. You could also use bow tie, penne or whatever you like. You could even swap out the pasta and serve it over rice. Whatever floats your boat.

You could also jazz this up by adding mushrooms and/or a diced bell pepper. Just chop them and sauté them with the onion. I really want to try that but my son keeps refusing because he loves it just the way it is!

Serve this with a nice green salad or some grilled green vegetables like green beans, zucchini, or asparagus and you have a great meal.

Equipment
2 burner camp stove, 6 quart pot for cooking the pasta, 2 quart pot for the sauce, 2 stirring spoons, measuring spoons.

Ingredients
1 pound ground beef or cut of your choice cubed
1 pound (16 ounces) pasta of choice
1 (10.5 oz) can beef consommé
2 tablespoon flour
1 teaspoon salt
½ teaspoon pepper
1 teaspoon paprika
1 medium onion, diced, or 2 tablespoons minced onion
8 ounces sour cream

Prep
In 6 quart pot, start water for pasta. Salt the water. When the water comes to a boil, stir in the pasta, reduce heat and cook until al dente. While you are prepping the pasta, start the beef sauce. In 2 quart pot, on medium heat, brown beef and onion. Add dry ingredients and stir until paste is smooth. Add beef consommé. Reduce heat, cover, and simmer until pasta is ready, stirring occasionally. When the pasta is ready, drain it. Stir sour cream into the sauce. Return pasta to the large pot, add sauce and stir to combine.

Serves 6-8 hungry campers.

This post has been shared at Homestead Bloggers Network. If you like this blog and don’t want to miss a single post, subscribe to Chuck Wagoneer by clicking on the Follow Us button in the upper right corner and follow us on Facebook and Pinterest for the latest updates and more stuff!

Categories: Main Dishes, Meals in 30 Min., Recipes | Tags: , , , , , , , , | 3 Comments

Are You Prepared?

when_the_lights_go_out

It is a dark and stormy night. Rain pelts the windows as tree branches scrape along the side of the house like fingernails down a chalkboard. The howling wind outside sends shivers down your spine. The lights flicker once, twice. Suddenly you are engulfed in blackness. Inside, the house has become silent as a tomb.

Where do you keep that flashlight?

Winter is definitely here. We’ve had a lot of windy, rainy weather lately, and snow is probably not too far away. Winter storms often bring frequent and sometimes lengthy power outages.

Recently, I was having a conversation with a coworker and I asked her, “What do you do when the power goes out? How do you feed your kids? What do you eat?” Her answer was, “We don’t eat.”

Really?!

My outdoor cooking skills are great in spring, summer and fall when we’re camping, but in winter they become a life saver.

When the power goes out for more than a couple of hours, knowing how to whip up a hot meal without a stove or a microwave comes in pretty handy. When we lose power, we don’t miss a beat. Out comes the propane stove and/or a Dutch oven and in no time at all we have a piping hot meal to warm our bodies and our spirits.

In addition to keeping our camp cooking equipment handy, we also keep a well stocked pantry so that we can last a while without having to buy groceries in case stores are closed. It’s also good to keep a supply of water for drinking and cooking in case those systems are compromised due to storm damage.

Short-term emergency preparedness experts recommend 3 days, but we’ve gone without power for a week sometimes and we have family and friends in other parts of the country who have gone without power for more than a week at a time.

Going into winter, we make sure our propane tanks are full, the camp stove is handy, and we have a good supply of charcoal for the Dutch ovens. I do my cooking out in the garage or on my covered front porch. Remember! Never operate your propane stove or use charcoal inside your home or anyplace that isn’t well ventilated as it can lead to carbon monoxide poisoning.

So, are you prepared for when Old Man Winter comes a calling? Just like if you get lost in the wilderness, your top three priorities are: shelter, and water and food.

Shelter is easy, you’re home, but make sure your camp clothing (polypropylene, fleece, and wool) are handy and layer up as temperatures inside your home start to dip. Remember to put on a warm hat. Sleeping bags can be pulled out and used to sleep warm.

Water and food are also easy, if you are prepared. You should have one gallon of water per day for each person in your household. That’s just for hydrating. Water used in cooking, cleaning, and bathing is extra. 55% of Americans have less than a 3-day supply of food in their homes. Is your pantry well-stocked? You should plan on eating 2,220 calories per day per person.

But don’t eat out of stress or boredom. Manage your supplies and be responsible and avoid eating just to pass the time.

So, what do you do to keep yourself and your children from going stir crazy without the television, DVD-player, and game console? How about pulling out your camping rainy day box of games? You do have one of those, right? Mine is stocked with traditional playing cards and poker chips as well as specialty card games like Uno, Skip-Bo, etc. How about chess, backgammon, cribbage? You can also head to the game closet and pull out Monopoly, Sorry or Life.

Just like camping, power outages can be beneficial in that they force us to unplug from all the electronics and reconnect to each other as a family. But the better prepared you are, the better you will be able to weather whatever nature throws at you.

Your camping skills and your outdoor cooking skills aren’t just for camping. They are good skills to have for survival.

Categories: Cooking Outdoors | Tags: , , , , , , , , , | 1 Comment

Convert or Starve!

recipe-box-612wHow do I convert home recipes for camp cooking?

Between a camp stove and a Dutch oven, you can convert just about any home recipe into a camp recipe. Why rely on cookbooks that are strictly for camp cooking? You can convert recipes from any cookbook, including your family cookbook, for cooking in camp.

Camp Stove

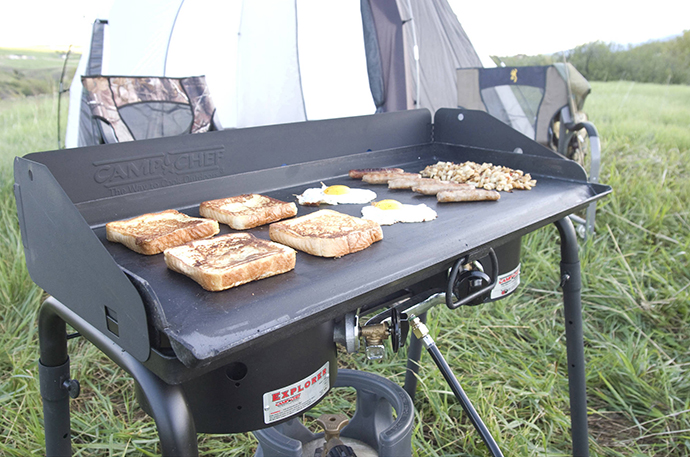
Anything you can cook on your stove top at home can be cooked on a camp stove at camp, but managing the flame on a camp stove can be a challenge. Too low and it will take forever to cook. Too high and your food will be burnt on the outside and raw on the inside. My son’s common complaint is that our camp stoves don’t come with the fancy numbered dials like our home stoves do.

When adjusting the flame on a camp stove, you need to bend down so that you can see the flame and you need to listen to the hiss of the propane gas. As you gently turn the knob and lower the flame, look and listen. Over time, you’ll get a feel for how low you can go before it extinguishes. It takes a really light touch, which you will develop with patience and practice.

To judge the temperature of an open flame, cautiously hold your hand, palm side down, over the fire at cooking height. Count the number of seconds you can hold that position and you will have an indicator of how hot the fire temperature is:

5 seconds = low

4 seconds = medium

3 seconds = medium-high

2 seconds = high

After a while, you’ll probably just be able to eyeball it.

A common mistake I see with young camp chefs is they plan a menu that requires too many things to be cooked at once. They are so used to cooking on their home stove, which has anywhere from 4 to 6 burners, they forget that their camp stove only has 2 burners and if you’re using your griddle, that consumes both of those burners. So I can’t fry bacon on the griddle and cook oatmeal at the same time.

To minimize the number of pots and burners you need in camp, you can pre-cook in your home kitchen things like sauces, noodles, meats, etc. Just remember to slightly undercook them because they will cook more at camp. When you get to camp, perhaps all you need is one pot to assemble and heat everything.

If you add a Dutch oven or two to your camp kitchen, now you’ve increased your cooking capacity.

Dutch Oven

Anything you can cook in your oven, slow cooker or bread machine at home can be cooked in a Dutch oven.

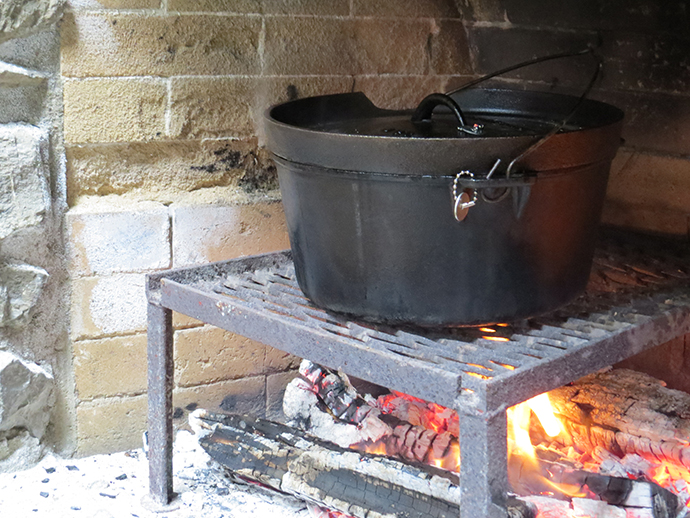
Dutch ovens are cast iron with tight fitting lids and they make excellent vessels for cooking over the campfire. They can handle high temperatures and long cook times. They are excellent heat conductors and champion slow-cookers.

Campers usually use charcoal briquettes with Dutch ovens to get the best results. For more information on charcoal, please see my blog post: “I Want Coal in my Stocking!

With a few easy modifications, you can turn any home recipe into a camp recipe. The first thing you need to determine is what size and type of Dutch oven will be most suitable for your recipe.

Ovens with shallow sides of about 4” are called “bread” ovens and the deeper sided ones are known as “stew” or “meat” ovens. The 12-inch to 16-inch regular ovens are excellent for baking pies, cakes, breads, biscuits and rolls.

The “deep” ovens can more easily handle turkeys, chickens, hams, and even standing rib roasts!

If you’re converting a casserole, quick bread, or dessert—anything that calls for a specific size of pan—you’ll want to compare the area and get as close a match as you can. This will involve a little math. Let’s convert brownies out of the box. Directions call for an 8 x 8, 9 x 9 or 7 x 11. To determine the area, multiply width by length. I’ll “show” my work below:

8 x 8 = 64

7 x 11 = 77

9 x 9 = 81

I should note here that I’m only interested in the area so I’m only working with 2 dimensions. For our brownies, we need a Dutch oven with an area between 64 and 81. Smaller area means thicker brownies; larger area means thinner brownies. So, how do we figure out the area of a round Dutch oven? I have to admit that I had to go ask my resident math geeks for how to do this, but I’m sure that once I give you the answer, like me, you’ll slap your forehead and say, “Oh, ya, I remember that!” We need to use the math formula πr2 (read: Pi times radius squared).

Pie?! I Like Pie!

Yes! You could bake a pie in a Dutch oven, but I digress. Back to our math homework. To simplify my math, I’m going to use the rounded version of π (Pi), which is 3.14, and multiply it by the radius squared, which is half the diameter of my Dutch oven multiplied by itself. With me so far? I’ll start with my 10-inch Dutch oven and show my work below:

First, I will find the radius of my oven by dividing its diameter – its size – in half. For my 10-inch oven;

10 / 2 = 5

So my radius, r, is 5. Easy!

Next, I need to “square” the radius by multiplying it by itself,

5 x 5 = 25

Now it’s time to multiply my squared radius, (r2 = 25), by π (for which I am using the simplified value of 3.14),

25 x 3.14 = 79

Bazinga! The area of my 10-inch Dutch oven is 79, which is really close to the area of a 7×11 baking dish.

Just for giggles, I used the same formula for my 12-inch Dutch oven and it has an area of 113, which turns out to be a little too big and would make really thin brownies that will likely burn – and nobody likes burnt brownies! So, it looks like my 10-inch Dutch oven is “just right” for the box of brownies. (I should add here that a double batch of brownies would fit just about perfectly in a 14-inch Dutch oven, which has an area of 154.)

If you’re cooking a stew or something that needs volume, the recipe will most likely tell you what size pot (in quarts) you’ll need. The chart below will show you (in quarts) how much a Dutch oven can hold.

do_size_card

Betcha didn’t think you’d be doing so much math, did ya?! Well, a lot of cooking is a science as well as an art.

Cooking Temperature and Time

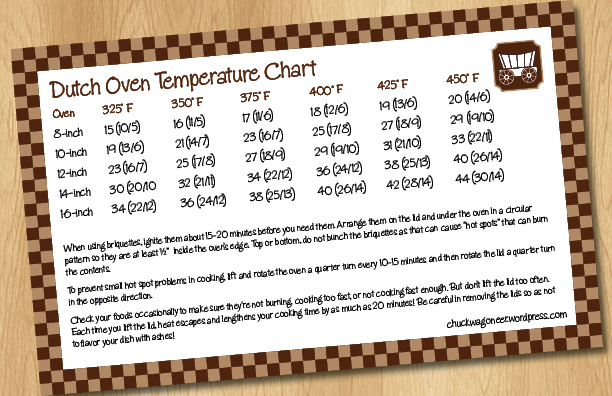
Check your recipe for baking temperature. Using the chart below, find your required oven temperature and then run down that column to the size Dutch oven you’re using. This is how many coals you’ll need. The first number is your total number of coals. The numbers inside the parenthesis is a breakdown of how many coals go on top and how many coals go underneath. This is a typical distribution of coals. Some recipes may require a slightly different distribution of coals depending on whether you want more heat on the top or the bottom. Make a test batch and adjust your distribution if you need to. If you are cooking in really cold temperatures, you may want to throw a few more coals on, but try to maintain that 2:1 ratio or two-thirds of your coals on top and one-third of your coals underneath.

do_temp_card

Refer to the recipe for the length of cooking time. If you’re camping in high altitude you may want to cook things a smidge longer.

Prep Work

Now you just need to decide how much prep you want to do in camp versus at home or are there ways to simplify the prep for camp? Does the recipe call for noodles or meat that could be pre-cooked at home? Could you cook the noodles in the pot with the rest of the ingredients and just add water or more liquid for the noodles to absorb? Are there dry ingredients that could be pre-mixed at home and sealed in a bag or container? Determine how you want to prep it and then I would recommend prepping it like you would for camp and doing a test batch at home before taking it to camp.

So that’s really all there is to converting your home recipes to camp recipes. Now you can take that favorite family recipe and make it in camp! How cool is that?!

Let’s get outside and get cooking!

Categories: Cooking Outdoors, Dutch Oven | Tags: , , , , , , , , , , , | Leave a comment

Blog at WordPress.com.