Box Oven

Tex-Mex Tater Tot Casserole

This is a great year-round dish. It’s hot and hearty, it packs a little heat to warm your belly, but it is surprisingly light. So, regardless of the season or the climate, this is a great dish. It’s also very versatile and can be easily customized to your tastes and dietary needs. For example, we have a family member who can’t have corn so we serve the corn on the side and those of us who can have corn simply mix it in on our plates.

The black beans could be swapped out for a different kind of bean. The green chiles could be swapped for something hotter. The taco seasoning can be adjusted as can the cheese blend. I encourage you to modify and make it your own, but first try this version because it is pretty darned good.

At home, you can make this using a skillet and a casserole dish or, if your skillet is large enough and oven proof, you could make it all in the one skillet. In camp, you could make this using the same skillet and casserole dish combo with a box oven or you could do the whole thing in a Dutch oven.

Start to finish, this takes about an hour to get on the table, which is nice and while it’s baking, you can prepare your side dishes. I recommend a green salad with a cool creamy dressing, cornbread, or simply a handful of chips. You’ll also want to have some sour cream and salsa handy, as well as a good hot sauce for those who like it spicy! Chop some fresh cilantro for a garnish and serve with a pitcher of lemonade and/or margaritas.

Equipment
12-inch skillet, 9×13 casserole dish, and box oven; or 12-inch Dutch oven

Ingredients for casserole
1 pound ground beef
1/2 onion, diced (about 1/2 cup)
1 batch taco seasoning mix (see my recipe below) or you could use a store-bought packet
1 (4-ounce) can green chiles
1 (15.5-ounce) can black beans, rinsed and drained
1 (14.4-ounce) bag frozen corn
1 (10-ounce) can red enchilada sauce
3 cups shredded cheddar and Monterey jack cheese or your favorite mexi-blend, divided
4-5 cups frozen tater tots
Cilantro, optional garnish
Sour cream, optional

Taco Seasoning Mix
(This is for 1-pound of ground protein)
1 teaspoon garlic powder
1 teaspoon onion powder
1/2 teaspoon oregano
1/2 teaspoon black pepper
1 tablespoon chili powder
1 teaspoon paprika
1/4 teaspoon red pepper flakes
1/2 teaspoon salt
2 teaspoons cumin
3-6 dashes of Tabasco sauce, added separately (I mixed it into the enchilada sauce)

Prep
Prep coals or preheat oven for 375°F. For home or a box oven, spray a 9×13 baking dish with non-stick cooking spray.

Over coals or a camp stove or stove top, on medium heat, using a 12-inch skillet or a Dutch oven, brown the ground beef and sauté the onion until thoroughly cooked. Drain off excess fat if you need to. Add the taco seasoning, enchilada sauce, green chiles, black beans, frozen corn and stir until combined. Simmer for about 8 to 10 minutes.

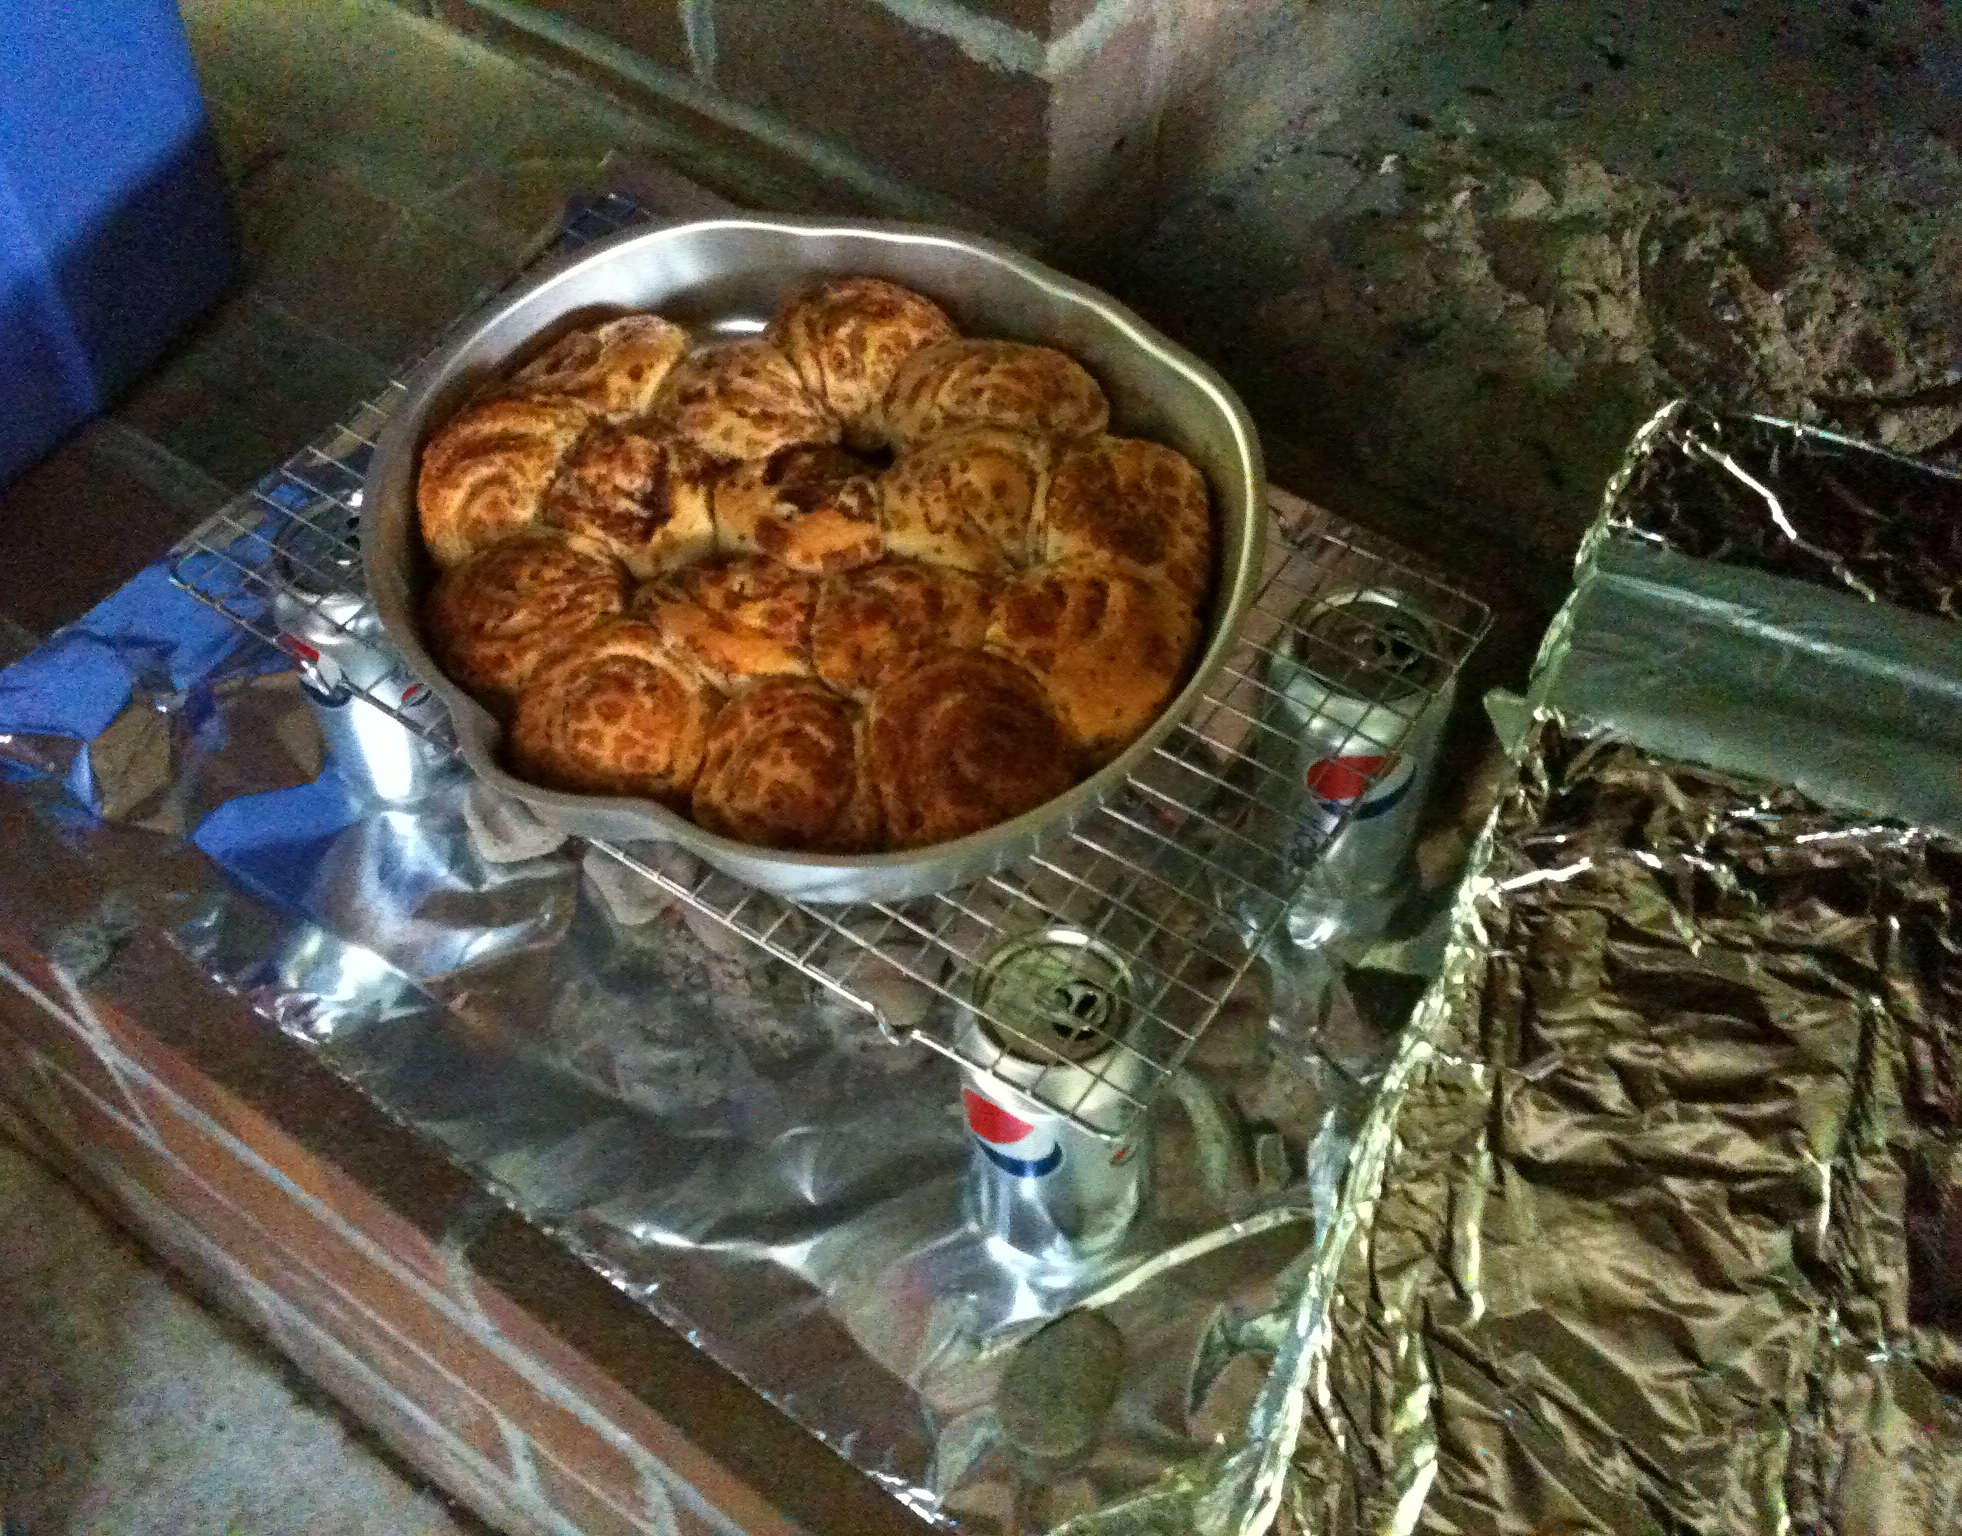
For the skillet/casserole dish to oven method, pour the meat mixture into the casserole dish, sprinkle on 2 cups of the cheese, and gently place the tator tots on top (you don’t want them mixed in). Make sure the tator tots are spread evenly over the top in one layer. The casserole dish can go into a 375°F box oven or home oven. The box oven will need about 15 coals.

For the skillet or Dutch oven method, remove from heat and let it rest for just a moment to stop bubbling. Sprinkle on 2 cups of the cheese, and gently place the tator tots on top (you don’t want them mixed in). Make sure the tator tots are spread evenly over the top in one layer. The skillet can go directly into the 375°F oven. The Dutch oven can be lidded and moved to coals on the top and bottom for a 375°F oven. A 12-inch Dutch oven will need about 27 coals (18 on the top and 9 underneath).

Bake for 35-40 minutes then sprinkle the remaining cup of cheese over the top and bake another 5 minutes or until cheese is melted. Serve with chopped cilantro, sour cream, chips and salsa, salad, and/or cornbread.

Serves about 8.

If you like this blog and don’t want to miss a single post, subscribe to Chuck Wagoneer by clicking on the Follow Us button in the upper right corner and follow us on Facebook and Pinterest for the latest updates and more stuff!

Categories: Box Oven, Dutch Oven, Main Dishes, Recipes | Tags: , , , , , , , , , , , , , | Leave a comment

Cheddar Herb Biscuits

These biscuits are little flavor bombs. They are light and fluffy and super cheesy.  The garlic adds savoriness while the buttermilk adds tanginess, and the cayenne gives it just a bit of a kick. They go well with a hearty stew or chili or jambalaya. Really, I think they could go with just about anything. You can serve them with breakfast or dinner.

They go together really easy and could be baked in a Dutch oven or in a box oven. While you could serve them with butter, they don’t really need anything. They are perfect all on their own. Be warned, once you start eating them, you’ll find it difficult to stop and before you know it, they’ll have disappeared and all that will be left will be that tingle from the cayenne.

Ingredients for Biscuits
2 cups all-purpose flour
1 tablespoon sugar
1 tablespoon baking powder
2 teaspoons garlic powder
1/2 teaspoon salt
1/4 teaspoon cayenne pepper
1 cup buttermilk
1/2 cup unsalted butter, melted
1 1/2 cups shredded sharp cheddar cheese
1/2 tablespoon parsley, fresh, or 1/2 teaspoon dried

Ingredients for Topping
4 tablespoons unsalted butter, melted
1/2 tablespoon parsley chopped fresh or 1/2 teaspoon dried
1/2 teaspoon garlic powder

Prep
At home, before you go, combine flour, sugar, baking powder, garlic powder, salt, and cayenne pepper. Load into a resealable bag or an airtight container and add it to your food tote.

In camp, melt your butter and then start your coals according to your baking method. For a box oven, 15-18 ought to do. Coals for a Dutch oven will depend on the size of the Dutch oven you’re using. Check my Dutch Oven Size Chart and Temperature Guide on the Resources page. The temperature of your oven needs to be 450°F.

I recommend using parchment paper to bake on because the cheese makes them just a bit sticky.

Dump your dry ingredients into a medium or large bowl. In a 2-cup measuring cup or a small bowl, whisk together buttermilk and melted butter. Pour mixture over dry ingredients and stir using a rubber spatula just until moist. Gently fold in cheese and parsley.

Using a standard ice cream scoop or a 1/4-cup measuring cup, scoop the batter evenly onto the prepared baking sheet or into the prepared Dutch oven. Leave a little space between the biscuits. Bake for 10-12 minutes, or until golden brown.

For the topping, whisk together melted butter, parsley, and garlic powder in a small bowl. Brush the tops of the biscuits and serve immediately.

Makes about 12 biscuits.

If you like this blog and don’t want to miss a single post, subscribe to Chuck Wagoneer by clicking on the Follow Us button in the upper right corner and follow us on Facebook and Pinterest for the latest updates and more stuff!

Categories: Box Oven, Breakfasts, Dutch Oven, Recipes, Sides | Tags: , , , , , , , , , , , , , , | 2 Comments

Easy Peasy Peach Crisp

My sister is going peach picking soon, so now I’m dreaming of peach pie, peach cobbler, and peach crisp. I made this peach crisp about a month ago and it was so yummy, I made it again this past weekend!

This peach crisp is sweet and delicious. The topping is light and crispy. It’s the perfect dessert on a warm summer night. Pack along some vanilla ice cream in a cooler with a lot of ice and/or dry ice and you have a match made in heaven!

When I’m teaching and/or cooking for a large group, I often need to accommodate food allergies. That was the case a few weeks ago when I was teaching outdoor cooking to Cub Scout and Boy Scout leaders. I wanted to make a Dutch oven dessert that was gluten free. Crisps are a great way to do that because they typically require very little flour or what flour there is can be easily substituted with almond and/or rice flour. The almond flour will add just a bit of nuttiness and the rice flour will bring a bit of snappy crispness. Both are a straight across 1-to-1 substitution for all-purpose flour. I made this one with almond flour.

If you don’t have any nut allergies in your group, add some chopped walnuts or pecans to the topping for added crunch and flavor. About a handful ought to do it. Eyeball it. You can’t go wrong!

You can use fresh, frozen or canned peaches for this recipe. If using frozen peaches, thaw, and drain any excess liquid. If using canned peaches, use peaches that are canned in juice (not syrup) and completely drain them first.

If you don’t have a Dutch oven, you could make this in a pie or baking dish and bake in a box oven.

A lot of the prep for this crisp can be done at home before you go. When you get to camp, all you have to do is assemble and bake. Easy peachy peasy!

Equipment
10-inch Dutch oven, 9-inch pie plate or an 8×8 baking dish. You could double the recipe and use a 12-inch Dutch oven.

Ingredients for the Topping
½ cup almond flour, rice flour or all-purpose flour
¾ cup brown sugar
½ teaspoon ground cinnamon
¼ teaspoon salt
½ cup cold unsalted butter, cubed into small pieces
1 cup old-fashioned rolled oats

Ingredients for the Filling
5 cups peaches (about 6-7 medium peaches), sliced or diced
⅓ cup granulated sugar
¼ cup almond flour, rice flour or all-purpose flour

At Home Before You Go
For the topping, mix together the dry ingredients and load into a resealable gallon freezer bag. Cut up the butter into small cubes and load into a small plastic container. Toss it into the freezer to get it extra chilled before loading it into the cooler.

For the filling, combine the sugar and flour into a resealable gallon freezer bag. The topping dry ingredients bag and the filling dry ingredients bag can ride to camp in your food tote. The butter and peaches will ride in your cooler. Pack something to grease your Dutch oven or baking dish.

In Camp
Grease your Dutch oven or the foil lining, or your pie plate or baking dish. Start your coals or preheat your oven (if making at home). You’ll need about 21 coals for a 10-inch oven, 25 for a 12-inch Dutch oven, or about 14 coals for a box oven.

For the filling, add the peaches to the freezer bag with the filling dry ingredients, seal the bag, and mix it up until all the peaches are coated with the sugar and flour. Dump the peaches into the prepared Dutch oven or baking dish.

For the topping, add the cold, cubed butter to the freezer bag with the topping dry ingredients, seal the bag, and mush it together until it starts to come together and is crumbly. Sprinkle evenly over the peaches.

Bake in a 350°F oven for 40-50 minutes or until the topping is lightly golden brown and the juices are bubbling around the edges. For a 10-inch Dutch oven use 14 coals on the lid and 7 underneath. If you’re doubling and using a 12-inch Dutch oven, use 17 coals on the lid and 8 underneath. Refresh coals as needed.

How easy was that? Serve with whipped cream or ice cream.

Serves about 6.

This post has been shared at Homestead Bloggers Network. If you like this blog and don’t want to miss a single post, subscribe to Chuck Wagoneer by clicking on the Follow Us button in the upper right corner and follow us on Facebook and Pinterest for the latest updates and more stuff!

Categories: Box Oven, Desserts, Dutch Oven, Recipes | Tags: , , , , , , , , , , , , , | 1 Comment

Enchilada Pull-Aparts

enchilada_pull-aparts_img_2090_690px

The first time I made these, I accidentally used diced jalapenos instead of diced green chilies. They were just a wee bit spicy, but we still really liked them. In addition to being hot and tasty, these go together in a snap and take only 30 minutes to bake. You can easily have dinner on the picnic table in under an hour. Serve with sour cream, guacamole, and a salad, and you have a great meal.

This is also a dish that you can easily customize. I did, without even intending to, when I swapped the diced green chilies for diced jalapenos. You could swap the red enchilada sauce for green or swap the ground beef for chicken. You could add black beans, diced tomatoes, or some corn. Whatever floats your boat. Have some fun and make it your own. I’ll bet it becomes a family favorite.

Equipment
12-inch Dutch oven or 9×13 baking dish.

Ingredients
1 package of refrigerated biscuit dough
10 ounces enchilada sauce (we like to use red)
1 pound ground beef
1 packet taco seasoning or use your own mix
4 ounce can diced green chilies or diced jalapenos
1 cup grated cheddar cheese
1 cup grated pepper jack or Monterey jack cheese

Prep

On a propane stove or over coals, in a Dutch oven, brown the ground beef. Drain the grease and stir in the taco seasoning and 2 tablespoons of water. Stir in the diced green chilies or jalapenos. Remove from heat and set aside. Start your coals.

Open the biscuits and slice each biscuit into 8 small pieces. Add the biscuits and enchilada sauce to the Dutch oven and lightly mix everything together like tossing a salad. Sprinkle the cheese evenly over the top.

Bake in a 350°F oven, using 17 coals on the lid and 8 underneath, for 30 minutes or until the biscuits are cooked through and the cheese is fully melted. You could also load this into a 9×13 baking pan and bake it in a box oven, using about 14 coals.

Top with cilantro, avocado or guacamole, sour cream, hot sauce, etc.

Serves about 8

This post has been shared at Homestead Bloggers Network. If you like this blog and don’t want to miss a single post, subscribe to Chuck Wagoneer by clicking on the Follow Us button in the upper right corner and follow us on Facebook and Pinterest for the latest updates and more stuff!

Categories: Box Oven, Dutch Oven, Main Dishes, Recipes | Tags: , , , , , , , , , , , , | 1 Comment

Chicken Mini Pies

Chicken_Mini_Pies_IMG_1977_690pxThis has to be one of our family’s top 10 favorite things to eat. We don’t make them very often because they are a bit labor intensive, but they are well worth the effort. In fact, they taste so yummy that we nearly devour them as soon as they come out of the oven, piping hot and scalding our mouths in the process. But we just can’t stop ourselves. They are that yummy.

The cream cheese chicken mixture is well seasoned, but not spicy. It goes so well with the paprika seasoned pie crust. It’s comfort food you can hold in your hand.

To make assembly in camp easier, both the pie crust and the filling could be made ahead of time at home and ride to camp in a cooler. Here are a few more tricks we’ve learned along the way.

We chop all the vegetables really fine so every pie gets a nice variety of goodies. Dicing the veggies extra small also makes sure the filling is not too lumpy, which makes assembling the pies harder. When making the filling, we add the celery at the very last so it’s still a little crisp, but don’t forget to add it (like I’ve never done that before).

For the poultry seasoning, we prefer Johnny’s but you could also use Lawry’s or whatever poultry seasoning happens to be your favorite.

We make our own pie dough from scratch in 2 batches. I’ve tried to make one big batch, but it’s too hard to handle. For a flakier pie crust, make sure to refrigerate the dough before rolling out. So, making ahead actually works better for the pie crust.

If you choose to use store-bought pie dough, just give it a light, even, dusting of paprika as you roll it out. Use about a teaspoon of paprika and evenly distribute across your pie crusts. The pies won’t taste the same without the paprika pie dough. And you’ll need the equivalent of about 4-5 pie crusts.

To cut out the pastry rounds, we use Pampered Chef’s 4-inch round cut-n-seal or you can use a 4-inch biscuit cutter and then crimp the edges with a fork. I can bake 4 at a time in a 12-inch Dutch oven.

Chicken_Mini_Pies_IMG_1972_690px

I can bake 7 at a time in my 16-inch Dutch oven.

Chicken_Mini_Pies_IMG_1973_690pxI can bake 8 on a 17¼ x 11¼ baking sheet in a box oven (apple box) or a regular home oven.

Chicken_Mini_Pies_IMG_1968_690pxFor instructions on how to make a box oven, see my blog post, “DIY How to Build a Box Oven.”

Any way you bake them, they will disappear as fast as you can make them. Make sure you get one before they are gone!

Equipment
Dutch oven or 17¼ x 11¼ baking sheet, skillet, mixing bowl, pastry cutter, measuring cups and spoons, 4-inch round cut-n-seal or 4-inch biscuit cutter, and a 2-tablespoon ice cream scoop.

Filling Ingredients
¼ cup celery, finely diced
¼ cup onion, finely diced
3 tablespoons butter
3 cups chicken, cooked and finely shredded, fresh or 2 13-ounce cans
3 tablespoons chicken broth
½ teaspoon poultry seasoning
½ teaspoon pepper
½ teaspoon garlic powder
½ cup cream cheese

Pastry Ingredients (make 2 batches)
3 cups flour
1 teaspoon salt
½ teaspoon paprika
1 cup cold butter, grated or diced
8-10 tablespoons cold water

Prep Work for the Filling

In a large skillet, sauté onion in butter. Stir in chicken, broth, seasonings, and cream cheese. To the chicken mixture, add the celery and just heat it through.

Prep Work for the Pastry

Sift together flour, salt and paprika. Cut in butter until it resembles small peas. Gradually add water until ball forms. Shape into a disk and wrap in plastic wrap and refrigerate until chilled. Roll out pastry to 1/16-inch thickness. Cut rounds.

Assembly of the Meat Pies

Mound 2 tablespoons of filling on half of the rounds you cut (we use a small 2-tablespoon ice cream scoop).

Chicken_Mini_Pies_IMG_1964_690pxMoisten edges with water; place another round on top and seal the edges either with the cut-n-seal or with a fork.

Chicken_Mini_Pies_IMG_1965_690pxPlace in ungreased Dutch oven or on ungreased cooking sheet. Prick tops with a fork. Bake in a 375°F oven for 20 minutes or until golden brown.

For a box oven, you’ll need about 15 coals.

For a 12-inch Dutch oven, you’ll need 27 coals, 9 underneath and 18 on the lid.

For a 16-inch Dutch oven, you’ll use 38 coals, 13 underneath and 25 on the lid.

Makes about 20 pies, which will feed 10 if everyone has 2 pies or 6 if everyone has 3 pies (it’s been known to happen). If there are leftovers, at home, they reheat very nicely in the microwave. In camp, we just wrap them in foil and warm them by the fire.

Chicken_Mini_Pies_IMG_1981_690px

This post has been shared at Homestead Bloggers Network. If you like this blog and don’t want to miss a single post, subscribe to Chuck Wagoneer by clicking on the Follow Us button in the upper right corner and follow us on Facebook and Pinterest for the latest updates and more stuff!


Categories: Box Oven, Dutch Oven, Main Dishes, Recipes | Tags: , , , , , , , , , , , , , , , | 1 Comment

Bakin’ Bacon in a Box Oven

Bacon05_IMG_1010_690px

Saturday was International Bacon Day! Did you fry some bacon while you were camping? I know, silly question. Of course, you did!

Making bacon in camp can be hard to manage because of all the bacon grease. Your griddle or flat-top grill just gets overrun with it. But did you know you can bake bacon in a box oven? Not only does this manage the grease a little better, but also frees up your griddle or flat-top for other fun, like pancakes, hashbrowns or eggs.

We knew bacon could be baked in the oven at home and we had baked bacon in the big camp kitchens, which is a great way to do it if you’re feeding a bunch of hungry campers; so why wouldn’t it work in a box oven at camp? We decided to try it on one of our Girl Scout campouts and it worked! Here’s how we did it:

We lined a rimmed baking pan with parchment paper. The pan must be rimmed or you’re going to have bacon grease everywhere! The parchment paper will help manage the grease. Lay your bacon out on the pan in a single layer. They can touch but not overlap.

Bacon03_IMG_1006_690pxIn a regular oven, you would bake at 375° for 18 to 20 minutes or until it reaches your desired level of crispness. There is no need to flip it. Just let it do its thing. When it’s done, use tongs to transfer the bacon to a paper-towel lined plate.

In camp, in the box oven, we found we needed a little hotter oven. We bumped it up to 425° using 17 coals. I’d also recommend soup or juice cans to elevate your baking sheet, which are shorter and will place your baking sheet closer to the coals.

Our box oven was an apple box, my favorite. For instructions on how to make a box oven, see my blog post, “DIY Box Oven.” An apple box will accommodate a standard 17¼ x 11¼ baking sheet, which will hold about 10 slices of bacon, depending on the size of your bacon. If you are feeding a crowd, you may want a second box oven or you may need to make a couple of batches. If making multiple batches, you can always wrap the bacon in foil and place it near the fire to keep it warm, although I don’t mind cold bacon. I mean, bacon is bacon, right?

Bacon03_IMG_1008_690pxSo, the next time you camp, try baking bacon in a box oven. You may need to experiment a little to find the temperature and time combination that will give you bacon to your desired doneness, but it’s worth every bake, because you’re making bacon! Don’t be so distracted by the magic in your box oven you forget you can have hashbrowns and eggs going on the griddle, while the bacon is baking.

Get out outside and cook something amazing!

If you like this blog and don’t want to miss a single post, subscribe to Chuck Wagoneer by clicking on the Follow Us button in the upper right corner and follow us on Facebook and Pinterest for the latest updates and more stuff!

Categories: Box Oven, Breakfasts, Recipes | Tags: , , , , , , , , , , | 1 Comment

DIY: How to Build a Box Oven

Box_Oven_IMG_0889_690px

A box oven is a cheap and easy way to add an oven to your outdoor cooking gear. They are simple to make and you can build as many as you want. If a Dutch oven is out of your budget, a box oven is definitely in your budget and they are so simple to make a Brownie or Cub Scout could build one. Even if you have one or more Dutch ovens, one or two box ovens can add that much more oven power to your camp kitchen. Here’s all you need to build a box oven: a cardboard box, heavy duty aluminum foil, 4 empty cans, and duct tape.

For the cardboard box, all you need is a box that is large enough to fit a cookie sheet, muffin pan, casserole or baking dish, and is about a foot high. Go to your local grocery store and ask for an empty produce box. I prefer apple boxes, banana boxes, and pineapple boxes. You can also use the bottom portion of a box that held reams of paper or you can use any other regular box and just cut the top flaps off. Whatever you use, it will probably be free! The 2 best things about apple boxes are: they are virtually the perfect size for any kind of baking, and you can use the lid and bottom to make 2 box ovens or you can nest the bottom inside the lid for a double layer, making for a better insulated oven!

Use Heavy Duty Aluminum Foil. I prefer Reynolds Wrap 18-inch.

Your cans can be empty soda pop cans, soup cans or juice cans. You just need something that will elevate your baking dish above the coals. I have a little wire rack for cooking over a small campfire that just happens to be the perfect size. But if you don’t have one of those, cans will work perfectly. Keep in mind that the smaller juice cans will place your dish closer to the coals. Conversely, the taller soda pop will place your dish farther away from the coals. To keep your cans more stable, before you bake, fill them with sand.

Box_Oven_Cans_IMG_1641_690px

How to Build the Box Oven

Using the aluminum foil in large pieces, cover the inside of the box completely with foil, placing the shiny side out. I find that using the backs of my hands to press the aluminum foil to the inside of the box results in fewer tears as I’m working. It may take a couple of layers to get all the cardboard covered but it’s important that no cardboard is exposed. Otherwise, you risk it catching fire and going up in a blaze along with your blueberry muffins! Wrap the aluminum foil over the edge and secure it to the outside using the duct tape.

That’s it! You’re done! You now have a box oven. Let’s bake something!

How to Use a Box Oven

Find a non burnable patch of ground or concrete and lay down a piece of aluminum foil, shiny side up, that is larger than your box. In the middle, arrange your rack or your four cans so they can support your baking dish and elevate it on top of the coals.

Prepare your baked dish and prep your coals. Control the baking temperature of the oven by the number of charcoal briquettes used. The average briquette will supply about 35 degrees of heat (a 350°F temperature will take 10 briquettes). If you have to round, I would round up rather than down. If it’s cold outside, you may want to add a couple extra briquettes.

Arrange the briquettes on the aluminum foil under your rack or between your cans. Set your baking dish on the rack or on the cans and carefully lower the box so that it covers everything. Important Note: Use a small rock (about an inch in diameter) to prop up one end of the box to allow in the air that the charcoal needs to burn.

Box_Oven_690px

Try not to peak at what you are baking, but if you absolutely must peak, lift the box straight up, peak, and go straight back down. You’ll lose the smallest amount of heat doing it this way.

Optional Extras

Add a window by cutting a hole in your box that is smaller than a Reynolds Oven Bag or take advantage of the hole in the top that is on most banana or pineapple boxes. Cover the box with foil as directed above, making sure to wrap foil over the edges of the hole. On the outside of the box, stretch the Reynolds oven bag across the hole and secure it with duct tape. Now you have a window for peaking.

Add an oven thermometer by punching a candy thermometer into the box so the probe is inside and the dial is on the outside.

As noted above, for added durability and insulation, use both parts of the apple box and tuck the bottom inside the lid for an extra layer of cardboard.

So, if you don’t have a Dutch oven, you can still bake in camp and, even if you do have a Dutch oven, this will add yet another baking option to your camp kitchen. Imagine the looks on your camper’s faces when you serve them amazing fresh baked muffins or biscuits for breakfast out of a discarded cardboard box!

box_oven_02_690px

If you like this blog and don’t want to miss a single post, subscribe to Chuck Wagoneer by clicking on the Follow Us button in the upper right corner and follow us on Facebook and Pinterest for the latest updates and more stuff!

Categories: Box Oven, Do-It-Yourself (DIY) | Tags: , , , , , , , , , | Leave a comment

Create a free website or blog at WordPress.com.