Fan Favorites

Looking Back on the Dusty Trail of 2014

wagon_train

More than 268 followers. 54 posts. 61 comments. More than 6,000 page views. 5 new recipe sub categories.

Wow! What a year!

I want to thank all my guinea pigs, I mean, family, friends, and scouts who taste tested every recipe I blogged about, and for all your comments and suggestions for blog ideas.

Let’s celebrate 2014 and look back at the 10 posts you gave the most “hits” to this year.


10. Cast Iron Cooking Colonized and Settled America

That’s a pretty bold statement, I know, but colonizing, exploring, pioneering, and trailblazing is hard work and the men and women who did that needed to be well-fed and cast iron cooking played a huge part in nourishing their bodies and souls. Read the post.


9. Perfect Peach Cobbler

Sunday was National Peach Cobbler Day so I made this one. It’s a great recipe. The peaches on the bottom are spiced with just a little cinnamon and the biscuit topping is light and fluffy. The peach filling and the topping integrate nicely. It tastes very much like pie. We decided serving it with ice cream is best, but it is also good all by itself. Read the post.


8. Think Inside the Box Part 2-Your Camp Pantry

Hard sided totes are a good choice for your camp kitchen pantry. Totes protect delicate foods from getting smashed and bruised, and keep foods organized and gathered in one place. Totes keep most critters out. I say most because we all know nothing can stop a bear determined to have that last jelly donut! Read the post.


7. I Got a Dutch Oven! Now What?!

Adding a Dutch oven to your camp cooking equipment opens up a world of possibilities. No longer are you limited to what you can boil in a pot or fry on a griddle on your propane stove. You are also no longer limited to two burners, which is the number of burners on the average camp stove. Just like in your home kitchen, you can have multiple dishes going in your camp kitchen. Read the post.


6. The Right Tool for the Right Job

The day I decided to fill a tote with everything I would need for Dutch oven cooking was a Red Letter Day* It was also a day when I kicked myself and asked, “Why didn’t I do this sooner?!” Read the post.


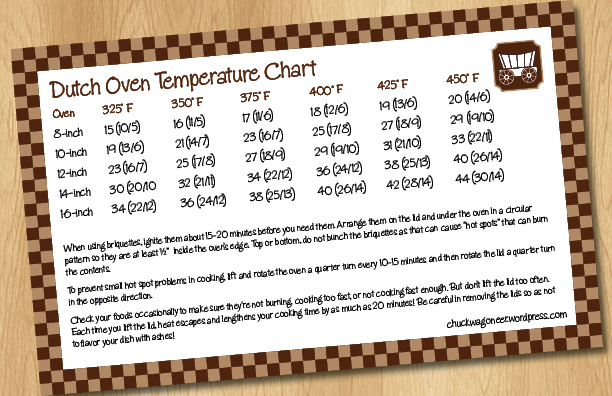
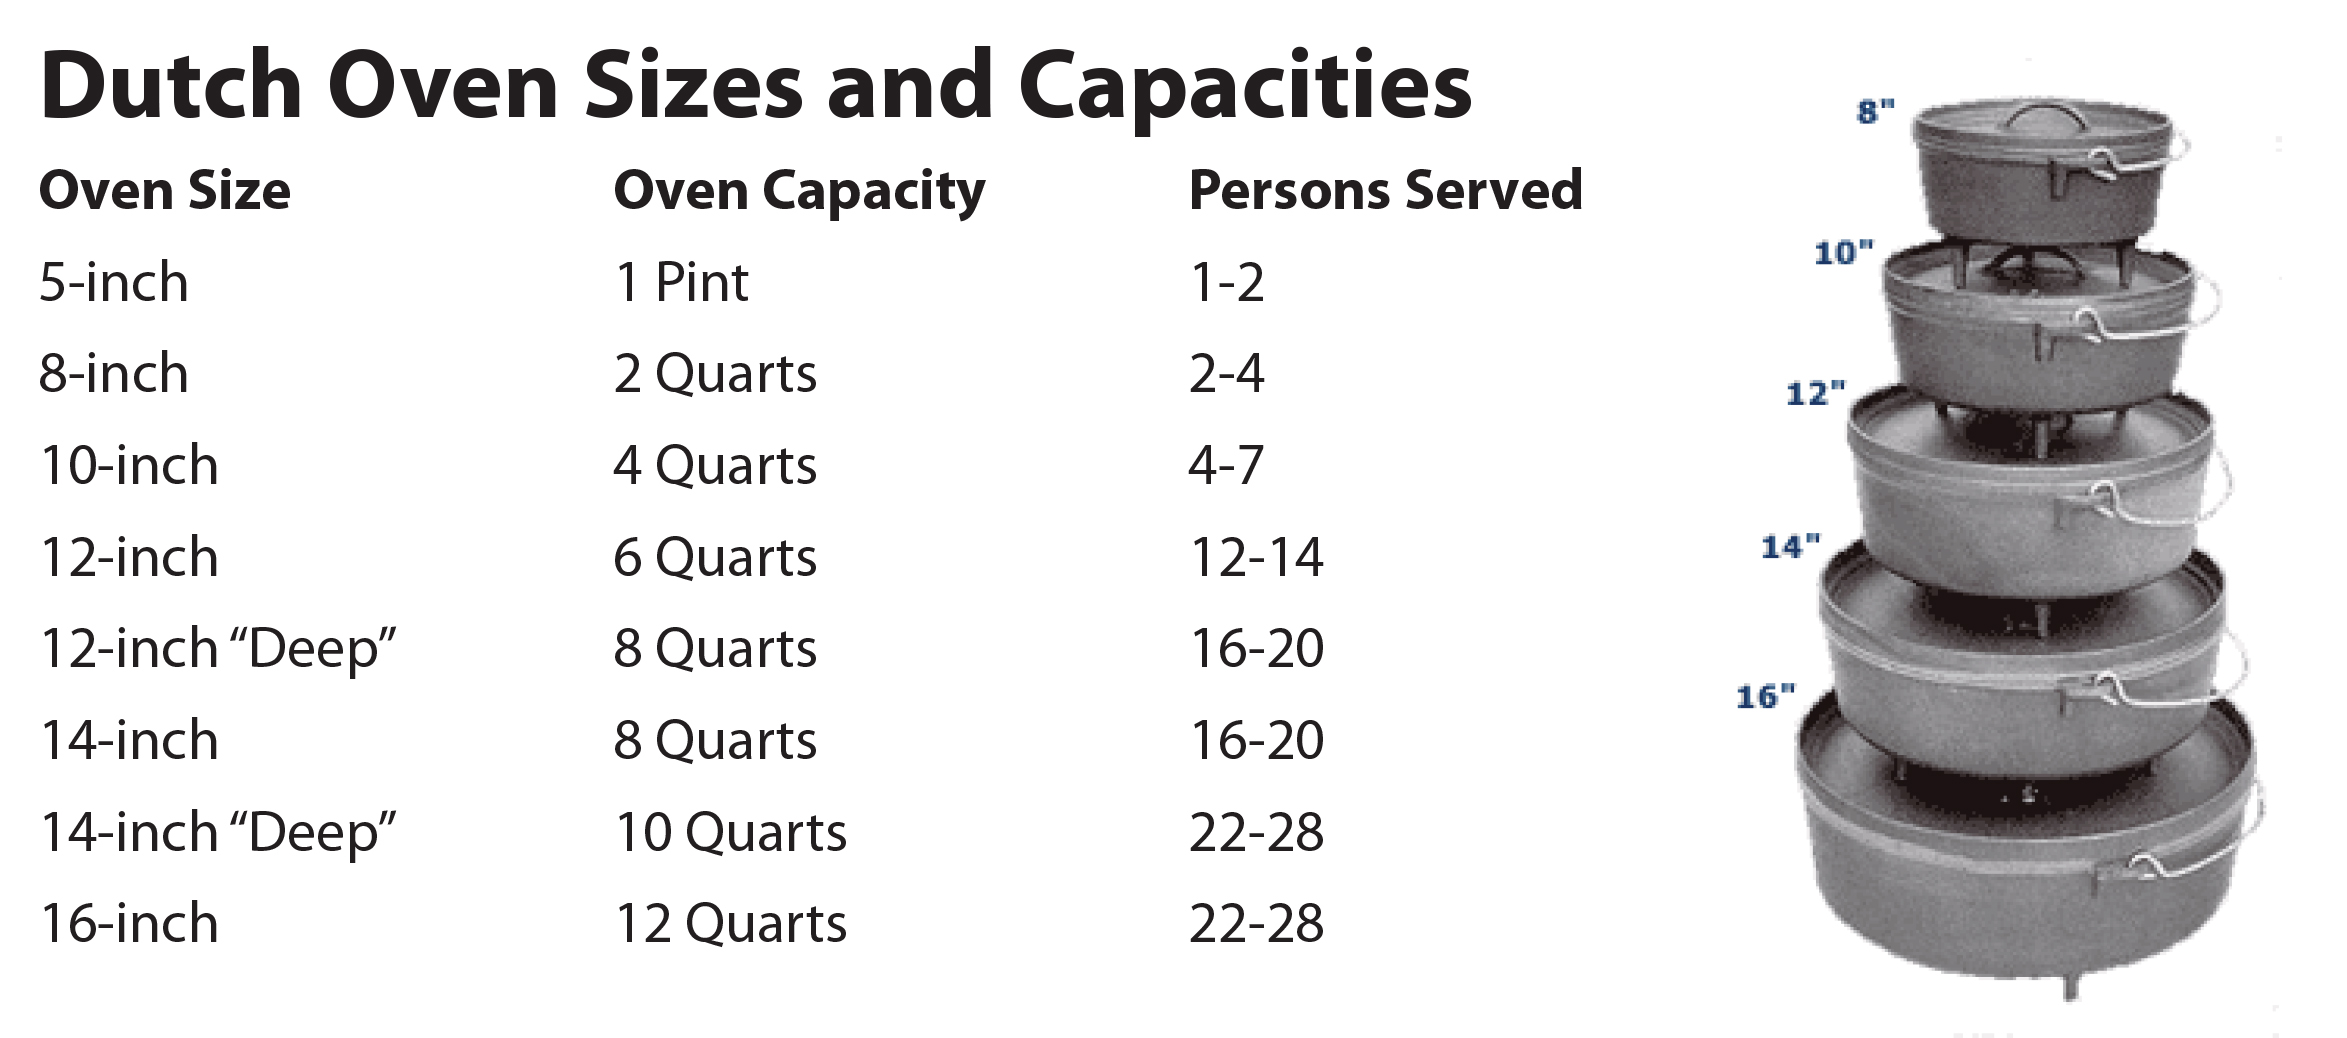
5. What Kind of Dutch Oven Should I Buy?

Recently, a friend said her husband had come back from a camping trip where he’d seen a couple of Dutch ovens in action and he wanted to get one. She wanted to know what I would recommend. Of course, my answer was, “Well, it depends.” Read the post.


4. Hash Brown Breakfast Casserole

I made this for the first time in March on our first Boy Scout campout of the season. It is my friend Susan’s recipe and she usually bakes it in the oven at home or in her RV. We thought it would be perfect for a Dutch oven and it most certainly was. We made this on Saturday morning for the Scoutmasters and it was a cold, crisp morning. This really hit the spot. It was warm, creamy, and filling. It was good all by itself, but when some of us plopped over easy fried eggs on top of it; it suddenly jumped to a whole new level of yumminess. Read the post.


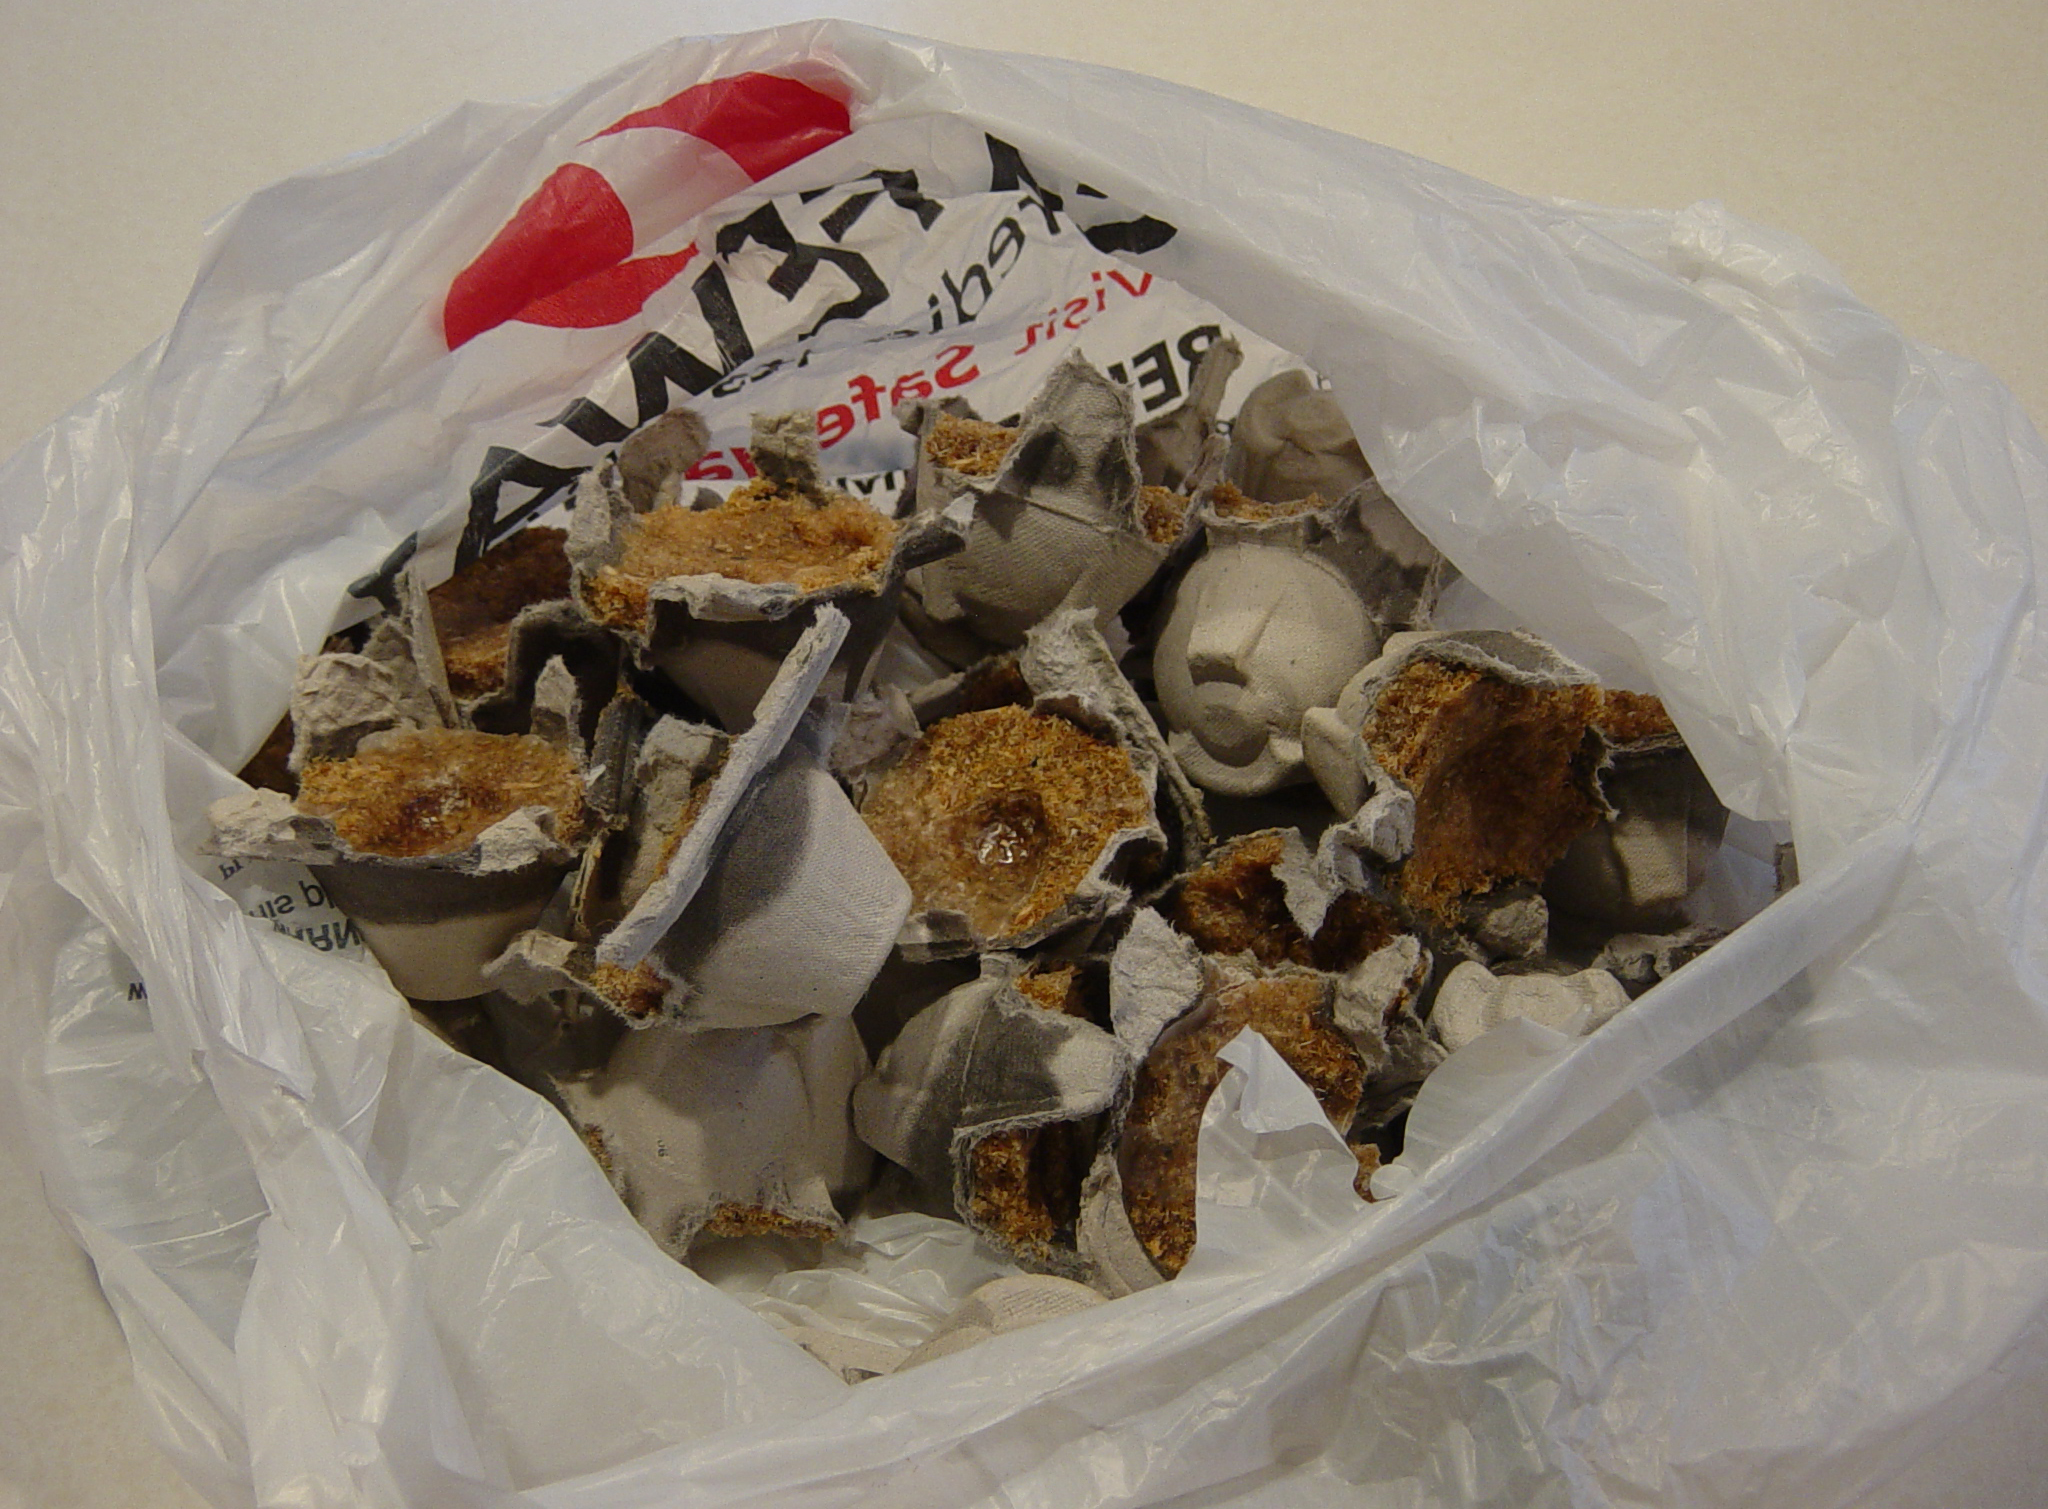
3. DIY: Making Your Own Fire Starters

In my camp kitchen, when I need coals for Dutch oven or foil cooking, I start them in 1 or 2 chimneys, depending on how many I need. To get them going, I simply toss a couple of fire starters into the bottom of the chimney, load in the coals and light the fire starters. In a matter of minutes, I have fire blazing up through the chimney and igniting my coals. Coals are ready in about 15-20 minutes. Read the post.


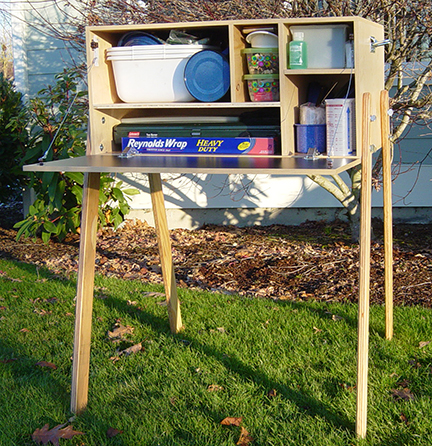
2. Think Inside the Box Part 1-Your Camp Kitchen

Usually I’m encouraging you to think outside the box, but just this once, I want you to think inside the box, specifically your chuck box—the box (or boxes) that serve as your camp kitchen. Read the post.


And the most-popular post of 2014 was …


1. Cast Iron Seasoning

The weather is turning cold, windy and rainy. We’re not doing as much camping. Now is a good time to inspect the seasoning on your cast iron. Are there any gouges or thin spots in the seasoning? Is there any rust? Does it smell funky? Read the post.


Keep those comments and suggestions coming! Now, let’s make 2015 even better and let’s get outside and get cooking!

Categories: Fan Favorites | Tags: , , , , , , , , , | 2 Comments

Hash Brown Breakfast Casserole

hashbrown_casseroleI made this for the first time in March on our first Boy Scout campout of the season. It is my friend Susan’s recipe and she usually bakes it in the oven at home or in her RV. We thought it would be perfect for a Dutch oven and it most certainly was. We made this on Saturday morning for the Scoutmasters and it was a cold, crisp morning. This really hit the spot. It was warm, creamy, and filling. It was good all by itself, but when some of us plopped over easy fried eggs on top of it; it suddenly jumped to a whole new level of yumminess.

Because it was so chilly, I probably should have added a few more coals to the Dutch oven or let it bake a little longer. The casserole was cooked all the way through, but I would have liked it a little more brown and toasty. The next time I make this, I will experiment with a hotter oven. I’d also like to add some color to this dish. Maybe add a little green onion and a red or green bell pepper. You could also add some crumbled up bacon to this. Bacon makes just about everything better! I promise to post a revised recipe after I’ve tweaked it a few times!

If you are not going to line your Dutch oven, you could melt the butter in the Dutch oven, add the rest of the ingredients and do all the mixing in the Dutch oven.

Equipment

12-inch Dutch oven or 9×13 casserole dish

Large mixing bowl

Large mixing/serving spoon

Ingredients

2 pounds shredded hash browns

3 tablespoons minced onion

1 pound (16 ounces) sour cream

1 can cream of mushroom soup

½ cup butter, melted

8 ounces shredded cheddar cheese

¼ teaspoon salt

½ teaspoon pepper

Prep Work

Start 25+ coals in a chimney.

Mix all ingredients together and pour into the Dutch oven or casserole dish. Bake in a 350°F oven, using 17 coals on the top and 8 coals underneath, for 1 hour or until the hash browns are golden brown. Serves about 16.

Categories: Breakfasts, Dutch Oven, Fan Favorites, Recipes | Tags: , , , , , , , , , , , | 3 Comments

Perfect Peach Cobbler

perfect_peach_cobblerSunday was National Peach Cobbler Day so I made this one. It’s a great recipe. The peaches on the bottom are spiced with just a little cinnamon and the biscuit topping is light and fluffy. The peach filling and the topping integrate nicely. It tastes very much like pie. We decided serving it with ice cream is best, but it is also good all by itself.

The recipe calls for canned peaches, but I imagine frozen or fresh would also work. If you go fresh or frozen, you may want to substitute some kind of fruit juice in place of the ¼ cup reserved syrup or juice from the canned peaches.

This recipe fits perfectly in a 10-inch Dutch oven or you could double it and bake it in a 14-inch Dutch oven, if you’re feeding a larger crowd. If you do double it, remember to adjust your coals for the 14-inch. If you are making this at home, you would use a 9×9 baking dish.

Equipment

10-inch Dutch oven

2 mixing bowls

Mixing/serving spoon

Fork

Measuring cups and spoons

Ingredients for the Fruit Filling

¼ cup brown sugar
1 ½ tablespoons corn starch
½ teaspoons ground cinnamon
1 teaspoon lemon juice
1 can (28 oz.) peach slices in syrup or juice
¼ cup of reserved syrup or juice from canned peaches

Ingredients for the Topping

¼ cup butter
¼ cup granulated sugar
1 egg, slightly beaten
1 teaspoon vanilla extract
1 ¼ cup all-purpose flour
1 tablespoon baking powder
½ cup milk

Prep Work

Line your Dutch oven with foil (if you want) and start 21+ coals.

For the filling, strain the peaches, reserving ¼ cup of syrup or juice. In a large bowl, combine brown sugar, corn starch, cinnamon, and lemon juice. Add the peaches and the ¼ cup of reserved juice or syrup, and toss to coat the fruit. Transfer the peach mixture to the Dutch oven.

For the topping, in a medium size bowl, cream the butter and granulating sugar (using a fork) until well combined. Add the vanilla and the lightly beaten egg. Add the flour and the baking powder alternately with the milk. Batter will be thick. Using the fork or a spoon, drop the batter over the peaches in the baking dish.

Bake in a 350°F oven, using 14 coals on the top and 7 coals underneath, for 30-35 minutes or until peaches are bubbling and topping is golden brown. Serve warm or cooled, plain or with a dollop of whipped cream or a scoop of ice cream. Serves 6.

Categories: Desserts, Dutch Oven, Fan Favorites, Recipes | Tags: , , , , , , , , , , , , | 8 Comments

Think Inside the Box Part 2-Your Camp Pantry

Hard sided totes are a good choice for your camp kitchen pantry. Totes protect delicate foods from getting smashed and bruised, and keep foods organized and gathered in one place. Totes keep most critters out. I say most because we all know nothing can stop a bear determined to have that last jelly donut!

And, critters are getting smarter. Some raccoons have learned how to open totes and even bear cans! For that reason, I always slide my totes under the picnic bench so critters can’t lift off the lid, or I use bungees or rope to secure the lids. You can also store your food totes in your car, but if you are in bear country, bears have been known to peel a car like an orange to get at the food stored inside! If you’re not familiar with the area, check with the local park rangers for food storage suggestions. Some ranger stations even have bear canisters that you can rent.

And, never, ever store any food in your tent or sleeping bag. One of our scouts learned that lesson the hard way when he had food in his tent and woke in the middle of the night to find raccoons chewing through his tent wall! He managed to scare them away but, needless to say, he didn’t sleep well the rest of the night.

At summer camp one year, there was a scout in a neighboring site who brought snacks into camp in his rolled up sleeping bag. While he and his troop mates were at the waterfront taking their swim tests, a squirrel chewed through the side of his rolled sleeping bag, ate the goodies, and then chewed its way out the other side. When he unrolled his sleeping bag, it looked like Swiss cheese! Luckily, for him, one of his Scoutmasters had brought an extra bag for just such an emergency.

Your camp pantry should be customized and built for each trip based on your planned menu. Below, are some items that you should probably always have in your pantry tote:

Salt and pepper shakers w/lids.

Cooking oil (small bottle). I prefer olive oil for its high smoke point.

Hot chocolate, apple cider, tea, coffee and/or Russian tea.

Sugar, creamer, cinnamon, and Mallow Bits. (For the awesomeness of Mallow Bits, see my blog post: “Product Review: Have You Never Been Mallow?”)

Seasonings for jazzing up your dishes on the fly or to individual tastes. Cook to the lowest tolerance level and let those who like it spicier layer on more to their liking.

Condiments (some people like hot sauce on everything).

Snacks and/or cracker barrel items. If dinner is running late, we can set out a small cracker barrel to stave off the bears so they don’t chew off a corner of the chuck box. If dinner ended up being early and/or we’ve had a late night of campfire, games or star gazing, a cracker barrel makes a great late-night snack before trudging off to bed. Little meats on crackers (like what you get in luncheables) make great cracker barrel fare (protein on a carb). A small veggie tray with a tub of ranch dressing is also good. Chips and a dip. Anything that is finger food with zero cleanup (think: pull it out, eat it, put it away). A sleeping warm trick is to eat a little protein before bed.

S’mores supplies.

Jiffy Pop Popcorn or popping corn kernels. (My son can’t go 24 hours without popcorn!)

Peanut butter and jam. This can be a snack or can supplement or replace a meal.

Container of disinfecting wipes. Good for emergency decontamination.

Paper towels.

Napkins. After eating, save your napkins and use them to wipe your dishes clean before you wash them. This will keep your wash water from getting gunky. If you’ve used them to mop up something greasy (like bacon grease), you could save them and use them later to start a fire.

Disposable grease receptacle (an empty tin can works). If you’re going to be cooking bacon or some other food that leaves a lot of grease, you need to have something that you can pour that grease into so it can cool, become solid, and be disposed of or saved for later use as a griddle lubricant or fire-starter.

So, what’s in your camp pantry? What do you think should be must haves in your food totes?

Categories: Cooking Outdoors, Fan Favorites | Tags: , , , , , , , | Leave a comment

Think Inside the Box Part 1-Your Camp Kitchen

Usually I’m encouraging you to think outside the box, but just this once, I want you to think inside the box, specifically your chuck box—the box (or boxes) that serve as your camp kitchen.

Storage is always an issue in the camp kitchen. It needs to be compact; it can’t take up a lot of room in my vehicle or at the campsite. I have a 10×10 pop-up that serves as my kitchen shelter and everything needs to fit under that and still give me room to work. It needs to be organized so I can quickly find what I want without a lot of digging. I use a small plastic container to organize all my little items like vegetable peelers, paring knives, etc. I use a plastic bread storage container for my larger tools like whisks, mixing spoons, chef’s knife, etc. I do this also for safety. I don’t want to be digging through my equipment box and slice open my hand on a sharp knife!

In scouting, we use chuck boxes. These are free-standing wooden boxes with sides that open out to provide work space. The boxes have compartments to organize and hold equipment. Chuck boxes hearken back to 1866 and the days of cattle drives and chuck wagons. For the complete story, see my blog post: “History of the Chuck Wagon.”

With a quick internet search, you can find chuck boxes to purchase (some assembly required) or you can find plans that show you how to build your own or, if you’re handy or know someone who is, you could design and build your own. My chuck box is pictured below. It was purchased from camping-boxes.com.

chuckbox_full

There are also a number of outdoor companies, including Coleman and Camp Chef that make camp kitchen organizers. However, if you’re on a tight budget, all you really need is a table or two for work space and some hard sided totes to hold your equipment. My back prefers tables with adjustable legs that I can extend up to counter height.

If you live in rain country like I do, you can use a pop up for a cook shelter or string a tarp overhead. I use a small, refillable propane tank and then I pack one propane canister in case my tank runs dry. All of my Dutch oven equipment is in its own tote. For a complete Dutch oven equipment list, see my blog post: “The Right Tool for the Right Job.”

Just as the kitchen is the hub of the home, the campfire and the camp kitchen are the hearth of your campsite. Here’s what’s in my chuck box and kitchen tote:


Prep

  • Cutting Board, Polyethylene
  • 2 Mixing Bowls, 10” Aluminum
  • Measuring Cups
  • Measuring Spoons
  • Apple Corer/Slicer
  • Pastry Cutter
  • Aluminum Foil, Heavy-Duty


Cook Kit

  • Camp Stove
  • Camp Stove Griddle
  • Lighter & Matches (in a water-tight container)
  • 8 Qt. Pot & Lid
  • Large Kettle
  • Cast Iron Skillet
  • 4 Qt. Pot & Lid
  • 2 Qt. Pot
  • Non Stick Frying Pan
  • Colander
  • Pie Pan
  • Pizza Pan
  • Coffee Pot


Large Tool Kit (in a Plastic Container)large_tool_container

  • Chef’s Knife
  • Tongs
  • Ladle
  • Whisk
  • Spatula, High Temp. Plastic
  • Large Cooking Spoon
  • Slotted Spoon
  • Turning Fork
  • Rubber Spatula
  • Scissors


Small Tool Kit (in a Plastic Container)small_tool_container

  • Paring Knife
  • Can Opener
  • Vegetable Peeler
  • Thermometer
  • Table Forks x4
  • Table Spoons x4
  • Table Knives x4


Eating Utensils

  • Plates x4
  • Bowls x4
  • Cups x4


Clean Up

  • Dish Washing Tubs x3
  • Bleach, Small Bottle
  • Dish Soap, Small Bottle
  • Sponge w/Scrubber
  • Clothesline Rope & Clothes Pins
  • Trash Bags w/Drawstring
  • Cheesecloth (for Straining Gray Water)


Linens (clean plastic grocery bag)

  • Oven Mitts x2
  • Mesh Dunk Bags (for Hanging and Air Drying Dishes)
  • Dish Washing Cloths
  • Dish Towels
  • Tablecloths for Picnic Table x2


Storage Supplies

  • Zip-loc Bags, 1 gallon
  • Zip-loc Bags, Sandwich
Categories: Cooking Outdoors, Fan Favorites | Tags: , , , , , , , , | 1 Comment

The Right Tool for the Right Job

dutch_oven_equipment_boxWhat Should You Have in Your Dutch Oven Equipment Box?

The day I decided to fill a tote with everything I would need for Dutch oven cooking was a Red Letter Day* It was also a day when I kicked myself and asked, “Why didn’t I do this sooner?!”

To have all of my Dutch oven equipment all together in one place is the next best thing to sliced bread. If I’m packing for a camping trip, an outdoor cooking workshop, or just heading to the front porch to test a new recipe, I know everything I need is in the tote and I don’t waste time getting this from here and that from there or risk forgetting something and then kicking myself when I get to camp.

So far, a 25-gallon tote holds just about everything. So, here’s what’s in my Dutch oven cooking equipment box:

Charcoal

Okay, so this doesn’t actually fit in the tote, but it sits next to the tote so I remember to grab it when I’m packing. I keep my charcoal in 5-gallon buckets. It makes it easier to carry and I don’t have to worry about the bag getting damaged while camping in wet weather, which I experience 10 months of the year.

Chimneys

Currently, I have two chimneys, which do a good job of preparing coals for my Dutch ovens. Even if I added another large Dutch oven to my collection, odds are that I would not need coals for all of them at the same time.

Fire Starters

I make my own fire starters and keep a supply in the tote in a plastic grocery bag. If you’d like to learn how to make your own fire starters, please see my blog post: “DIY: Making Your Own Fire Starters.”

Dutch Oven Stand

The stand provides a place for the coals and the Dutch oven to sit so that it’s off the cold, damp ground. If I’m teaching in someone’s home, it allows me to cook on a porch or patio. I like the stand because it is so portable. I also have four 13-quart galvanized feed pans that serve the same purpose, but on the ground. They have 4-inch sides, which provide protection for the coals that are underneath the Dutch oven.

Tongs for Handling Coals

Long, strong BBQ tongs work great for reaching deep into the chimney and pulling out coals.

Leather BBQ Gloves

Good quality gloves are a must for handling the Dutch ovens and their lids. Regular oven mitts will not protect your hands from the intense heat of the cast iron. I literally burned through my first three sets of oven mitts until I finally found a good set of leather BBQ gloves.

Lid Lifter

Choose a lid lifter that will securely lift the lid without it wobbling around or tipping. You don’t want to risk dumping hot coals into whatever you are cooking.

Dutch Oven Domes and Heat Diffuser Plates

I use these for when I want to use a Dutch oven on a camp stove or for insulating the oven in inclement weather.

Aluminum Foil

I use wide, heavy-duty aluminum foil to line my Dutch oven when I don’t want to use a liner. I’ve found over the years, that some recipes just don’t do well with the parchment-style liners and I don’t have the budget to stock the pre-formed aluminum ones. The foil is also necessary if you’re planning to do any foil cooking over coals or the fire.

Liners

These are one-size fits all (20-inch diameter) parchment paper liners to use in the Dutch oven to make cleaning up easy and fast. The only brands I know that make them are Lodge and Coleman. If you know of another brand, let me know.

Lid Rests

My lid rests are homemade. The rests give my lids a place to sit and keep them off the ground in case they need to go back onto the oven.

Thermometers

I have a clip-on thermometer for meat and candy for when I want to fry something and need oil to be a certain temperature. I also keep a small hand held one for testing the doneness of meats. Two of my Dutch ovens have a thermometer slot that allows you to check internal temperatures without removing the lid but, currently, I only have one thermometer with a probe so that has to pull double duty. It “lives” in my home kitchen and gets added to the camp box when needed.

Trivet

A trivet sits inside the Dutch oven, providing a small rack to rest a pan on if I want to bake something like a pie or a pizza.

Polycarbonate Scrapers, Scrubbers & Brushes

I use these to clean the Dutch ovens. A good scraper and really hot water is all you need to clean your Dutch ovens.

Unrefined, Organic Flaxseed Oil for Seasoning

After each outing, I apply a thin (really thin) coat with my hands to thoroughly dried cast iron and wipe off any excess with a clean wash cloth. I don’t like to use paper towels because they leave little towel fibers behind. For more information on seasoning cast iron, please see my blog post: “Cast Iron Seasoning.”

Lighters & Matches

I usually pack two lighters; the one I’m currently using and a spare. I pack matches as a back up on the off chance that both my lighters die.

Rubber Gloves

When cleaning my Dutch ovens, I use blistering hot water and that’s a little hot even for my asbestos hands. Wearing the rubber gloves allows me to start scrubbing the pot while the water is hotter.

Small Straw Broom

I use the broom for sweeping coals off the Dutch oven lid and off my stand. It needs to be straw; otherwise, you’ll melt the broom!

You by no means need to have all of these things to cook with a Dutch oven. And some of these could be constructed using materials you could find around the house. The right tools always make any job easier and cooking is no different.


*A red letter day (sometimes hyphenated as red-letter day) is any day of special significance. The term originates from medieval church calendars. Illuminated manuscripts often marked initial capitals and highlighted words in red ink, known as rubrics. The First Council of Nicaea in 325 decreed the saints’ days, feasts and other holy days, which came to be printed on church calendars in red. The term came into wider usage with the appearance in 1549 of the first Book of Common Prayer in which the calendar showed special holy days in red ink. Many current calendars have special dates and holidays such as Sundays, Christmas Day and Midsummer Day rendered in red color instead of black.

Categories: Cooking Outdoors, Dutch Oven, Fan Favorites | Tags: , , , , , , , , , | 1 Comment

I Got a Dutch Oven! Now What?!

Dutch-oven-cookingAdding a Dutch oven to your camp cooking equipment opens up a world of possibilities. No longer are you limited to what you can boil in a pot or fry on a griddle on your propane stove. You are also no longer limited to two burners, which is the number of burners on the average camp stove. Just like in your home kitchen, you can have multiple dishes going in your camp kitchen.

Just about anything you bake in a regular oven—pies, breads, stews—can be baked in a Dutch oven, using hot charcoal in your campfire ring. Depending on the size of your Dutch oven, you could roast a chicken, turkey or standing rib roast. You can bake casseroles and pizza. Again, the possibilities are just about endless.

Whether your Dutch oven is new from the store (preseasoned or unseasoned) or a hand-me-down or a fantastic find, you need to make sure it is clean and seasoned before you use it. For more information on how to restore your cast iron or season your cast iron, please see my blog posts: “Restoring Cast Iron” and “Cast Iron Seasoning.”

Re-season your oven regularly and especially if it starts to rust, smells rancid, or food has a metallic taste—this is a sign your seasoning has been removed. You’ll want to maintain that black patina (like a satin black bowling ball) to maintain the non-stick qualities and protect your oven from rust.

Once your Dutch oven is seasoned it should never be scrubbed with soap. I find really hot water and a polycarbonate scraper works wonders. For easy cleanup, you can line the bottom and the sides of the Dutch oven with aluminum foil or you can purchase parchment liners.

When you dry your cast iron, be sure to dry it thoroughly. Remember that cast iron is porous and you’ll want to get any water out of all those pores. I like to set mine on or near the fire and let the heat of the fire dry any water I wasn’t able to get with a towel.

A Dutch oven seems indestructible, but it will shatter if dropped on hard cement (I know this from experience). Never pour cold water into a hot oven or you may crack it and cause permanent damage to the oven.

Store the oven in a warm, dry place with the lid cracked so air can circulate inside.

Now that you know how to care for your Dutch oven, let’s talk about how to actually cook with it. Start with good quality charcoal briquettes. Briquettes provide a long lasting, even heat source and are easier to use than wood coals, particularly if you are new to Dutch oven cooking. Briquettes will last for about an hour and will need to be replenished if longer cooking times are required. For more information on charcoal, please see my blog post: “I Want Coal in My Stocking.”

The number of briquettes you need will vary depending on the size of your Dutch oven and the temperature you need the oven to be. Please see the temperature chart below. The chart will show you the total number of coals you’ll need and how they should be distributed on the top and the bottom.

do_temp_card

Different types of cooking will require different placement of the briquettes. For most recipes, place one-third of your briquettes underneath your Dutch oven and two-thirds of your briquettes on the lid. For baking, place one-fourth of your coals underneath and three-fourths of your coals on the lid. For boiling, frying, stewing, and simmering, all of the heat comes from the bottom; therefore, all coals are placed beneath the Dutch oven.

When placing your coals under the oven, place them in a circular pattern so they are at least 1/2″ inside the Dutch oven’s edge. Arrange briquettes on top of the Dutch oven in a checkerboard pattern. Do not bunch briquettes as they can cause hot spots. To prevent (minimize) hot spots during cooking, get in the habit to lift and rotate the entire oven a quarter turn and then rotate just the lid a quarter turn in the opposite direction. Rotate every 10-15 minutes. If you use wood coals, remember that the flame will be much hotter than the coals! Avoid direct flames on the pot or turn frequently. It is important to remember that these tips are only a guide to help you get started. You will need to adjust briquettes (or coals) according to the recipe and keep in mind that the weather, ambient temperature, and ground conditions can affect cooking temperature.

Check your foods occasionally to make sure they’re not burning, cooking too fast, or not cooking fast enough. But don’t lift the lid too often. Each time you lift the lid, heat escapes and lengthens your cooking time by as much as 20 minutes! Be careful in removing the lid so as not to flavor your dish with ashes!

To maintain heat over an hour, ignite 6 coals 15 minutes in and add 4 coals on top and 2 on the bottom at 30 minutes; repeat as necessary.

I’m sure by now you may be thinking this sounds really complicated, but it really isn’t.

Choose a recipe suitable for the size of your Dutch oven. Start with a simple recipe. It could be as simple as a can of refrigerator biscuits. Keep your cook time short. Finally, choose a day with mild weather conditions.

Assemble everything you need. Start your coals and load your ingredients into the Dutch oven.  If your recipe is a Dutch oven recipe, use the recommended number of coals. If it’s not, use the temperature chart above to determine how many coals you need. Set your timer and remember to rotate the oven and the lid every 10-15 minutes.  Enjoy what you made!

Now decide what you’re going to make next! We’d love it if you shared in the comments section what you make.

Categories: Cooking Outdoors, Dutch Oven, Fan Favorites | Tags: , , , , , , , , | Leave a comment

Cast Iron Cooking Colonized and Settled America

cast-iron-kitThat’s a pretty bold statement, I know, but colonizing, exploring, pioneering, and trailblazing is hard work and the brave men and women who led the way needed to be well-fed and cast iron cooking played a huge part in nourishing their bodies and souls.

Cast iron cookware, such as skillets, griddles and Dutch ovens have been used for centuries and to this day are appreciated by cooks for its durability and strength. Cast iron distributes heat evenly and retains heat to keep food warm even out of the oven. Unlike most other cookware, it is versatile, easily moving from stove top to oven to table.

From the colonial hearth fires, to the campfires of Lewis and Clark, to the chuck wagon trails, cast iron Dutch ovens cooked the food that kept America going. They fed the colonists, helped tame the wilderness, and did their share in settling the American West.

Around 513 B.C. in China and A.D. 1100 in England, the first cast iron cookware was created by pouring molten iron into a mold of sand. By 16th century Europe, the art of casting iron was widespread and cast iron cookware had become a valued commodity. Although the colonists brought their cast iron pots with them to the New Word, soon they were casting skillets and Dutch ovens of their own.

In 1704, Abraham Darby traveled to Holland to inspect a Dutch casting process using dry sand molds.  When he returned home, Darby experimented with the same procedure and eventually patented a casting process using a better type of molding sand. He also baked the mold to improve the casting smoothness.

It is believed that the name “Dutch Oven” may have derived from this original Dutch casting process. Others have suggested that early Dutch traders peddling cast iron pots may have given rise to the name “Dutch Oven” while still others believe that the name came from Dutch settlers in the Pennsylvania area who used similar cast iron pots.

Paul Revere, a blacksmith and silversmith by profession, is credited with the flanged lid of the Dutch oven. The flanged lid, which is a lip around the rim, and bottom legs allow for a fire source to be under the pot and on the lid, making it an actual baking oven at the hearth or campfire.

By 1776, Adam Smith, in his book, The Wealth of Nations, could note that the actual wealth of the nation was not its gold but in its manufacture of pots and pans.

Cast iron cookware was treasured so much that George Washington’s mother even specified the recipient of her cast iron cookware in her will.

In the 1800s, cast iron cookware enjoyed tremendous popularity. Manufacturers that arose during that time included Wagner, Lodge, Griswold, and John Wright. Some of these manufacturers still exist today.

In 1803, President Thomas Jefferson engaged Lewis and Clark to explore America’s new territory acquired with the Louisiana Purchase. During their amazing two-year Corps of Discovery, many things were discarded to lighten the load, but never their cast iron pots. In fact, the only manufactured items returning with them were their guns and their iron pots. Little did they know that this would become the preamble to the settling of the American West.

And settle we did, but never without our cast iron cookware. To make the journey to lay claim to their parcel of Western America, each settling family packed their covered wagon with only their most necessary and cherished possessions. Needless to say, that always included their cast iron pots and skillets.

Dutch Ovens were especially useful as the country expanded westward. Families could not bring their large cook stoves with them so they learned to cook complete meals, ranging from stews and soups to breads and desserts, in their Dutch Ovens over an open fire.

During the Great American Gold Rush, no matter how hurried a fellow left his home to travel to the American West to hunt for gold, he never left without his cast iron cookware.

Every chuck wagon was built with special compartments for the iron Dutch ovens and skillets and “Cookie” was the most important person on every cattle drive.

Cast iron fed the pilgrims and colonists as they settled the American East, and it fed the settlers, hopeful gold miners, and cowboys as they settled the American West.

From the cannons of the Revolutionary War, to the iron-shod horses that carried settlers westward, and the skillets and Dutch ovens that fed the adventurous explorers across the Rocky Mountains, cast iron has been an integral part of the forging of the American experience.

Categories: Cooking Outdoors, Dutch Oven, Fan Favorites, History | Tags: , , , , , , , , , | 4 Comments

DIY: Making Your Own Fire Starters

01_blazing_chimneyIn my camp kitchen, when I need coals for Dutch oven or foil cooking, I start them in one or two chimneys, depending on how many I need. To get them going, I simply toss a couple of fire starters into the bottom of the chimney, load in the coals and light the fire starters. In a matter of minutes, I have fire blazing up through the chimney and igniting my coals. Coals are ready in about 15-20 minutes.

If you’re having trouble getting a campfire going, you can also nest a fire starter under a pile of tinder and kindling and start it that way.

Fire starters can be purchased in most grocery or outdoor stores, but it’s cheaper to make them on your own. And it’s so simple to do.

Ingredients

Cardboard egg cartons.

Household wax, which is also used for canning, candle making, etc, and can be found in most grocery stores where you would find canning supplies. You could also use bits of crayon and candle stubs.

Sawdust, wood shavings or dryer lint. I have a woodworking buddy who keeps me supplied with sawdust, but not having someone like that, you could purchase a bag of wood shavings (for animal bedding) at your local pet store.

Equipment

Double boiler for melting the wax. I have an old beat up set that I use strictly for this purpose.

02_equipment

Directions

Start by laying an old towel on your kitchen counter top to protect it.

Melt the wax in a double boiler.

03_melting_wax

Prep the egg cartons by tearing off the tops and the closing tab thingie (technical term) and fill each little compartment with your saw dust, wood shavings or dryer lint.

04_adding_sawdust

Carefully pour the melted wax into the egg carton, being careful not to overflow the cups. If you’re doing a lot and your wax starts to cool (your clue is if it starts to pool on top instead of sinking in) then just reheat your wax.06_adding_wax

After filling all the little egg cups, allow the wax to cool and harden and then break apart the egg carton. I toss them into a couple of plastic grocery store bags and stuff them into my chimneys in my equipment box.

09_bagged

And you’re done. It is really that simple. Depending on how much cooking and camping I’m doing, I usually end up making them a couple times a year.

Categories: Do-It-Yourself (DIY), Fan Favorites | Tags: , , , , , , , , , , | 4 Comments

What Kind of Dutch Oven Should I Buy?

Recently, a friend said her husband returned from a camping trip where he witnessed a couple of Dutch ovens in action and he wanted to get one. She wanted to know what I would recommend. Of course, my answer was, “Well, it depends.”

Before you buy, you need to figure out how much you want to spend, how you’re going to use it, how many you need to feed, and what you want to make? Let’s explore these in more detail.

How Much Do You Want to Spend?

If you have the money, Lodge is probably the best brand on the market. They’ve been making quality cast iron cookware since 1896. Lodge is an American company and still family-owned and operated. For many, Lodge is considered the Cadillac of cast iron.

While much, much younger, Camp Chef is another solid American brand with a vast selection of products, including some great Dutch ovens and skillets. Since 1990, Camp Chef has been designing their products to be rugged and reliable.

There are also a number of other well-made, quality brands out there such as Texsport, Stansport, Bayou, Cajun, Le Creuset, just to name a few. I have 2 Texsport 12-inch deep Dutch ovens that are at least 15 years old and they have served me very well over the years. I have absolutely no complaints.

No matter which brand you go with, Dutch ovens can be expensive, but they are also an investment. If well cared for, your Dutch oven can be handed down to future generations. Imagine someday your grandchildren begging you to teach them how to cook in the Dutch oven.

How Are You Going to Use it?

Style is an important consideration. If you’re going to suspend it over a fire or use it on a conventional stove then your Dutch oven doesn’t need to have feet and will have a flat bottom and a domed lid. These are also known as bean pots. If your plan is to use it as a camp oven with coals on top and bottom, then you should get one with short legs. These have lids that are flatter and flanged (a lip around the rim) so the coals won’t roll off. Some lids also have their own short legs and can double as a griddle, essentially giving you two for the price of one.

dutch_ovens

How Many Do You Need to Feed?

To feed a family of 4, my 10-inch Dutch oven is great. It has a 4-quart capacity and will feed from 4-7 people so that gives us plenty of extra for seconds and/or leftovers. When I started cooking for my daughter’s Girl Scout troop, I picked up the 2 12-inch deep Dutch ovens because we needed to feed 24 girls and 3+ adults. Each Dutch oven has an 8-quart capacity and will feed 16-20 people.

Here is a chart that shows sizes, capacities and servings of Dutch ovens.

DO Charts.indd

What Do You Want to Make?

Cast iron’s ability to withstand and maintain very high cooking temperatures make it a common choice for searing or frying, and its excellent heat retention make it a good option for long-cooking stews or braised dishes. Other uses include baking such as cornbread, cobblers and cakes.

Ovens with shallow sides of about 4” are called “bread” ovens and the deeper sided ones are known as “stew” or “meat” ovens. The 12” to 16” regular ovens are excellent for baking pies, cakes, breads, and biscuits or rolls. You can even bake a pizza!

The “deep” ovens can more easily handle turkeys, hens, hams, and even standing rib roasts! They can also handle large batches of soups and stews.

It’s Time to Go Shopping!

Now that you have a good idea of how you want to use your Dutch oven, you can find the one that will work best for you—one that you will be able to legacy to your children. And if you have more than one child then you will need to get more than one Dutch oven; otherwise, they’ll fight over it!

Categories: Dutch Oven, Fan Favorites | Tags: , , , , , , , , , , , | Leave a comment

Create a free website or blog at WordPress.com.