Monthly Archives: November 2013

Product Review: Have You Never Been Mallow?

mini_marshmallowsFor those Lucky Charms fans who eat all the marshmallows out of the cereal—you know who you are—these jet-puffed “mallow” bits are for you!

This has got to be a must-stock item for my camp pantry! My son will demand that this is a must-stock item for our home pantry as well.

What a relief!  I won’t have to listen to the complaints at camp and at home that there are not enough mini marshmallows in the hot cocoa.

Now, I can stock my camp pantry with just one kind of hot cocoa and campers can add mallow bits as they wish.

I can’t count the number of times I have been planning a camping trip with a group and asked the highly controversial question: “Do you want hot cocoa with or without mini marshmallows?” Oh, the heated debate that ensues. This is the Mason-Dixon Line of camping! People either love them or hate them. It’s like the Hatfields and the McCoys! To satisfy both camps, I have always had to stock both kinds and I inevitably run out of one kind and campers have to resort to the (shudder) other kind.

And, just think of all the other possibilities! You could add them to ice cream and brownies. These would melt super-fast if you were making Rice Krispies Treats. And, there has to be a s’mores application somehow. I’ll work on that.

Scrumpdillyicious!

Special thanks to my friend Amy for sharing this and her picture, and my apologies to Olivia Newton-John, who’s song title I corrupted for the title of this post.

Categories: Cooking Outdoors, Product Reviews | Tags: , , , , , | Leave a comment

Off the Grid(dle) Pancakes

pancake_squaresWould you like to make pancakes but don’t want to stand there at the griddle flipping flapjacks all morning? Here is a fun way to make pancakes at camp in your Dutch oven, freeing up your griddle for more important things like frying bacon!

I first made these in my 10-inch Dutch oven, but you could easily double or triple the recipe and bake them in a larger oven. The next time I do this; I plan to triple the recipe and bake it in a 16-inch Dutch oven.

Ingredients

3/4 cup milk

2 tablespoons vegetable oil

1 large egg

1 tablespoon sugar

1 cup flour

2 teaspoons baking powder

1/2 teaspoon salt

Equipment

10-inch Dutch oven, mixing bowl, wire whisk, rubber spatula.

Prep

Start 21 briquettes. Grease or line your Dutch oven. In a large mixing bowl, beat together milk, butter and egg. Add sugar and then gradually beat the flour in. Carefully stir in the baking powder and salt. Pour batter into prepared Dutch oven. Bake for 20-25 minutes, using 14 coals on the lid and 7 under the oven. Serve with butter, maple syrup and/or honey. Serves 4-6.

Categories: Breakfasts, Dutch Oven, Recipes | Tags: , , , , , , , | Leave a comment

Dear Santa, All I Want for Christmas is a New Dutch Oven

postcard_on_wood

Black Friday and Cyber Monday are coming and, before we know it, the snow will be flying and we’ll be hearing on the roof the clatter of eight tiny reindeer. Now is a great time to start thinking about Santa’s list for your favorite outdoor chef, even if that favorite outdoor chef is you!

Is any of your equipment old, worn out or broken, and need replacing? Were you on any campouts where someone was using a cool piece of gear and you thought to yourself, “I sure would like to have one of those!”? Do you have a piece of equipment that you love so much you wish you had another? Well, it’s time to be making your list and checking it twice. And if I were you, I’d be real nice!

For many of us, we keep our home kitchens stocked with the best knives we can afford, the best pots and pans, and the best gadgets while our camp kitchens are filled with substandard or hand-me-down equipment. After all, we’re just going to take it camping and it’s just going to be beat up, right?

But when we go camping we don’t want to eat substandard food. We want the food that we eat to be just as good as the food we make in our home kitchens. Why do we hamstring ourselves by forcing ourselves to create meals with substandard equipment?

Well, Santa is coming and now is your chance to make some improvements to your camp kitchen.

What would make your camp kitchen more functional? A better, bigger stove? More burners? Bigger burners? A larger griddle? Something with a hood for better grilling?

Do you need more workspace? Often times, our camp kitchen ends up consuming the picnic table, leaving no place to sit and eat. What do you need in the way of prep space?

Do you have a Dutch oven? If you already have one, do you want another one? A bigger one? If you’re not sure what to get, see my blog post: “What Kind of Dutch Oven Should I Buy?

Are you currently using your Dutch ovens on the ground? Wouldn’t it be nice to have a table for them to sit on while they’re baking?

Are your current BBQ gloves a little scorched around the edges? Are they doing the job they’re supposed to be doing? Maybe it’s time to replace them or upgrade them. A good pair of leather BBQ gloves, not only for grilling but for handling your Dutch ovens, is important.

Do you need more chimneys? Tongs? A small straw broom to sweep the charcoal dust off your Dutch oven lid? A trivet?

Remember the little things—the stocking stuffers. If you had a thermometer you could make fried chicken in camp, or donuts. How about a bottle or tube of oil to season your Dutch ovens?

Start thinking about what and how you’d like to be cooking next year. If you feel your camp kitchen is pretty complete, what about an upgrade? Make your list and check it twice and get that list into the hands of Santa!

Categories: Cooking Outdoors, Dutch Oven | Tags: , , , , , , , | Leave a comment

Cast Iron Cooking Colonized and Settled America

cast-iron-kitThat’s a pretty bold statement, I know, but colonizing, exploring, pioneering, and trailblazing is hard work and the brave men and women who led the way needed to be well-fed and cast iron cooking played a huge part in nourishing their bodies and souls.

Cast iron cookware, such as skillets, griddles and Dutch ovens have been used for centuries and to this day are appreciated by cooks for its durability and strength. Cast iron distributes heat evenly and retains heat to keep food warm even out of the oven. Unlike most other cookware, it is versatile, easily moving from stove top to oven to table.

From the colonial hearth fires, to the campfires of Lewis and Clark, to the chuck wagon trails, cast iron Dutch ovens cooked the food that kept America going. They fed the colonists, helped tame the wilderness, and did their share in settling the American West.

Around 513 B.C. in China and A.D. 1100 in England, the first cast iron cookware was created by pouring molten iron into a mold of sand. By 16th century Europe, the art of casting iron was widespread and cast iron cookware had become a valued commodity. Although the colonists brought their cast iron pots with them to the New Word, soon they were casting skillets and Dutch ovens of their own.

In 1704, Abraham Darby traveled to Holland to inspect a Dutch casting process using dry sand molds.  When he returned home, Darby experimented with the same procedure and eventually patented a casting process using a better type of molding sand. He also baked the mold to improve the casting smoothness.

It is believed that the name “Dutch Oven” may have derived from this original Dutch casting process. Others have suggested that early Dutch traders peddling cast iron pots may have given rise to the name “Dutch Oven” while still others believe that the name came from Dutch settlers in the Pennsylvania area who used similar cast iron pots.

Paul Revere, a blacksmith and silversmith by profession, is credited with the flanged lid of the Dutch oven. The flanged lid, which is a lip around the rim, and bottom legs allow for a fire source to be under the pot and on the lid, making it an actual baking oven at the hearth or campfire.

By 1776, Adam Smith, in his book, The Wealth of Nations, could note that the actual wealth of the nation was not its gold but in its manufacture of pots and pans.

Cast iron cookware was treasured so much that George Washington’s mother even specified the recipient of her cast iron cookware in her will.

In the 1800s, cast iron cookware enjoyed tremendous popularity. Manufacturers that arose during that time included Wagner, Lodge, Griswold, and John Wright. Some of these manufacturers still exist today.

In 1803, President Thomas Jefferson engaged Lewis and Clark to explore America’s new territory acquired with the Louisiana Purchase. During their amazing two-year Corps of Discovery, many things were discarded to lighten the load, but never their cast iron pots. In fact, the only manufactured items returning with them were their guns and their iron pots. Little did they know that this would become the preamble to the settling of the American West.

And settle we did, but never without our cast iron cookware. To make the journey to lay claim to their parcel of Western America, each settling family packed their covered wagon with only their most necessary and cherished possessions. Needless to say, that always included their cast iron pots and skillets.

Dutch Ovens were especially useful as the country expanded westward. Families could not bring their large cook stoves with them so they learned to cook complete meals, ranging from stews and soups to breads and desserts, in their Dutch Ovens over an open fire.

During the Great American Gold Rush, no matter how hurried a fellow left his home to travel to the American West to hunt for gold, he never left without his cast iron cookware.

Every chuck wagon was built with special compartments for the iron Dutch ovens and skillets and “Cookie” was the most important person on every cattle drive.

Cast iron fed the pilgrims and colonists as they settled the American East, and it fed the settlers, hopeful gold miners, and cowboys as they settled the American West.

From the cannons of the Revolutionary War, to the iron-shod horses that carried settlers westward, and the skillets and Dutch ovens that fed the adventurous explorers across the Rocky Mountains, cast iron has been an integral part of the forging of the American experience.

Categories: Cooking Outdoors, Dutch Oven, Fan Favorites, History | Tags: , , , , , , , , , | 4 Comments

DIY: Making Your Own Fire Starters

01_blazing_chimneyIn my camp kitchen, when I need coals for Dutch oven or foil cooking, I start them in one or two chimneys, depending on how many I need. To get them going, I simply toss a couple of fire starters into the bottom of the chimney, load in the coals and light the fire starters. In a matter of minutes, I have fire blazing up through the chimney and igniting my coals. Coals are ready in about 15-20 minutes.

If you’re having trouble getting a campfire going, you can also nest a fire starter under a pile of tinder and kindling and start it that way.

Fire starters can be purchased in most grocery or outdoor stores, but it’s cheaper to make them on your own. And it’s so simple to do.

Ingredients

Cardboard egg cartons.

Household wax, which is also used for canning, candle making, etc, and can be found in most grocery stores where you would find canning supplies. You could also use bits of crayon and candle stubs.

Sawdust, wood shavings or dryer lint. I have a woodworking buddy who keeps me supplied with sawdust, but not having someone like that, you could purchase a bag of wood shavings (for animal bedding) at your local pet store.

Equipment

Double boiler for melting the wax. I have an old beat up set that I use strictly for this purpose.

02_equipment

Directions

Start by laying an old towel on your kitchen counter top to protect it.

Melt the wax in a double boiler.

03_melting_wax

Prep the egg cartons by tearing off the tops and the closing tab thingie (technical term) and fill each little compartment with your saw dust, wood shavings or dryer lint.

04_adding_sawdust

Carefully pour the melted wax into the egg carton, being careful not to overflow the cups. If you’re doing a lot and your wax starts to cool (your clue is if it starts to pool on top instead of sinking in) then just reheat your wax.06_adding_wax

After filling all the little egg cups, allow the wax to cool and harden and then break apart the egg carton. I toss them into a couple of plastic grocery store bags and stuff them into my chimneys in my equipment box.

09_bagged

And you’re done. It is really that simple. Depending on how much cooking and camping I’m doing, I usually end up making them a couple times a year.

Categories: Do-It-Yourself (DIY), Fan Favorites | Tags: , , , , , , , , , , | 4 Comments

Pecan Sticky Bun Bits

pecan_sticky_bun_bitsThis recipe has become one of our favorites. It is super easy to make and has only 4 ingredients. From start to finish, you can have it on the camp table in just over an hour. It serves about 8 with each serving size being about 3 ounces or 1/3 of a cup. My family of 4 can easily demolish the whole batch!

These are so good you just can’t stop eating them. The bits of dough are covered in yummy caramel and the pecans add flavor and crunch. Be warned; however, these are a sugar rush and should be served with a well rounded breakfast that includes other items likes eggs, sausage or bacon, potatoes, etc. to help balance out the sugar load. They go well with milk, coffee or tea.

If you’re going to line your Dutch oven, I highly recommend using heavy duty foil. These are so sticky and gooey that the parchment liners just don’t hold up and end up tearing as you pull out the sticky bits.


Ingredients

24 ounces of refrigerator biscuit dough. (Container size varies depending on what brand and type you buy. I choose a hearty biscuit style rather than a more “delicate” style like croissants or crescent rolls.)

1 cup (2 standard sticks) butter

2 cups dark brown sugar

1 cup chopped pecans


Equipment

12-inch camp Dutch oven, cutting board, knife, 1 cup measuring cup, and something to stir with.


Prep Work

Start 25 briquettes.  In the 20 minutes or so that it will take these to be ready, you can pretty much get all the other prep work done. It goes faster if you have helpers.

Line your Dutch oven (optional). I use the wide heavy-duty foil.

Remove the biscuit dough from the containers and quarter each biscuit.

Once the coals are ready, warm the Dutch oven for a few minutes on all the coals.

In the pre-heated Dutch oven, melt the butter then stir in the brown sugar until well blended and it forms a nice smooth caramel sauce. If you don’t mix it well, then the brown sugar can be a little gritty.

Add the chopped pecans, mixing and coating them with the caramel sauce.

Add the dough bits and stir until all the pieces are coated with the caramel sauce.

Seat the lid and transfer 17 coals up to the lid, leaving 8 coals underneath. Bake 35 to 45 minutes or until biscuits are light golden brown, refreshing the coals as needed.

Categories: Breakfasts, Dutch Oven, Recipes | Tags: , , , , , , , , , , , , | Leave a comment

History of the Chuck Wagon

chuck_wagon_side_viewIn 1866, when cattleman Charles Goodnight needed a way to keep his drovers fed while trailing cattle from Texas to points north, he took an old Army supply wagon and bolted to its back a wooden box divided into different compartments. He covered the box with a hinged lid that when opened and supported by a single leg could serve as a work table or wide shelf.

The box was a simple contraption, but it revolutionized the cattle industry. Food and cooking utensils were stowed in the pigeonholes of this traveling kitchen cabinet. There were other uses for the wagon as well. Bedrolls, medicine, lariats, branding irons, whiskey and water–they each found a place attached somewhere on the wagon.

It was no difficulty coming up with a name for Goodnight’s invention. Since early 17th Century England, individuals involved in the meat business referred to a lower priced part of the beef carcass as the “chuck.” Although less glamorous than other cuts, the chuck was an important source of nutrition for the working man.

By the next century “chuck” became a catch-all phrase for good, honest, heart-warming food. The term encompassed beef, vegetables, bread, dessert, coffee and anything else that could be eaten. On the ranch, the hands ate “chuck” at the “chuck” house.

Goodnight’s all-purpose compartment on the back of the Army wagon became the “chuck” box. And a wagon with a chuck box became a “chuck” wagon. The chuck wagon quickly gained independent status.

While the wrangler or trail boss set the rules outside the camp, he and all the other hands obeyed the cook within the sphere of the chuck wagon. Cookie, as he was often affectionately called, brooked no interference with his cooking or his utensils, but the cowboys never rebelled against his rule. They paid him tribute each day by roping dead mesquite or oak wood and dragging it into camp for the fire.

The chuck wagon was also the cowboy’s only known address—truly their home on the range. During the long trail drives, the chuck wagon was the headquarters of every cattle outfit on the range. The cowboys didn’t just eat their meals there; it was their social center and recreational spot. It was the natural gathering place for exchanging tall tales, listening to music if there happened to be a musician in the group, or just recounting the experiences of the day.

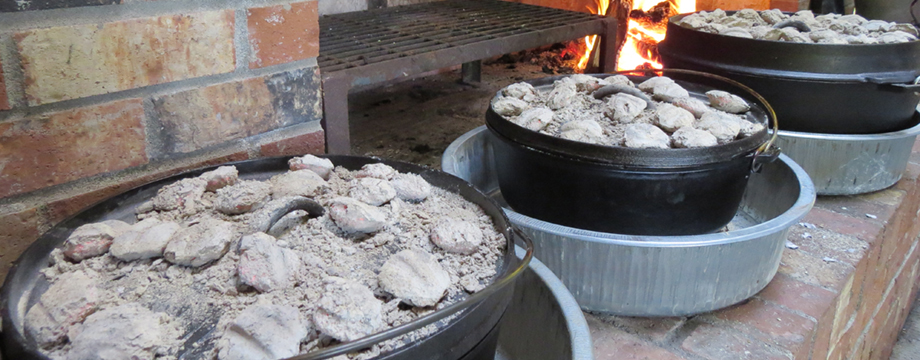
A good chuck wagon cook was hard to find and harder to keep. Because of this they earned double or more what the cowhands earned. Wagon cooks as a group had the reputation of being ill-tempered, and no wonder. Their working conditions usually left a lot to be desired. The nature of Cookie’s job required that he get up several hours earlier than the cowhands, so he worked longer hours with less sleep. When the outfit was on the move, he had to be at the next appointed camp and have a hot meal ready on time. He was often short on fuel or water. He was constantly called upon to battle the elements—wind, rain, sand, mud, insects, and even rattlesnakes—while preparing his meals. In addition to preparing meals, Cookie also was expected to act as barber, doctor, banker, and sometimes as mediator or referee if a disturbance among the cowboys arose. He was keeper of the home fires, such as they were, out on the range.

For the cowboys, there were definite rules of behavior around the chuck wagon. Most were unwritten laws understood by all but the greenest of cowhands. For example, riders approaching the campsite always stayed downwind from the chuck wagon so that they didn’t cause dust to blow into the food. No horse could be tied to the chuck wagon wheel or hobbled too close to camp. Cowboys looking for warmth never crowded around Cookie’s fire. There was no scuffling about or kicking up billows of dust around the chuck wagon while meals were being prepared.

When it came to eating, no cowboy dared help himself to food or touch a cooking instrument without Cookie’s permission. The cowboys never used Cookie’s worktable as a dining table; they sat on the ground and used their laps instead. When dishing out a helping of food from a pot, they placed the lid where it wouldn’t touch the dirt. It was against the rules for a cowboy to take the last piece of anything unless he was sure the rest of the group was through eating. If a man got up during a meal to refill his cup with coffee and someone yelled, “Man at the pot,” he was supposed to fill all the cups held out to him as well as his own.

After a meal, the cowboys always scraped their plates clean and put them in the wash tub. Like most rules of etiquette, the rules around the chuck wagon were based on concern for others and common sense.

Along with sourdough biscuits and coffee, most chuck wagon meals included beans, or frijoles, as they were often called. Beef was something that was never in short supply, and a good chuck wagon cook knew how to prepare it in many different ways. Fried steak was the most common—the cowboys never seemed to get tired of it—but pot roasts, short ribs, and stew showed up often on the menu.

If Cookie had time, and he was feeling kindly toward “the boys,” as he called the cowhands, he would make a dessert. Usually it was a two-crust pie made with apples or some other dried fruit. To let the steam out, he often cut the outfit’s brand into the top crust of the pie.

Simple food, a seemingly monotonous menu, and less than ideal dining arrangements were standard on the range. Yet many retired cowboys get misty-eyed when they recall their food from their days with the wagon.


Chuck Wagon Etiquette

No one eats until Cookie calls.

When Cookie calls, everyone comes a runnin’.

Cowboys eat first, talk later.

Hungry cowboys wait for no man. They fill their plates, fill their bellies, and then move on so stragglers can fill their plates.

It’s okay to eat with your fingers. The food is clean.

If you’re refilling the coffee cup and someone yells “Man at the pot” you’re obliged to serve refills.

Don’t take the last serving unless you are sure you’re the last man.

Food left on the plate is an insult to the cook.

No running or saddling a horse near the wagon. And when you ride off, always ride downwind from the wagon.

If you come across any decent firewood, bring it back to the wagon.

Strangers are always welcome at the wagon.


Categories: Cooking Outdoors, History | Tags: , , , , , , , , , , , | 4 Comments

Product Review: Dutch Oven Dome

dutch_oven_domeJust in time for last Christmas, Camp Chef came out with a Dutch Oven Dome. I went and took a look at it and immediately added it to my list for Santa. Christmas morning, Santa delivered!

I’ve been using the dome for nearly a year now and if your weather conditions are cold and/or windy, the dome is a definite game changer.

There are two ways to use it.

On a Camp Stove

If you don’t want to pack coals, don’t want the hassle of coals or can’t use coals because of a fire restriction, but still want to use your Dutch oven, you can still use it on a camp or backpacking stove with a Dutch Oven Dome and Heat Diffuser Plate. The plate sits on the stove burner. Your Dutch oven sits on the plate. The plate efficiently uses the heat from your stove and distributes it to your Dutch oven. The dome goes over your oven and traps, diverts, and circulates the heat creating a convection oven. (Please see photograph below.)

dome_in_action_cropped

With Coals

Place your coals on top and bottom of your oven just like you normally would. Place the dome over the oven and not only does it circulate the heat but it also insulates the oven from inclement weather.

Field Test

Last March I was a facilitator for an outdoor training for Girl Scout leaders. We were feeding about 30+ women so I brought my 2 12-inch deep Dutch ovens. It was very cold and rainy with overnight temperatures below the freezing point and we were getting a cold breeze off the water the whole weekend. Saturday night for dinner and Sunday morning for breakfast, we loaded the two identical Dutch ovens with identical recipes and used the same amount of coals on each.

I only had the one dome (should have asked Santa for two) so I thought this would be a great opportunity to do a side-by-side comparison and I domed one oven each time. We pulled them at the same time and checked them. For both meals, the un-domed oven was slightly undercooked and actually had to bake a little longer. The domed oven was perfectly done both times.

How Cold is Too Cold?

Below what temperature do I need to use the dome to level the playing field? I’m still trying to figure that out. If it’s not cold enough and I dome my Dutch oven, then I can end up with a hotter oven and risk burning my food. However, here in the Northwest, we have a lot of cold, rainy, windy weather and I like my dome so much it only stays in the equipment box in summer.

The Dutch Oven Dome with Heat Diffuser Plate included retails on the Camp Chef website for $37.50. If you want just the Dutch Oven Dome without the Heat Diffuser Plate, that retails for $29.16.

This Christmas, I definitely need to ask Santa for a second dome!

Categories: Cooking Outdoors, Dutch Oven, Product Reviews | Tags: , , , , , , , , , | 1 Comment

What Kind of Dutch Oven Should I Buy?

Recently, a friend said her husband returned from a camping trip where he witnessed a couple of Dutch ovens in action and he wanted to get one. She wanted to know what I would recommend. Of course, my answer was, “Well, it depends.”

Before you buy, you need to figure out how much you want to spend, how you’re going to use it, how many you need to feed, and what you want to make? Let’s explore these in more detail.

How Much Do You Want to Spend?

If you have the money, Lodge is probably the best brand on the market. They’ve been making quality cast iron cookware since 1896. Lodge is an American company and still family-owned and operated. For many, Lodge is considered the Cadillac of cast iron.

While much, much younger, Camp Chef is another solid American brand with a vast selection of products, including some great Dutch ovens and skillets. Since 1990, Camp Chef has been designing their products to be rugged and reliable.

There are also a number of other well-made, quality brands out there such as Texsport, Stansport, Bayou, Cajun, Le Creuset, just to name a few. I have 2 Texsport 12-inch deep Dutch ovens that are at least 15 years old and they have served me very well over the years. I have absolutely no complaints.

No matter which brand you go with, Dutch ovens can be expensive, but they are also an investment. If well cared for, your Dutch oven can be handed down to future generations. Imagine someday your grandchildren begging you to teach them how to cook in the Dutch oven.

How Are You Going to Use it?

Style is an important consideration. If you’re going to suspend it over a fire or use it on a conventional stove then your Dutch oven doesn’t need to have feet and will have a flat bottom and a domed lid. These are also known as bean pots. If your plan is to use it as a camp oven with coals on top and bottom, then you should get one with short legs. These have lids that are flatter and flanged (a lip around the rim) so the coals won’t roll off. Some lids also have their own short legs and can double as a griddle, essentially giving you two for the price of one.

dutch_ovens

How Many Do You Need to Feed?

To feed a family of 4, my 10-inch Dutch oven is great. It has a 4-quart capacity and will feed from 4-7 people so that gives us plenty of extra for seconds and/or leftovers. When I started cooking for my daughter’s Girl Scout troop, I picked up the 2 12-inch deep Dutch ovens because we needed to feed 24 girls and 3+ adults. Each Dutch oven has an 8-quart capacity and will feed 16-20 people.

Here is a chart that shows sizes, capacities and servings of Dutch ovens.

DO Charts.indd

What Do You Want to Make?

Cast iron’s ability to withstand and maintain very high cooking temperatures make it a common choice for searing or frying, and its excellent heat retention make it a good option for long-cooking stews or braised dishes. Other uses include baking such as cornbread, cobblers and cakes.

Ovens with shallow sides of about 4” are called “bread” ovens and the deeper sided ones are known as “stew” or “meat” ovens. The 12” to 16” regular ovens are excellent for baking pies, cakes, breads, and biscuits or rolls. You can even bake a pizza!

The “deep” ovens can more easily handle turkeys, hens, hams, and even standing rib roasts! They can also handle large batches of soups and stews.

It’s Time to Go Shopping!

Now that you have a good idea of how you want to use your Dutch oven, you can find the one that will work best for you—one that you will be able to legacy to your children. And if you have more than one child then you will need to get more than one Dutch oven; otherwise, they’ll fight over it!

Categories: Dutch Oven, Fan Favorites | Tags: , , , , , , , , , , , | Leave a comment

Restoring Cast Iron

If you purchase a brand new piece of cast iron, it will either come pre-seasoned or it will come in clean, pristine condition ready to be seasoned by you.

If you have been blessed with a family member’s cast iron or have been lucky enough to find a piece of vintage cast iron in an antique store or garage sale, chances are it will look less than pristine if not down-right butt-ugly nasty. It may have decades-worth of build up from improper care and be so covered in rust that it is nearly completely orange.

Have no fear, with a little tender loving care, you can have this kitchen workhorse back in beautiful black condition and ready for fried chicken in no time at all.

Restoring cast iron is a 3-step process and I offer two different cleaning methods for you to choose from. The ingredients you will need are patience and time (this may take a few days) and some elbow grease (this may take some scrubbing).

Cast-Iron-Pan-Buildup

Step #1: Cleaning the Cast Iron

Oven Baking Method

Laying a piece of foil on the rack below or in the bottom of your oven, you want to set your oven to the “clean” mode and place your pan upside down on a middle rack.  Note: You may want to plan this part of the cleaning while you are out of the house. It does create some smoke and fumes that you might not want to be in the house for. Just remember — who knows how many years of grime we are removing? If you stay in the house, make sure the area is well ventilated.

Cast-Iron-Clean-Cycle

After this cycle has completed and everything has cooled down, you can remove the pan from the oven. It will probably look gray and even rustier than before but any of the build-up or extra coating should have come off of the pan.

Oven Cleaner Method

In a well-ventilated area, lay down some cardboard and place the pan on the cardboard. Suit up like an astronaut or a hazmat specialist (long rubber gloves, nose and mouth mask, and goggles for the eyes). The fumes will be strong and you don’t want the oven spray to come in contact with any skin. Once you’re suitably covered and protected such that your own dog does not recognize you, spray all sides of the pan thoroughly.

After thoroughly spraying the pan with oven cleaner, place it into a large, thick plastic bag, and close the bag tightly. Set it near a heater to help things along, but too close that it melts the plastic bag or is a fire hazard. Wait about 24 hours, then glove up and take a look. After rinsing and scrubbing, you may decide you need a second treatment so suit up and repeat the whole process.

When you’re finished, the pan should be clean but it may look pretty rusty. On to the next step!

Step #2: Removing Rust

Place the pan in a tub and cover with equal amounts of water and white vinegar, then add a couple squirts of mild dishwashing liquid. You can leave the pan in this solution for 1-3 hours—the rustier it is, the longer you can leave it, just keep an eye on it. I recommend checking the pan at least every hour and change the solution if it looks too rusty. You really need to babysit this step because while the water and vinegar solution removes rust it can destroy the iron. When no more rust is bubbling up from the pan you should be done.

Vinegar-Bath-Cast-Iron-Pan

Be warned: When you take the pan out of the solution it will instantly start rusting because the iron is utterly unprotected. A very thin film of rust is unavoidable—we’ll take care of it in the next step. Don’t leave the pan in the vinegar indefinitely waiting for it to come out perfectly gray. It never will.

Step #3: Neutralizing the Vinegar and Prepping for Seasoning

Remove the pan from the water/vinegar bath and immediately rinse it well with water and baking soda (base) to make sure the vinegar (acid) is completely neutralized. Do not pass go; do not collect $200. The pan is rusting as I type. Once it is thoroughly rinsed and the vinegar has been neutralized, wipe it down with paper towels or cotton cloths and dry it completely. Your pan should be free from rust, grime and general build up at this stage. If not, continue to scrub with paper towels or fine steel wool until buildup and rust have smoothed out.

Rinsing-Cast-Iron-Skillet

Place the pan in a 200°F degree oven to make sure it is bone dry. It’s now ready for your first coat of seasoning.

Categories: Care & Maintenance, Dutch Oven | Tags: , , , , , | 3 Comments

Create a free website or blog at WordPress.com.